2017 Updates
December 2017
FrontLine 6.6.031- December 27, 2017
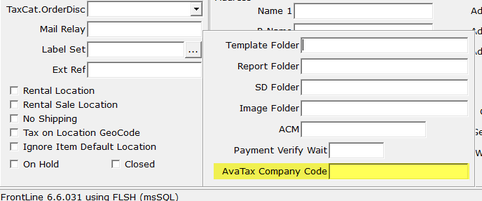
There is now an option to override the AvaTax company code per location. In the location file, click the ellipses next to Label Set to access additional fields. Enter an override AvaTax company code in the AvaTax Company Code field.
If the location of an order or recurring bill has an AvaTax Company Code specified, then FrontLine will send the location’s company code to AvaTax instead of the company code in the AvaTax Configuration in Company Settings.
If the location of an order or recurring bill has an AvaTax Company Code specified, then FrontLine will send the location’s company code to AvaTax instead of the company code in the AvaTax Configuration in Company Settings.
When items are Special Ordered, FrontLine now uses the vendor entered in Resource Costs as a possible vendor in purchasing autogen.
- In the Purchase Order window, click Auto and select Auto Generate Purchases. Select a vendor or ANY, and click Accept to generate purchase suggestions.
- If a special ordered item has a vendor entered in resource costs, the vendor’s list will contain this item.
- If an Item Cost is entered in resource costs, this cost overrides the Last Cost in the Generate Purchase Order window.
- Because these special ordered items with an override vendor usually have a different default vendor, they are now multi-vendor line items, so they are highlighted in yellow.
FrontLine 6.6.030- December 20, 2017
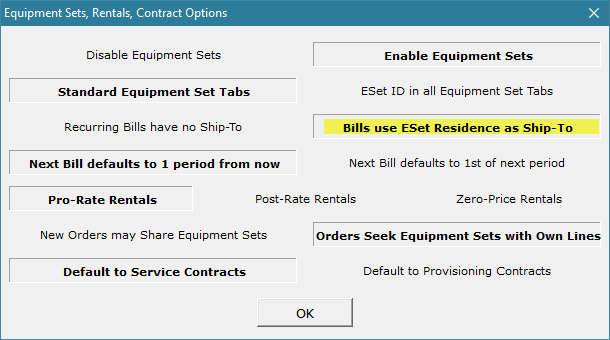
There is a new company setting that can be used assign a ship to address to recurring bills. In the company setting E-Sets, Rentals, Contracts there is a new option to have bills use the residence address on ESets as the ship to address.
- When you select Bills use ESet Residence as Ship-To, taxes on recurring bills are calculated based on the residence address in the ESet header rather than the bill to address. If no residence address is available, then the bill to address is used for tax calculations.
- When Recurring Bills have no Ship-To is selected, recurring bills calculate taxes based on the bill to address only. This is the default setting.
FrontLine 6.6.029- December 14, 2017
An AvaTax log file has been created to log all transactions that might end up recorded in AvaTax as an invoice or return. This log is saved daily in %LOCALAPPDATA%\FrontLine\AvaTax under file name AvaTaxLog_yyyymmdd.txt
FrontLine 6.6.028- December 11, 2017
FrontLine now records the Applied date of an AR credit created when you transact a return of an original order.
For Tax Exempt customers, FrontLine now only requires either a tax Exempt Category or an Exempt Code, not both. AvaTax uses the Exempt Category for more detailed breakdown of tax exemptions, so use the exempt category instead of the exempt code to use this AvaTax function.
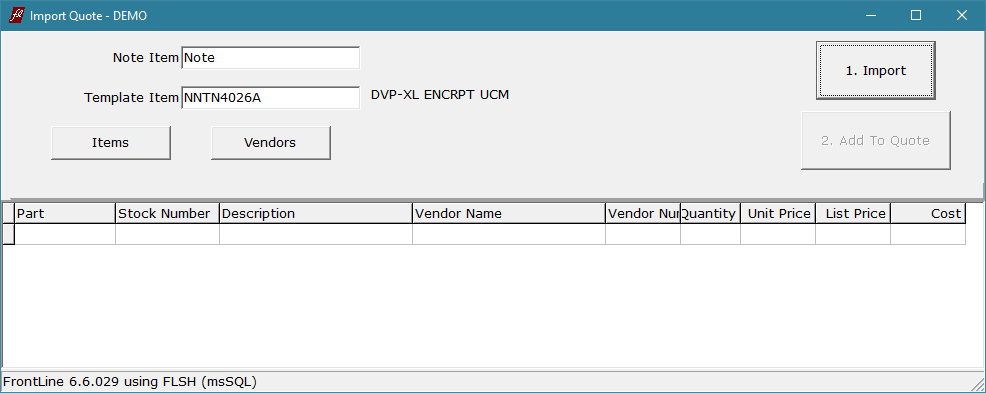
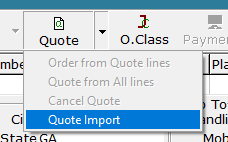
There is a new feature in the customer orders window to import a quote copied from an Excel file. Enter a customer on an order, and click the drop down arrow next to the Quote button to access the Quote Import feature.
To Import a Quote:
1. In an empty customer order with the customer selected, or in any open quote with a customer selected, the Quote Import function is available.
2. The order location must be a non-rental location.
3. Click the drop down arrow next to the quote button and choose Quote Import.
4. The Import Quote window opens.
5. To Create an import, select a Note Item and Template Item. These are sticky selections, so they only need to be picked once, and will be remembered the next time you log in.
7. Click Import in the Quote Import window to import data from the windows clipboard. FrontLine only imports spreadsheets with a specific format. For details on spreadsheet format requirements, contact [email protected].
- Select a Note Item that FrontLine will use to record any note lines on the import. The Note Item must be an intangible, a service or charge.
- Select a Template Item that FrontLine will use as a template to create new parts from the quote import. The Template Item must be a tangible. New items will be created using the template item values for the following:
- Identifier Document Template
- Item Type, Item Status, Item Category, UOM
- Item Tax Category, Billing Tax Category, Bill Frequency
- Default Location, Costing, Commissionable
- Warranty, Repair Vendor, Depot Repair Start/End
- Bin and physical dimensions
7. Click Import in the Quote Import window to import data from the windows clipboard. FrontLine only imports spreadsheets with a specific format. For details on spreadsheet format requirements, contact [email protected].
- To import, the vendor numbers must exist in FrontLine. If the vendor number does match an existing vendor, but the name of the vendor does not match, the Vendor Name column displays both names so you can double check.
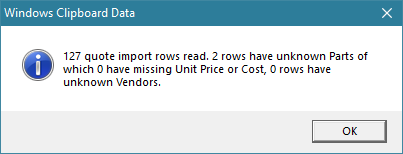
- A message will pop up to tell you the number of rows read, if there are new items, if there is a missing vendor, and other details of the import.
- The grid shows information that was imported from the clipboard. New items that will be created in the import are highlighted.
8. Click Add To Quote to create a quote from the imported spreadsheet lines. FrontLine tries to identify an item by matching the vendor part number, and if that fails, it tries to match a stock number. Parts that do not exist in FrontLine are created using information on the sheet combined with template item data. You are prompted before creating new stock items.
- When a new item is created, the item Description from the spreadsheet is inserted into the first two stock description lines. A note is added to the new item with subject indicating it was created by a quote import and note body containing the imported description.
- The import also creates a Vendor Part Number including the full imported description in Parts Cross-Reference.
- Imported lines are always special ordered, always quoted, and contain the Vendor, Part Number, and Costs in Resource Costs. Also, a note is added to each line item with the subject containing the full imported description.
November 2017
FrontLine 6.6.027- November 21, 2017
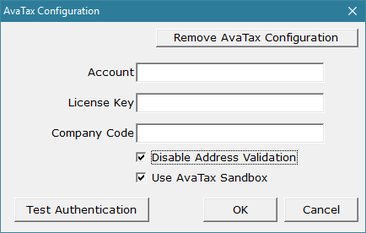
There is now an option to Disable Address Validation in the AvaTax Configuration. This will stop FrontLine from sending new or revised addresses to AvaTax for validation.
FrontLine 6.6.026- November 17, 2017
This release contains only maintenance updates.
FrontLine 6.6.025- November 15, 2017
You can now include the order revision number on forms. Contact [email protected] to request changes to forms.
Avalara Taxes Integration:
FrontLine is now integrated with Avalara for tax calculations. The new company setting, AvaTax Configuration, must be set up to turn on this feature.
FrontLine is now integrated with Avalara for tax calculations. The new company setting, AvaTax Configuration, must be set up to turn on this feature.
When using Avalara Taxes:
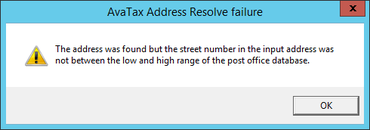
- Tax GeoCodes are not needed for addresses and orders. All addresses will be validated through AvaTax. When you add an address, if there is a problem with the address, you will get a warning message.
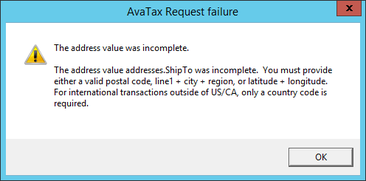
- You can save the invalid address, but AvaTax will not calculate taxes unless you provide either a valid postal code or address line 1 + city + state (or province).
- Customer Orders and Purchase Orders are submitted to AvaTax, but Transfers, Adjustments, and I-RAs are not submitted to AvaTax.
- Transactions are not committed in AvaTax until the Check-Out or Check-In is completed.
- Tax reporting is done in the AvaTax account where are all tax details are kept. FrontLine does not record tax details, it only records tax totals per line and per transaction.
- Because tax details are kept by AvaTax, FrontLine cannot tell AvaTax the exact tax amounts to credit for returns. So FrontLine attempts to provide details of the return as close as possible to the prior sale including the date of sale, the location of sale, and original ship to address.
- When an open order is reopened, it is resubmitted to AvaTax to refresh tax calculations.
- As you enter lines on an open order, the order is resubmitted to AvaTax to update line item taxes and the running tax totals.
To use Avalara Taxes:
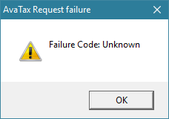
- You must have a working Internet connection. If your internet is down, you will get this error message each time FrontLine attempts to send for taxes from Avalara.
- One AvaTax Company Code is used for each FrontLine company (database).
- A FrontLine company (database) must either use AvaTax tax calculations or FrontLine tax calculations, not both.
The following setups are needed for Avalara integration:
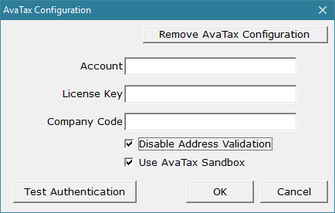
- In the company setting AvaTax Configuration, enter the Account and License Key issued by Avalara, and the Company Code created in your AvaTax account.

- The Exempt Category must be set up for the Self Customer for purchasing to work. In Setup/Company & Stations, click the ellipses in the Value column of the first company setting, Self Entity, and select Customer to open the Self Customer. Assign the appropriate Exempt Category.
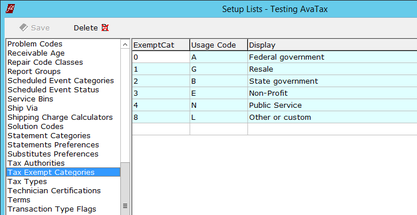
- The Usage Code column in Tax Exempt Categories must contain valid AvaTax customer exempt usage types. In Setup/Lists, select Tax Exempt Categories. Assign a usage code to each Exempt Category using the appropriate reasons as documented by Avalara. https://help.avalara.com/000_Avalara_AvaTax/Exemption_Reason_Matrices_for_US_and_Canada

- The External Ref. column in Item Tax Categories must contain a valid AvaTax Tax Code for each Item Tax Category. In Setup/Lists, select Item Tax Categories. Enter the appropriate AvaTax Tax Code in the External Ref. field for each Tax Category as documented by Avalara. https://taxcode.avatax.avalara.com/
October 2017
FrontLine 6.6.024- October 12, 2017
This release contains only maintenance updates.
September 2017
FrontLine 6.6.023- September 15, 2017
Job Costing now excludes repair unit line items and depot repair line items in the Job Details analysis, since these lines never hold costs or prices.
FrontLine 6.6.022- September 7, 2017
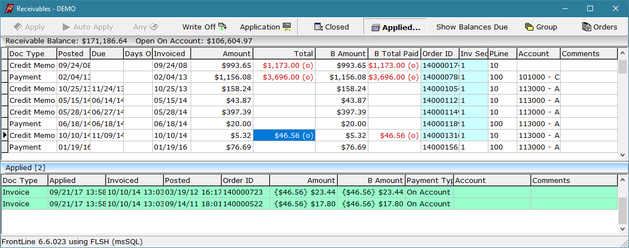
Accounts Receivable now displays where an open credit has been partially applied in the Applied section at the bottom of the Receivables window. The receivable that the credit has been applied to is highlighted in the bluish green color, and displays details of the receivable.

The Identifier Document History window now gives equal space to the Value and Edit columns when the window is enlarged.
August 2017
FrontLine 6.6.021- August 14, 2017
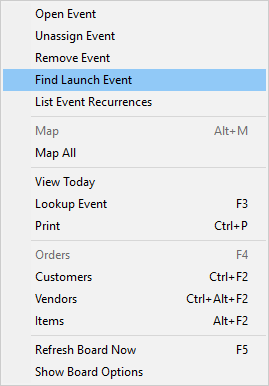
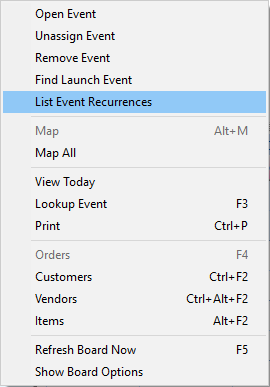
There is a new lookup for finding the launch event of a recurring event sequence. Right-click on a recurring event in the Scheduler and click Find Launch Event. FrontLine will take you to the launch event on the scheduler and it will flash red. If you do not see the flashing red event, your resource selections may be filtering it out. If the Find Launch Event selection is not active, the event you are clicking on is the launch event.
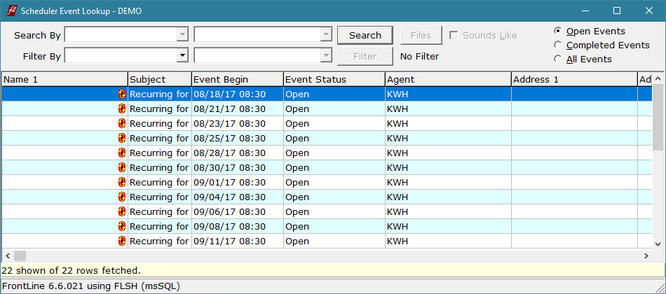
There is a new lookup for finding all the events in a recurring event sequence. Right-click on a recurring event in the Scheduler and click List Event Recurrences. FrontLine will open the Event Lookup window and list all the events in that sequence.
FrontLine Images can now display PNG and GIF image formats in addition to JPEG and BMP. Double-click the image to toggle between the actual image resolution and scale to window size.
FrontLine 6.6.020- August 3, 2017
There is now security for creating recurring events. In the Scheduler class, the new Recurrence Plans security context gives permissions for recurring events access. Users with Add permits can create a new recurring event, or add recurrency to an existing event. Modify permits allow the user to make changes to a recurrency plan on a scheduler event.
When line items have no description, the note subject of the line note now appears in the line description as soon as the note is closed.
The FrontLine Licenses in Use list now shows the database each user is connected to.
July 2017
FrontLine 6.6.019- July 27, 2017

All provisioning contracts now require the “Flat Billing Rate” Item Type flag if they are not meter billing.
Scheduler has been modified to create recurring events that can be individually modified. In previous releases, recurring events were linked so that they were all tied to the same customer order, and all recurrences had the same status. Now, recurring events are individual, so you can complete one recurrence and have later recurrences remain open.
This change means you will need to look up your recurring events and “unroll” them into the new recurrence format. Old recurrences will no longer appear on the scheduler until they are unrolled or recreated.
This change means you will need to look up your recurring events and “unroll” them into the new recurrence format. Old recurrences will no longer appear on the scheduler until they are unrolled or recreated.
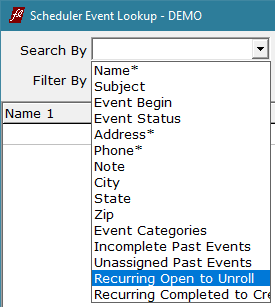
To make it easier for you to unroll your recurring events, Scheduler Event Lookup now has a special Search By, Recurring Open to Unroll, to find recurring events that need to be unrolled into the calendar. Search for Recurring Open to Unroll to find these events, open them, and save them again. Saving will recreate the recurring events, but in the new individual recurrence format.
You can also find completed recurring events that need to be recreated because they have more recurrences in the future. Search Recurring Completed to Create, and look at the Event Exp column to see if they expire in the future. If they do, you can create these events again to replace the old ones.
You can also find completed recurring events that need to be recreated because they have more recurrences in the future. Search Recurring Completed to Create, and look at the Event Exp column to see if they expire in the future. If they do, you can create these events again to replace the old ones.
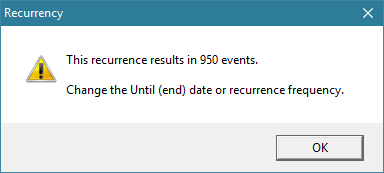
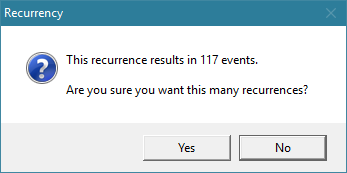
When creating the new Scheduler Event Recurrences, enter an Until date that is within the next 10 years, and no more than 200 events long. If your recurrence creates more than 40 events, FrontLine will ask you to confirm.
The Recurring Scheduler Events you now create become a sequence of individual events planned for the future. These plans can be modified separately on each event to reflect reality.
- The subject, notes, equipment, participants, status, and order number are independent for each occurrence.
- You can delete an event in the recurring sequence without affecting any other events.
- If the launch event is deleted then the second occurrence becomes the launch event. To delete the whole sequence, change the recurrence to NEVER, and then delete the launch event.
- If you change the recurrence scheme of an event in the sequence, the recurrence is regenerated from that event forward, so later events may be moved in time, deleted, or added. Earlier events will still reflect the old recurrence scheme.
- Changing the launch event will change all the events in the sequence.
- If you change the recurrence frequency to add more recurrences within the sequence, later events are pulled back to close the gaps and new events are added to the end of the sequence.
- Specify Days recurrence schemes can only be changed from the launch event.
- If you change the end date of an event in the sequence, this new Until date appears on all the events, including earlier events.
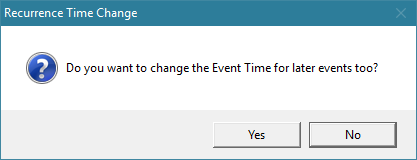
- If you change the start time or duration of an event in a recurring sequence without changing the recurrence scheme, when you save you are given an option to apply the time change to all later events in the sequence.
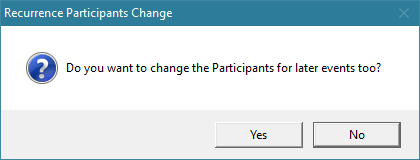
- If you change the participants of an event in a recurring sequence without changing the recurrence scheme, when you save you are given an option to change the participants of all later events in the sequence.
- If you regenerate a sequence by changing a recurrence scheme, you will not move or delete completed events.
- Regenerating a sequence by changing a recurrence scheme will move events attached to open orders and change the line item scheduled date, but will not delete these events.
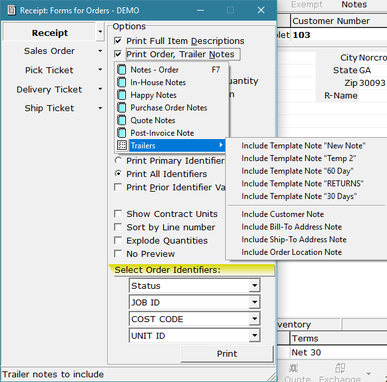
You can now print the order location note on forms. It is available as a Trailer Note type in Forms for Orders.
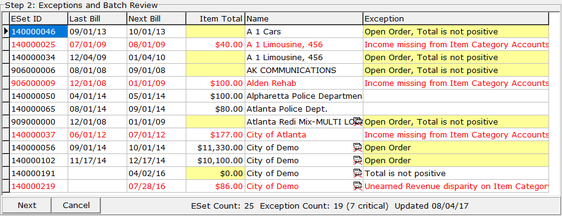
In Step 2 of Recurring Billing, FrontLine now shows you bills that have been created, but cannot be billed because the order is still open. These Equipment Sets are not billed until the originating order is invoiced. Right-click on the line and click Orders to view the open order that must be invoiced before billing.
June 2017
FrontLine 6.6.018- June 23, 2017
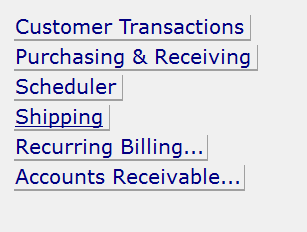
When using the Shipping feature from the Welcome window, the email address helper is now available to help you email packing slip forms.
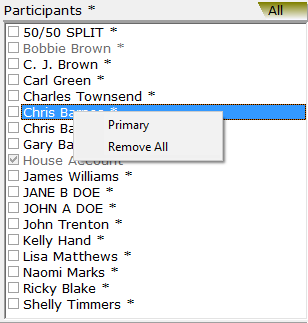
You can now change the Primary Participant from within the Scheduler Event window. Right-click on the new primary participant and select Primary to change the primary participant. The original participant will be a secondary participant, and can be deselected if not needed. Select Remove All to assign no participants, so the event is “Unassigned”.
FrontLine 6.6.017- June 19, 2017
The Name of the customer or vendor can now be viewed in Unit Tracking.
The Tax Report now only uses order location, so line locations are ignored.
The Bin field in Items Maintenance now shows the inventory bin at your workstation’s location. This bin is displayed in grey italics. If a default bin has been set, this overrides the location specific bin, and it displays in black with no italics.
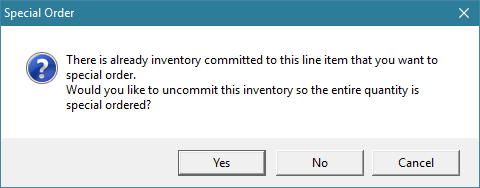
You can now Special Order the remainder of a line item quantity even after inventory has already been committed for part of the quantity. Click Details in the bottom toolbar and select Special Order. At the Special Order prompt, click Yes to special order the full quantity and release committed inventory, or click No to special order only the remaining units needed.
FrontLine 6.6.016- June 5, 2017
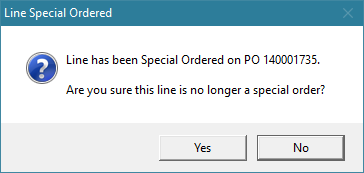
When you remove the Special Order on a line that already is linked to a Purchase Order, the Line Special Ordered prompt opens. This reminds you that the line is connected to a PO. Click Yes to remove the special order status and pick inventory. If you select the Special Order again, the link to the PO is restored.
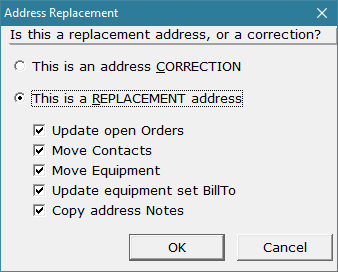
When making changes to existing addresses, the Address Replacement prompt now has no default. You must choose between address CORRECTION and REPLACEMENT.
Select CORRECTION if the change you are making is to correct a mistake in the address. This selection will fix the address on all existing orders as well as all previous invoices for that address.
Select REPLACEMENT if you are entering a new address to replace the existing one. This occurs if your customer is moving, for example. Old invoices will retain the old address, but that address will be retired. When selecting Replacement, there are checkboxes you can select if:
• open orders should be updated to the new address
• contacts on the old address should be moved to the new address
• customer equipment at the old address should be moved to the new address
• Bill To Addresses on contracts (ESets) should be changed to the new address
• and Address Notes should be copied from the old address to the new address
Receivable Statements now output multiple currencies. Aging summaries are broken down by currency and exchange rate. To use currency formatting output, forms must be changed. Contact [email protected] to have your forms adjusted.
When you use the Package Recall feature, FrontLine now auto-commits qualified package members as long as inventory is available at the same location as the unit you selected.
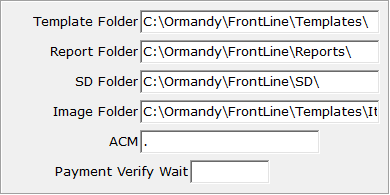
There is a new Image Folder that you can assign for each Location. You must select the FrontLine Connect upload image folder for this folder. Contact [email protected] to obtain the correct pathway. This Image Folder can hold multiple stock images, and also holds repair images uploaded from FrontLine Connect. (Once activated, it replaces the ItemImages folder within the Templates Folder that was used to hold stock images.)
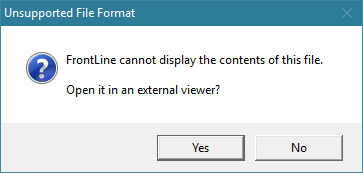
FrontLine's image viewer shows JPEG images, and will not open files larger than 8 MB. Images that are not JPEG or are over 8 MB can be opened in an external picture viewing software. If your image cannot be opened in FrontLine, click Yes to open the picture in your default software.
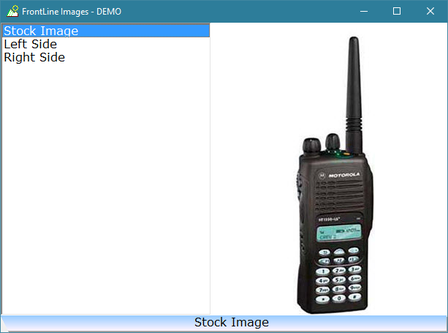
To use multiple stock images:
- The default stock image should retain the old ItemID format: ItemID#########.jpg
- Additional stock item images use the name scheme: ItemID#########*.jpg
where the # are the nine digit ItemID from FrontLine, and the * is the name you would like to see displayed. Spaces, underscores, and changes from lower to upper case in the name are shown as spaces when the name of the image is displayed. - To view multiple stock images from the Item file, double click on the default stock image or key Atl+F12 on your keyboard. The FrontLine Images window opens. Double-click on the picture name from the list to view the image.

Pictures captured in FrontLine Connect are now viewable on FrontLine events and orders. When an image is captured related to an event, you can access the images from the scheduler event by clicking the Images button at the top right of the event window.
May 2017
FrontLine 6.6.015- May 10, 2017
If you use the Company Setting Invoice Vendors for Warranty Services, you are required to enter a vendor when entering a unit warranty. This is needed to create the warranty vendor invoice.

You can now print pick tickets that display the attached PO number of any special ordered line items. If the line on the pick ticket is split between two or more POs, only one PO number will display.
The location on a line item can now be changed after the order has been partially invoiced, as long as the line has not been invoiced.
Parts imported from FrontLine Connect now reflect customer pricing from price levels.
You can now show Options on quotes, sales orders, and service orders. If you enter a quantity of zero on a line item, the price will display, but it is not included in the total. These lines are highlighted with the red void color in the Quantity and Total columns to remind you they are zero quantity and are not reflected in the total. These lines do not have a ready checkbox, and cannot be invoiced. After invoicing, these lines are closed.

Enter a quantity of zero for any line that is not part of a package, a rental, a return, or an exchange. These lines will print on quotes, sales orders, and service orders with $0, the word “Option,” or alternate text in the total column. Your quotes and orders will then show options and the price of those options without affecting the total. If a customer chooses to buy the option, you can change the quantity to make the line active for totaling and invoicing.
April 2017
FrontLine 6.6.014- April 24, 2017
On a workstation where the font size has not been set, the default font size is now 10 if the horizontal screen resolution is at least 1,600 pixels. Otherwise, the default is still 8.
You can now see quantity totals in the Order Totals window. This feature was added to show total labor hours for an order. When on a quote or order, click the Quote Total or Order Total header to open the Order Totals window. This window displays totals and margins broken down by Inventory, Services, and Charges. It now has a Quantity column that displays a total of all quantities regardless of unit of measure. The Service Quantity total displays the total of all the quantities on service lines.
When entering lines using FrontLine Connect, Parts and Labor that are entered without linking to a repair unit are imported as unlinked lines and sorted to the top of the service order.

The bank deposit batch information at the top of the order window now updates the batch total after each addition to the batch.
You can now search for cancelled quotes in Order Lookups. In the Search By field, select Quotes, Cancelled.
There is now separate security for users to present quotes. Give Add security for the Quote Presentation context in Customer Orders security to allow a user to present an open quote. To present other agents quotes, a user must also have Add security for the Other’s Orders security context.
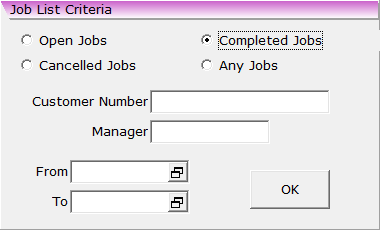
Jobs and Opportunities have been enhanced.
- The Job List and Opportunity List can now be sorted by clicking the column titles.
- There is a type-in box to filter the Job List and Opportunity List by Description. This filter box is found below the list.
- Click the Job List Title or Opportunity List Title to open the List Criteria. Here you can narrow the display based on the criteria selected. You can search by status, customer number, manager initials, and a date range. (The date range is only used when including Cancelled or Completed jobs/opportunities.)
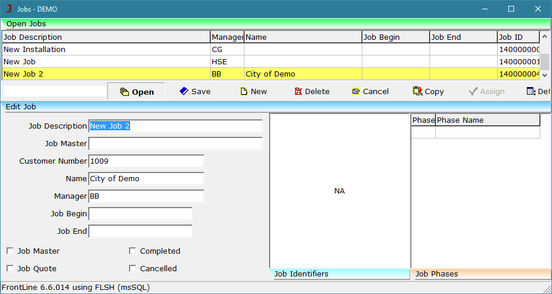
- The Job List and Opportunity List only show those managed by my agent (my jobs) when the Other's Orders security permit is None.
- The Details and the List now include the Customer Name. In job details, type in the name field and press enter to open the customer lookup.
Lookup windows such as Order Lookup have been modified for easier use.
- You can now type into the Search By field and FrontLine will attempt to autocomplete your selection. Press enter to choose the autocompleted selection.
- Select Newest First or Oldest First to choose your lookup sort order by placed date.
You now can set dollar limits to Quotes and Purchase Orders. In Setup/Security/Access Profiles, you can assign a limit that is enforced when attempting to present a quote or print a quote or purchase order. If these fields are blank, no limits are enforced. Someone with a higher limit is needed to print or present these quotes and POs.
FrontLine 6.6.013- April 5, 2017
You can now Cancel a presented quote so that is does not clutter lookups or appear in forecast reporting. To use this feature you must have Delete permits for the Order Quotes security context in the Customer Orders class. To cancel quotes from other agents, you must have Delete permits for the Other's Orders security context in the Customer Orders class.
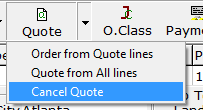
To Cancel a Quote:
1. Open a presented quote, and click the drop down arrow next to the Quote button.
1. Open a presented quote, and click the drop down arrow next to the Quote button.
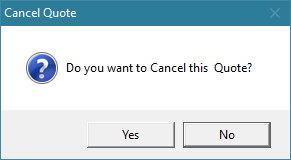
2. Click Cancel Quote, and a prompt asks if you want to cancel the quote. Click Yes and the status of the order is changed to Quote, Cancelled.
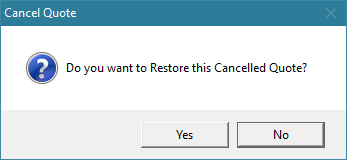
3. To restore a cancelled quote, reopen the quote and click the drop down arrow next to the Quote button to unselect Cancel Quote. A prompt asks if you would like to restore the quote. Click Yes, and Cancelled is removed from the status.
You can now toggle on and off the No Print feature on line items after invoicing.
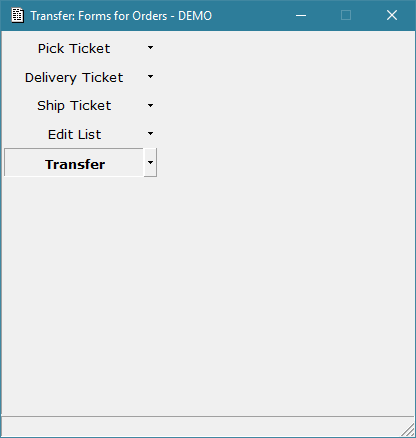
Forms for Orders now offers a Transfer form specifically designed for transfer orders. Ask [email protected] if you would like to use this new form.
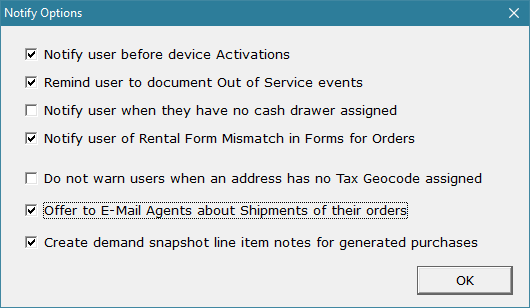
You can now turn on or off the notification when shipping items. In Setup/Company & Stations/Company Settings, the Notify Options window now includes a checkbox for Offer to E-Mail Agents about Shipments of their orders. This will create an email prompt at the time of shipping that includes ship tracking information and can be sent to the agent on the order header. This used to be on by default, but now can be turned on and off using this company setting.
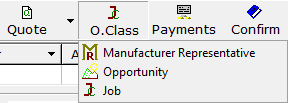
There is a new O.Class button in the Customer Orders window that is used for classifying orders. The Job, Opportunity and Manufacturer Representative (MR) menu entries in the customer order window have to the new O.Class button so they can be accessed after invoicing. This button label can be changed in Setup/Labels.
There is a new streamlined process for Non-AR payments that includes a separate order type for these transactions. A Non-AR order is not taxed, does not appear on tax reports, and does not open the Receivables window when entered as part of a bank deposit batch.
In order to use this feature, the following setups are necessary:
In order to use this feature, the following setups are necessary:
- A user must have permissions for the Receivable Payment security context in Customer Orders to create and modify Non-AR orders.
- There is a new Non-AR Customer entry in Company Settings. In Setup/Company & Stations/Company Settings, click the ellipses in the Value column to select the special customer used on Non-AR orders.
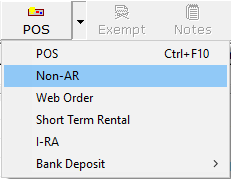
To enter a Non-AR order:
- Click the drop-down arrow next to POS to select Non-AR. This selection is active when the Non-AR Customer is set up in Company Settings.
- Enter a charge line item to record the value of the Non-AR payment. Usually this is a special NONAR item set up for this purpose.
- Click Payment at the top of the window to record the payment tenders, and click Confirm to complete the transaction.
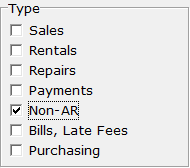
There is a new Non-AR selector in Transaction Inquiry that selects all transactions recorded using the new Non-AR feature.
March 2017
FrontLine 6.6.012- March 16, 2017
You can now close a bank deposit batch while in the batch, as long as the current order is blank.

When you close a bank deposit batch, you are now offered a review of your payment orders.
The review list shows payment order details. Right-click and select Orders to open the payment orders. This lets you review, edit, and check out payment orders that have not yet been confirmed. All orders must be completed before you can close the deposit batch.
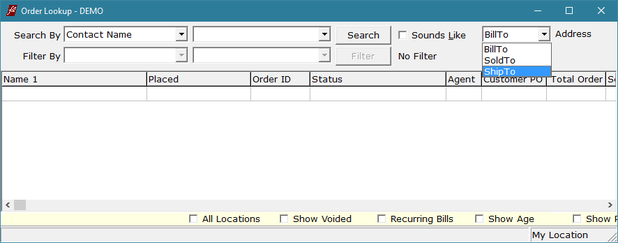
You can now look up contacts by address type.
- In the Order Lookup window, use the Address selector in the upper right of the window to select the address type.
- Select Contact Name in the Search By field, and FrontLine will search contacts at the address type selected.
When entering payments, when you enter a check number or checking account number in the payment tender line, the balance is automatically entered in the amount field.
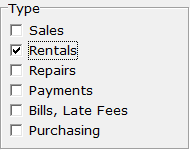
Transaction Inquiry now provides a separate flag for Rental type orders.
FrontLine 6.6.011- March 9, 2017

Deposit Batches can now be assigned a deposit date. When you start a new deposit batch, FrontLine will prompt you to enter a deposit date. This date will be assigned to all the payments entered in the batch. You will be asked to confirm the date you enter if it is more than four days from today.

When you select Short Term Rental in the Customer Order window, the window title now changes to Customer Short Term Rental.
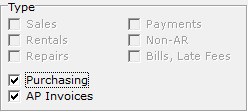
You can now select multiple order types in transaction inquiry to customize your search. Purchasing is the only selection that is mutually exclusive.
FrontLine 6.6.010- March 2, 2017

There are two new company settings for the Motorola SalesView integration: Motorola Dealer Number and Motorola Dealer Name. In the Value column for each of these company settings, enter your company’s Motorola dealer information. These fields will then appear on your SalesView report.

To mark your Motorola vendors for the SalesView report, click the new Special Reporting flag on the vendor file.
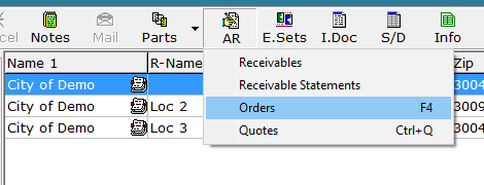
You can now open orders and quotes for editing from the Customers maintenance file. Click the AR button to access Orders and Quotes lists. These lists display the customer’s transactions, which you can now open and edit.
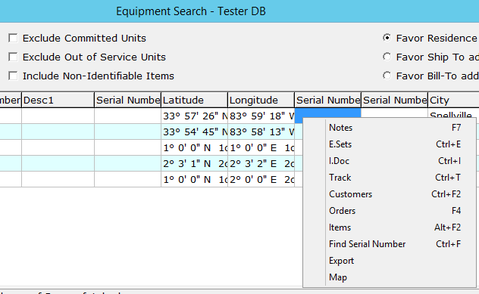
Equipment Search now offers mapping when both latitude and longitude identifiers are present. The maplink is also available on exports.
February 2017
FrontLine 6.6.009- February 24, 2017
|
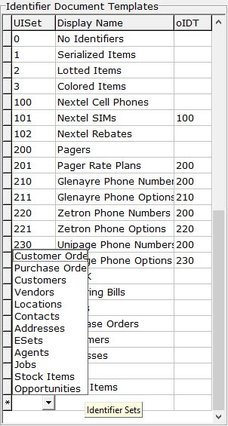
Opportunities now have identifiers. To set up opportunity identifiers, arrow down to create a new Identifier Document Template, and use the UISet drop down arrow to select Opportunities. Then create or select identifiers from the list on the left to add to the opportunity template.
Opportunity identifiers appear in the Opportunity window when editing selected opportunities.
|

FrontLine now defaults the full balance due in payment lines that are On Account, Credit Card, or Check. Negative balances on returns default in for On Account and Credit Card tenders.
FrontLine 6.6.008- February 20, 2017
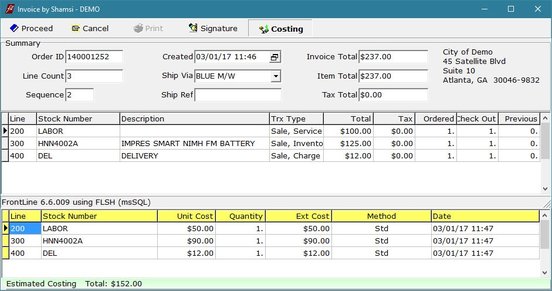
FrontLine now costs Services and Charges. Intangibles are always costed using Standard cost. You can set up item costing per location for services and charges in Items Maintenance.
Totals now appear with costing details in the Invoice window. To view, click the Costing button in the invoice window. Totals appear in the green bar at the bottom of the window.
Totals now appear with costing details in the Invoice window. To view, click the Costing button in the invoice window. Totals appear in the green bar at the bottom of the window.
FrontLine 6.6.007- February 15, 2017
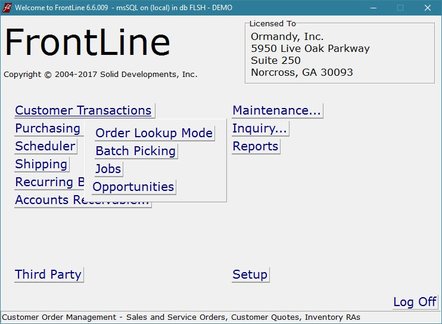
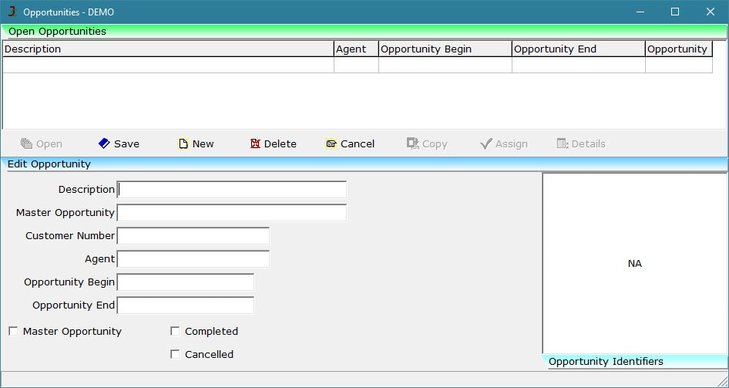
There is a new Opportunities feature that you can use to manage prospecting.
- From the Welcome window, point to Customer Transactions and click Opportunities to open the Opportunities management window.
- Click New to create a new opportunity.
- Fields for a new opportunity include:
- Description- Name the opportunity for future reference
- Master Opportunity- Name the Master Opportunity if this opportunity is linked to another opportunity.
- Customer Number- Identify the customer or prospect. If you do not know the customer or prospect number, enter the name and click ENTER on your keyboard to open the Customer Lookup window to select the customer. If you need to add a new prospect, click Files at the top of the lookup window to open a blank customer file.
- Agent- Identify the Sales Agent in charge of the opportunity.
- Opportunity Begin- Enter when this opportunity begins.
- Opportunity End- Enter when this opportunity will end.
- Checkboxes-
- Select Master Opportunity if this is an opportunity that consists of several sub-opportunities.
- Select Completed if the Opportunity is complete and should no longer be displayed in the open opportunities grid.
- Select Cancelled if the opportunity is lost.
- Click Details to view totals and margins of quotes and orders connected to the opportunity. From this window, key F4 to view the quote or order.
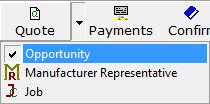
- An open customer order or quote can be connected to an opportunity. When in the customer order window, click the drop down arrow next to the Quote button and select Opportunity. The opportunity strip appears. Choose an opportunity from the drop down list.
- A View Opportunities button appears in the opportunity strip. Click it to open the Opportunities management window.
FrontLine 6.6.006- February 9, 2017
You can now have the agent entered in resource costs on a line item print on forms. Contact [email protected] to adjust your forms for this feature.
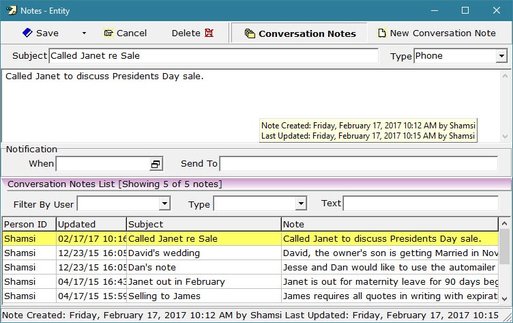
Conversation Notes and regular Notes now display who added the note and last revised it in both the status bar and the hover text.
FrontLine now auto-commits package line items that are special order or catalog when the package itself is not on special order.
You can now remove the special order status from lines on customer orders as long as they have no quantity committed and no special purchase order.
You can now remove the special order status from lines on customer orders as long as they have no quantity committed and no special purchase order.
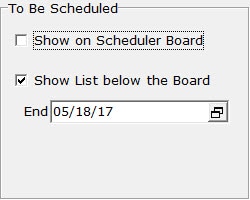
The To Be Scheduled options Show on Scheduler Board and Show List Below the Board are now sticky per user.
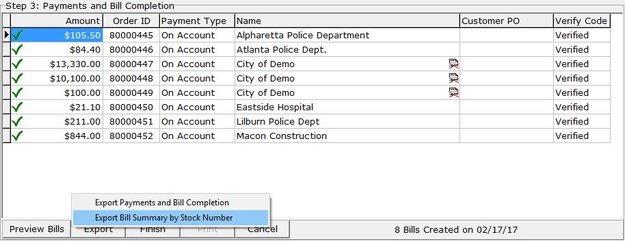
When using the Recurring Billing Export Summary or Export Summary by Stock Number functions, FrontLine now offers a Tax Total Column.
When identifying a unit (for example, when creating an exchange) the Identify Unit window now retrieves a maximum of 1600 units, increased from 800.
January 2017
FrontLine 6.6.004- January 12, 2017
You can now work in Order Lookup Mode when reviewing multiple orders. In the Welcome window, point to Customer Transactions and click Order Lookup Mode. The Order Lookup window opens, and is the basis for your work, rather than order entry. Use this window to search for, filter, and sort your lookups. Select orders to view and edit, and once you close the order, the Order Lookup window remains open with your active search.
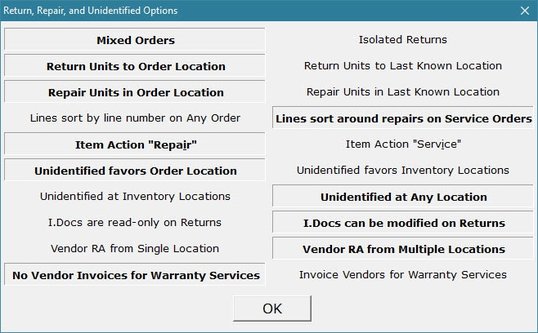
There is a new Company Setting to allow you to ship vendor RAs from multiple locations on one order. This is useful when consolidating vendor RAs at a central location before shipping them to the vendor.
- In Company Settings, select the ellipses in the Value column for the Return, Repair, and Unidentified Options context.
- Select Vendor RA from Multiple Locations to activate this feature.
- Remember that V-RAs do not follow the company setting to "Return Units to Order Location" vs "Return Units to Last Known Location"
Recurring Billing will now email to all of the email addresses flagged to receive invoices at the Bill To location of the recurring bill. These email addresses appear in the EMail field and are separated by semicolons. The EMail field is limited to 240 characters.
On a Service Quote, when a quoted part, service, or charge is assigned to a warrantied quoted repair unit, the line is now automatically warrantied.


