2016 Updates
December 2016
FrontLine 6.6.003- December 20, 2016
When you open Job Cost from within as order that is assigned to a job, FrontLine now automatically opens that particular job.

You can now see if an invoice has been paid in the Customer Orders window. Open the customer order, and click Payments to view the On Account tender. If the On Account tender has been paid in full, the account number column displays a (Paid) text and a light green highlight.
FrontLine 6.6.002- December 14, 2016

You can now sort lines on forms by line number instead of using FrontLine special sorting. Select the Sort by Line number checkbox in Forms for Orders when printing.
Receivables Statements can now include the periodic invoice number.
Three countries are added to the country list: Kosovo (+383, KV), Montenegro (+382, ME), and Serbia (+381, RS).
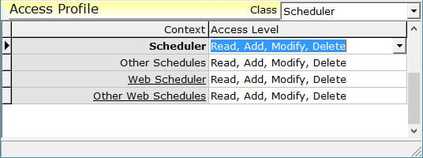
New security contexts have been added for access to FrontLine Connect. Under the Scheduler security class, Web Scheduler gives access to FrontLine Connect, and Other Web Schedules gives access to other user’s schedules in FrontLine Connect.
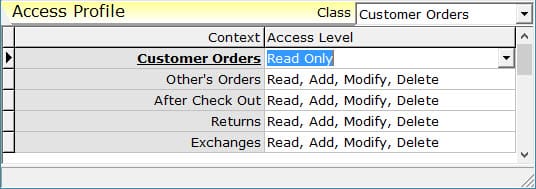
You can now give security access for users to create quotes only, and not create or edit orders. This setup requires a combination of security access settings in the Customer Orders class.
- Set the Customer Orders Access Level to “Read”. Do Not replace class member permits when prompted. This will restrict users from creating or editing orders.
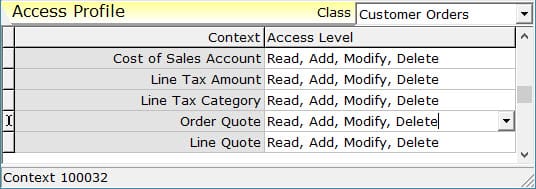
- Set the Order Quote Access Level to full access with "Read, Add, Modify, Delete". This will allow the user to create and edit quotes.
FrontLine 6.6.001- December 5, 2016
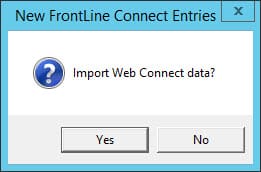
FrontLine now imports FrontLine Connect repair units, parts, and charges as well as labor. When you open an order in FrontLine, if there are repair units, parts, charges, or labor entered in FrontLine Connect, you are prompted to import web data.

- The import attempts to commit the units specified (repair units and parts) if the customer status is not on hold. If the repair unit is already on an open order, the previous order will need to be invoiced before the unit can be committed to the order.
- Lines imported from FrontLine Connect show a linked earth icon in the Description column.
- Parts and Charges are added at List Price. Labor is added as a no price no print line with hours recorded in resource costs.
- Once imported, these lines can no longer be changed in FrontLine Connect.
- Voiding imported lines reopens the FrontLine Connect data so it can be modified in FrontLine Connect and reimported.
- Voided imported lines cannot be unvoided, but they can be reimported by deferring and reopening the order.
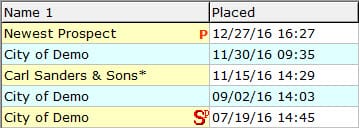
Customer Order Lookup and Customer Lookup now show a red P symbol in the first column to indicate the status of Prospect.
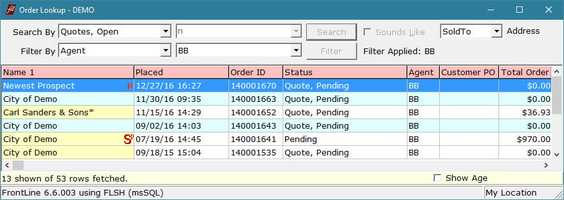
The row count display at the bottom of lookup windows now includes both the number of rows shown and fetched. Fetched is the number of rows produced by the search, and shown is the number of rows remaining after the filter is applied.
November 2016
FrontLine 6.6.000- November 11, 2016
You can now print invoices that show the amount paid on the receivable, and the outstanding balance. Contact [email protected] to have your invoice forms adjusted to show payments. This new feature will work for future invoices after updating.
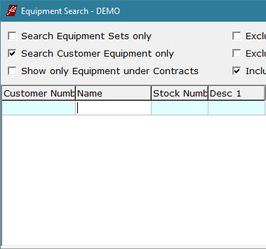
Equipment Search now displays the Name column on the left after Customer Number.
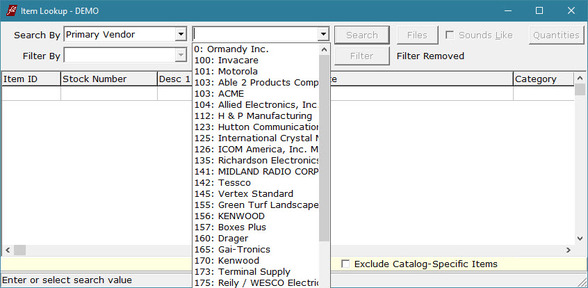
When looking up an item, the Vendor Number search by entry has been changed to Primary Vendor to find vendor names as well. A list of vendors is available from a drop down list, and vendors are also matched based on the name or number you key.
FrontLine 6.5.075- November 2, 2016
Introducing Frontline Package Recall!
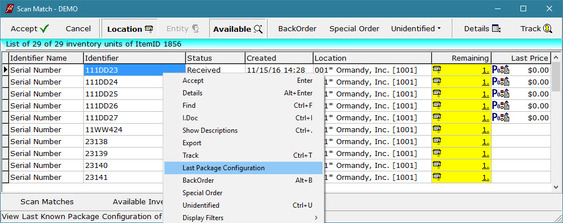
When you sell or transfer a unit that was last received, transferred, or returned as a package, FrontLine now offers a Package Recall feature to add it to the current order in the same package configuration.
This is used when picking units at the time of sale. Select inventory in scan match, right-click on a unit and select Last Package Configuration to view the package options previously selected.
This is used when picking units at the time of sale. Select inventory in scan match, right-click on a unit and select Last Package Configuration to view the package options previously selected.
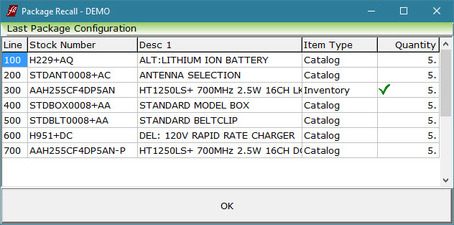
The Package Recall window opens to display the package lines from the last transaction.
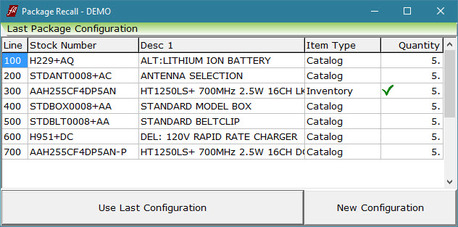
When you select a unit that has a previous package configuration, FrontLine opens the Package Recall window so you can select to Use Last Configuration or select New Configuration.
Once the package is accepted, FrontLine attempts to auto-commit inventory that was last transacted with the package, if available.
- If you select Use Last Configuration, the Package Content Selector opens with all the package items pre-selected according to the last transaction for that unit. Changes can be made to this configuration before clicking Accept.
- If you select New Configuration, you can choose to sell the unit with no package, or to open the Package Content Selector to choose different package options.
Once the package is accepted, FrontLine attempts to auto-commit inventory that was last transacted with the package, if available.
In the forms output viewer, the toolbar buttons are now larger on high resolution displays.
October 2016
FrontLine 6.5.074 October 21, 2016
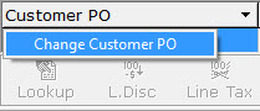
You can now make changes to Customer PO numbers and Contacts after invoicing a customer order. You can also change the Vendor Reference numbers after check-in of a PO. Click the drop down arrow for the Customer PO, Contact, or Vendor Reference to make changes. Security contexts for this feature are After Check Out in Customer Orders, and After Check In in Purchase Orders. Assign Modify permits to the new security settings to allow users to make these changes.
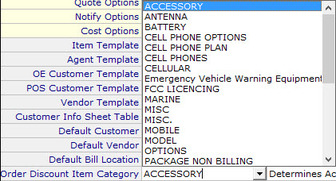
You can now assign item category accounting to Order Discounts. In the Company Setting Order Discount Item Category, indicate which item category should be assigned to order discounts.
Fast POS has been further streamlined to autocommit unidentified inventory when adding items that have no available inventory.
FrontLine 6.5.073- October 4, 2016
When you select Sort by Stock in Recurring Billing Output, recurring bills no longer combines multiple bills to the same customer in the same batch.
When the Current Station is set as a POS station and a customer order is a POS order, FrontLine now uses a Fast POS mode:
- If a unique identifier of an available item is scanned and Return Next Scan is off, inventory is committed to the order without showing Scan Match.
- If a non-identifiable item Stock number is scanned and Return Next Scan is off, inventory is assumed to be a sale without asking for the Item Action. Available stock is auto-committed if it is not a miscellaneous item.
- If no individual lines are checked off as ready when the customer order is confirmed, FrontLine assumes that all lines are ready and does not ask "Are all the line items on this Order ready?"
September 2016
FrontLine 6.5.072- September 14, 2016

The Shipping Charge Calculator now excludes items flagged as Travel from the assessed Value when the Item Type selected in the ship charge calculator is Tangibles, Services, or Charges.
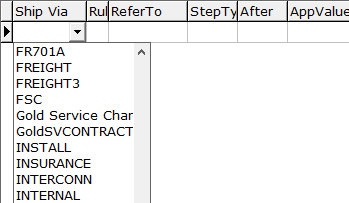
The Shipping Charge Calculator can now be used to add other services and charges to an order. Select the service or charge in the Ship Via field. Any charge or service items used in Shipping Charge Calculators "Ship Via" are excluded from the assessment of the ReqValue.
You can now print subtotals by item category on forms. Subtotals print one row per item category plus one total row, and are not available in batch outputs. To add subtotals to your forms, contact [email protected].
August 2016
FrontLine 6.5.071- August 22, 2016
You can now map To Be Scheduled events.
- In the Scheduler selections under To Be Scheduled, select Show List below the Board. A task list of events To Be Scheduled opens below the scheduler board.
- Right-click to access the context menu, and select Map to map the selected event.
- Select Map All Tasks to map all the tasks in the To Be Scheduled list.
FrontLine 6.5.070- August 15, 2016
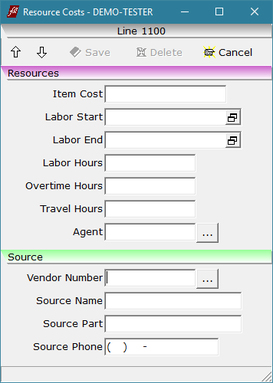
Resource Costs now displays the Vendor Number instead of VendorID
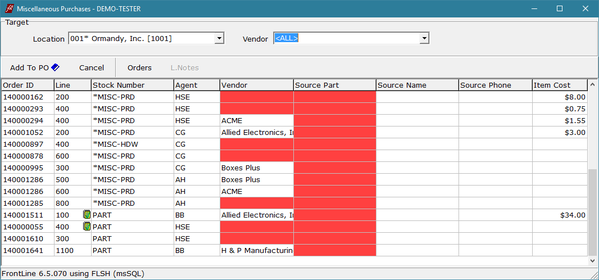
When you automatically generate Miscellaneous Purchases, there is now an <ALL> entry in the vendor selection list. Select ALL to include miscellaneous customer order lines where any vendor (or no vendor) has been specified. This assists you in determining all the POs that need to be generated.
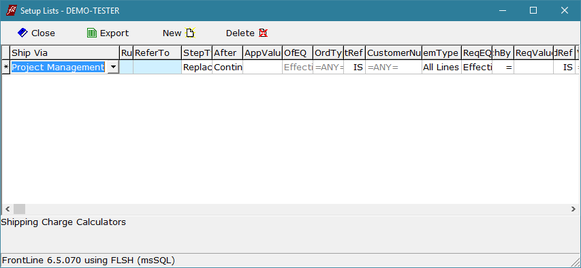
The Shipping Charge Calculator rules can now be used to calculate other charges that are manually added to the order.
- Create items for the charges you would like to have calculated automatically. Be sure to select the Charge Item Type flag.
- In Setup/Lists, select the Shipping Charge Calculator. In the Ship Via column drop down, select the charge item, and create rules to calculate the value of this charge.
- When this charge item is added to an order, the price is calculated according to the rules you set up.
- All charge items used in Shipping Charge Calculators are excluded from Value assessments by the ship charge calculator.

There is a new Item Type flag for Travel. This flag is available for Charge Type items to indicate than an intangible item is related to travel.
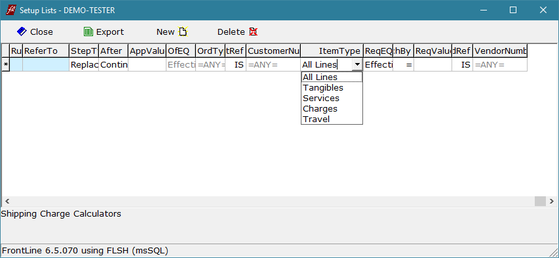
This flag is used by the Shipping Charge Calculators to calculate charges related to travel. Select the Item Type Travel in the shipping charge calculator to assess only items with the Travel flag selected.

The Shipping Charge Calculator rules can now be based on line Quantity values as well as extended price totals (Effective) for Application value (AppValue) and Required value (ReqValue) fields.
You can now print labor hours from resource costs on forms. Contact [email protected] to add resource costs labor hours to your forms.
July 2016
FrontLine 6.5.069- July 29, 2016
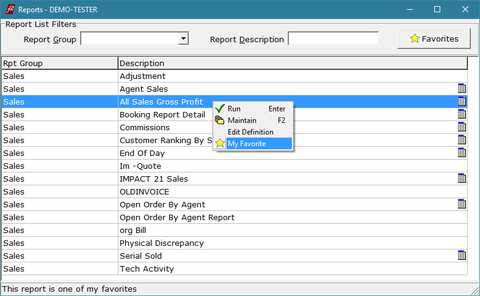
There is now a Favorites feature for Reports. You can flag up to 20 reports as your favorites, and then see only your list of reports, excluding the others.
- In the Reports window, right-click on a report and select My Favorite. Favorite reports show a star on the report line.
- Click the Favorites button at the top to view only reports you have flagged as favorites.
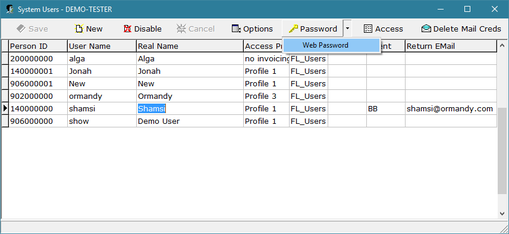
You can now set up your web application passwords in Setup/Security. Log in as system administrator and select a user. Click the drop-down beside the Password button and select Web Password. Enter the password for the user’s access to the web application.
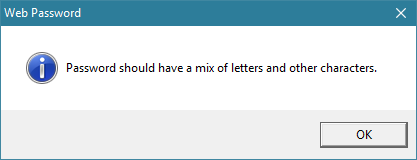
This password has more requirements than a regular FrontLine password since it provides access via web.
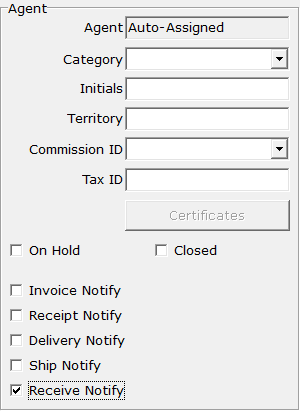
You can now get a notification when special orders are received. In the Agent file, select the Receive Notify flag. When receiving special orders for that agent’s orders, the receiver will be prompted to send them an email notification when they print the receiving register.
FrontLine 6.5.068- July 26, 2016
You can now exclude Out of Service Units when using Equipment Search.
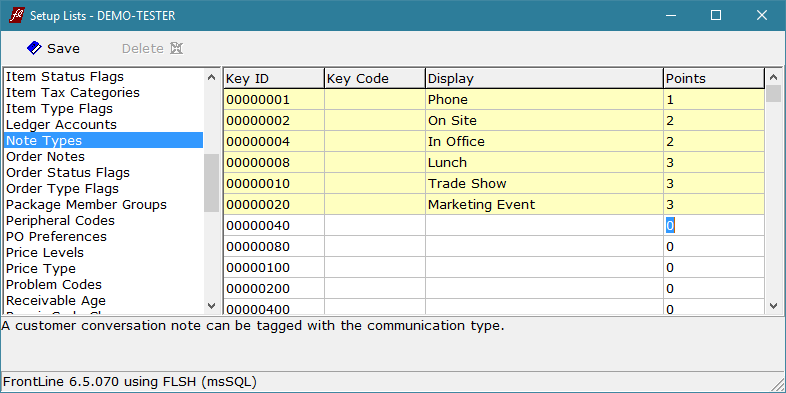
There is now a Points column for the Note Type list. When creating the list of conversation note types, each type can be assigned a points value for use in reporting. This is used to score sales people based on their logged conversations.
FrontLine 6.5.067- July 21, 2016
The Shipping Charge Calculator rules can now assess line item totals based on item types. Select from All Lines (as before), Tangibles, Services, or Charges.
FrontLine 6.5.066- July 14, 2016
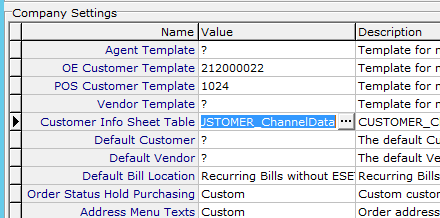
There is now a Customer Info Sheet. This is a custom table that is used to store company information that needs protection by security. To use the Info Sheet:
- Contact [email protected] to discuss your info table needs, design, and create your table. Once created you will be given a database table name.
- Enter the database table name in Company Settings. Point to Setup and click Company & Stations. In Company Settings, enter the database table name in the Customer Info Sheet Table value field.

- Users must have permission to access the info sheet in the new security context Info Sheet found in the Customers security class. Log in as System Administrator, Point to Setup and click Security. Click the Access button at the top of the System Users window. Double click to select an access profile, and use the Class drop-down selection to choose Customers. Find the Info Sheet context, and assign the appropriate access level.

- Once you set up the information sheet and assign access, in Customers Maintenance an Info button appears in the top bar. Also, in the Customer Order window, the Customer Number drop-down has a new Information Sheet selection.
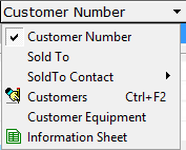
- Also, in the Customer Order window, the Customer Number drop-down will display a new Information Sheet selection.
Packages and Bills of Materials can now be added to an I-RA, but in either case only the members are added as in a Bill of Materials.
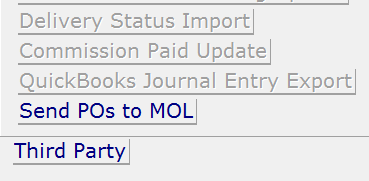
There is a new Third Party option, QuickBooks Journal Entry Export, for users who are integrated with QuickBooks. Contact [email protected] for instruction on using this option.
June 2016
FrontLine 6.5.065- June 30, 2016
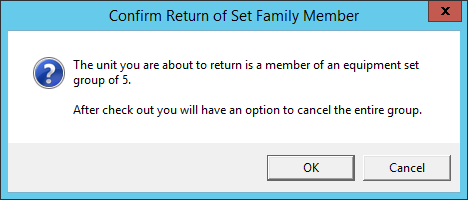
When you return equipment that was part of an equipment set group, you can now choose if you would like to cancel the whole group.
- When you return the equipment, a confirmation message lets you know the equipment was part of an equipment set group.
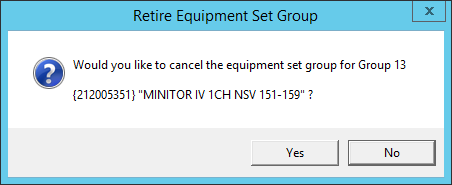
- After check out, FrontLine asks you if an equipment set group should be cancelled because an equipment member was returned. If you click Yes, the whole group is removed. If you click No, only the equipment is removed, and other group members remain in the equipment set.
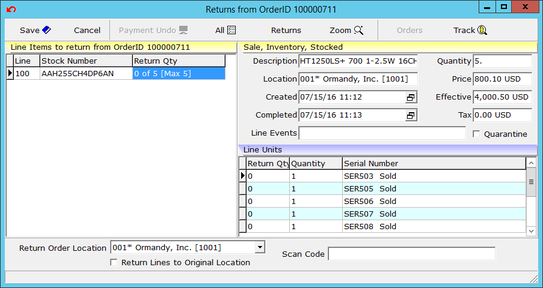
You can now scan items in the returns window. After you click Return on an invoiced order, the Returns window opens and has a ScanCode field on the bottom right. Scan the primary identifier of a unit that can be returned from the order and press Enter to have it added to the return list without looking for it.
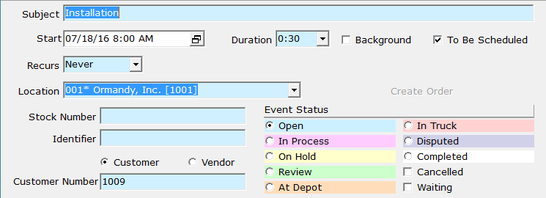
Now you can have a list of events that have not yet been scheduled. To Be Scheduled events can be viewed as a list or seen on the scheduler board.
- To create a To Be Scheduled event, click the To Be Scheduled checkbox in the Scheduler Event window.
- All the fields are highlighted in blue to show the event is not yet scheduled.
- To Be Scheduled events only display the first recurrence of a recurring event.
- Schedule the event by un-checking the To Be Scheduled checkbox.
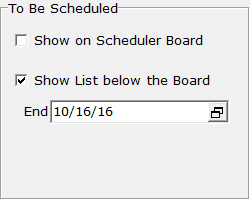
The scheduler board now has these To Be Scheduled view options:
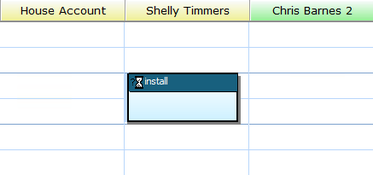
- Show on Scheduler Board - View To Be Scheduled events on the scheduler board to determine if there are schedule conflicts. To Be Scheduled events viewed on the scheduler board are outlined in black and display an hour glass symbol.
- Show List below the Board- View To Be Scheduled events in a list. Enter an End date to view only events up until the desired date. The list will only show the first occurrence of a recurring To Be Scheduled event. Dates for events appear in pink/red if they are in the past.
FrontLine 6.5.064- June 14, 2016
The Bin Description has been added to the Physical Count report.
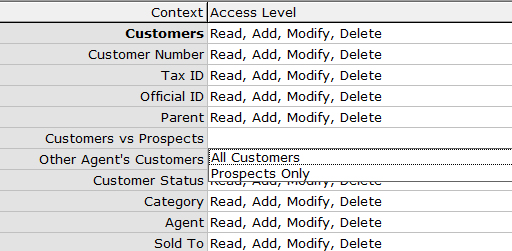
Now you can give sales people access to prospects without giving access to customer records.
- Login a system administrator, point to Setup and click Security.
- Click Access and select the access profile you would like to change.
- Select Customers in the Class field.
- There is a new security context called Customers vs Prospects. Select All Customers to have the security access settings in the Customers class apply to both customer and prospect access. Select Prospects Only to only apply security access to prospects, and have Customers remain Read Only.
- Once Prospects Only is selected, non-prospect Customer records open in a yellow read-only window. Users can add notes, add contacts, and modify contacts that are assigned to the user’s agent.
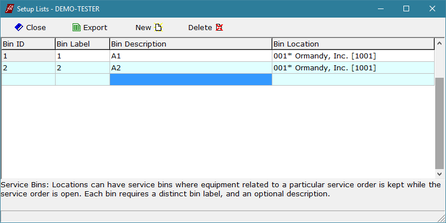
Service Bins have been added to the Service Order process. This allows you to assign a service bin to each order, view bins on order lookups, and view bins in the Customer Order window header.
1. Set up your bins in Setup/Lists in the new Service Bin list. Each bin is associated with a specific location. Bin Descriptions can be alpha-numeric, no more than 4 characters.
1. Set up your bins in Setup/Lists in the new Service Bin list. Each bin is associated with a specific location. Bin Descriptions can be alpha-numeric, no more than 4 characters.

2. Once service bins are listed, an S.Bin field appears at the top of customer orders. Assign a bin by typing in the bin description or selecting using the drop down.
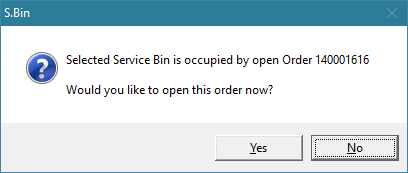
3. If you assign a service bin to a blank order, and that bin is occupied, FrontLine offers to open the order using the bin. This feature is useful for looking up orders associated with occupied bins.

4. Service Bins appear, if assigned, in the Order Type field in order lookups.
5. Changing the order location removes the assigned Service Bin. Once an invoice is ordered, the bin becomes available for reassignment.
6. Service Bins can print on forms.
6. Service Bins can print on forms.
FrontLine 6.5.063- June 1, 2016

You can now create a scheduler event from a line item with the item type Scheduled.
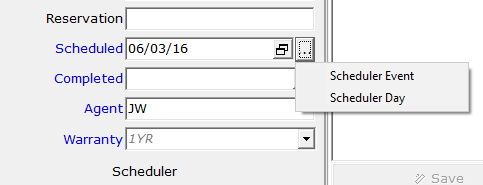
1. From a line item is not already scheduled, click Details in the bottom toolbar to open the Line Item Details window.
2. Enter a date and time in the Scheduled field.
3. Click the ellipses next to the Scheduled field and click Scheduler Event to create an event in the scheduler.
2. Enter a date and time in the Scheduled field.
3. Click the ellipses next to the Scheduled field and click Scheduler Event to create an event in the scheduler.
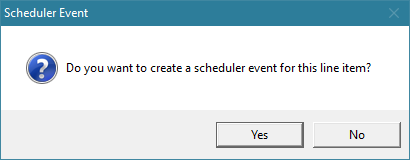
4. Click Yes at the prompt.
5. The event customer, address, contact, and location are assigned from the order’s ship-to address. The stock number is assigned from the line item.
6. The event is assigned one primary participant. In order of precedence, either the resource costs agent, line agent, order agent, or user agent is assigned. If none of these agents are designated, the event is created but unassigned to participants.
7. The begin and end date and time for the event come from resource costs, if they are assigned. Otherwise, the line item scheduled date and time is the begin date and time and the end time is determined by the quantity, in hours. For example, a labor line with quantity 5 will schedule a 5 hour block of time starting at the Scheduled date and time.
8. The line item notes are shared with the scheduler event notes. The subject of the line note becomes the subject of the event, and the body of the line note becomes the event note. Changes made to this note on either the order or the event are reflected on both note fields, as the note is shared.
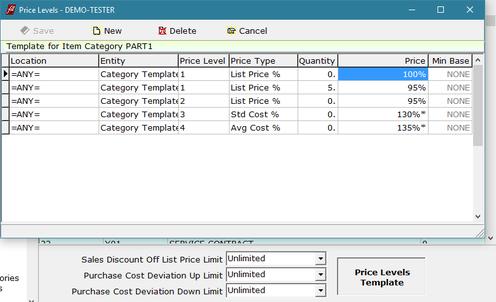
You can now set up price level templates for items by category. When you add an item to inventory, this template can be used to establish price levels.
1. In Setup/Lists, select Item Categories.
2. Select the item category you would like to set up, and click Price Levels Template.
3. The Price Levels window opens for you to enter template price levels. These template price levels must be entered as percentage prices.
1. In Setup/Lists, select Item Categories.
2. Select the item category you would like to set up, and click Price Levels Template.
3. The Price Levels window opens for you to enter template price levels. These template price levels must be entered as percentage prices.
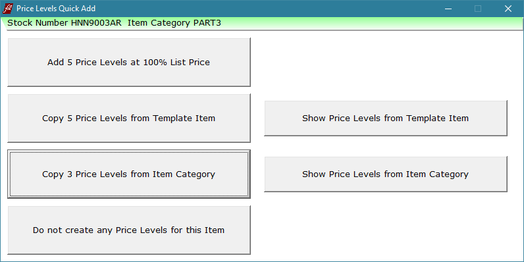
When a catalog item with no Price Levels is manually added to a Purchase Order, FrontLine offers to add this item to inventory. If you add it to inventory, FrontLine now offers a Price Levels Quick Add feature where you can choose to:
- Add 5 Price Levels at 100% List Price
- Copy Price Levels from Template Item (with option to view these first)
- Copy Price Levels from Item Category Template (with option to view these first)
May 2016
FrontLine 6.5.062- May 23, 2016
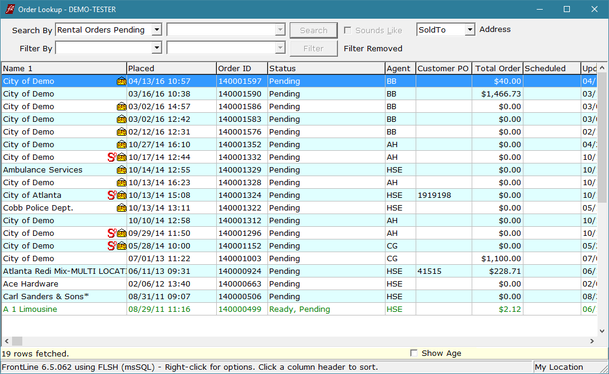
Orders in a rental location now display the rental symbol in the Order Lookup window.
The iCalendar (ICS) attachment generated when you send an email from a Scheduler Event now specifies the event start and end in universal time coordinates (UTC). This will solve issues that may arise in differing time zones.
FrontLine 6.5.061- May 11, 2016
You can now sort recurring billing by identifier before sorting by group. The first identifier determines the sorting. Contact [email protected] to adjust your recurring billing form to use this feature.
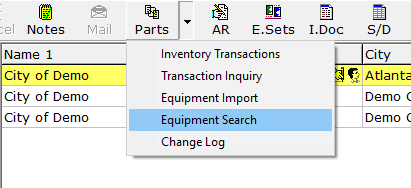
You can open Equipment Search from within the Customers window. Click the drop-down arrow next to the Parts button and select Equipment Search to open the Equipment Search window with the selected customer criteria pre-assigned.
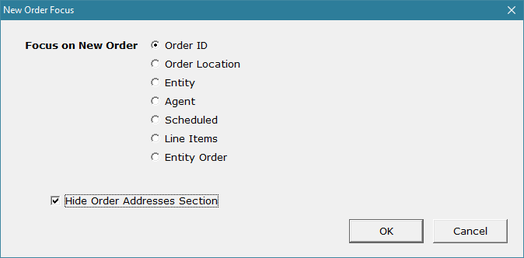
You can now hide the address section on all orders. In Company Settings, find New Order Focus and click the ellipses in the Value column. The New Order Focus window opens. Select the checkbox for Hide Order Address Section to hide Bill-To and Ship-To addresses on orders. You can reveal the addresses on an order by clicking Zoom in the bottom toolbar.
FrontLine 6.5.060- May 4, 2016
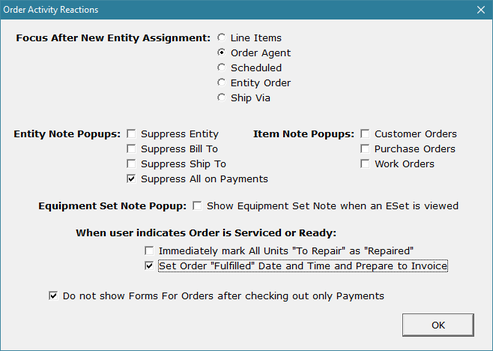
The Company Setting Order Activity Reactions option Set Order "Fulfilled" Date and Time and Prepare to Invoice now checks to be sure all line items are fully committed and identified as well as sets the fulfilled date.
A Department field has been added to Equipment Sets. Use this field to assign a department to recurring bills created. The header section of the Equipment Sets window has been rearranged.
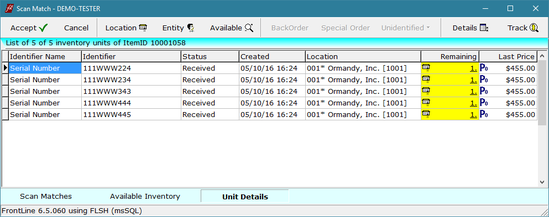
You can now look up inventory while in a Quote, but you cannot commit inventory.
- Select a line item and click Details to access the Lookup button.
- Click Lookup to open the Scan Match window to see available inventory.
- In the Unit Details tab in the Scan Match window, the Last Price column displays the last transaction price.
- If the last transaction was a purchase order or adjustment, the cost is displayed along with a bold Po symbol.
Labels now includes the word Period to allow renaming of the period column that appears when creating rental orders.
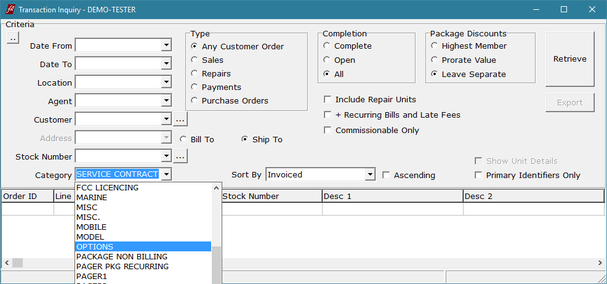
Transaction Inquiry can now be filtered by Item Category.
The FrontLine Logon window now uses font size 12, and current station setup now offers a font size 16 option for improved usability on HD displays.
April 2016
FrontLine 6.5.059- April 20, 2016

You can now enter text that will print on receivable statements based on the oldest receivable. In Setup/Lists, select the list for Receivable Age. In the Statement Text column for each age bracket, enter the text you would like to see appear on statements. The text for the highest days overdue will print on the statement. If you would like to use these statement texts, please contact [email protected] to have your receivable statement form changed.
Several new enhancements have been added to Inventory Valuation:
1. An Inventory Account criteria has been added to narrow search results by GL account.
1. An Inventory Account criteria has been added to narrow search results by GL account.
2. A direct link to Inventory Transactions has been added to the context menu. Right-click in the grid to access the Inventory Transactions selection.

3. Multiple Inventory Valuation results are now stored until logoff. Click Clear to delete stored valuations. Saved results can be reopened quickly, without re-evaluating, by double-clicking the valuation entry in the list.
4. You can compare two valuations on the list by selecting two using CTRL+Click. The two valuation results are highlighted, and you can compare them by clicking Compare 2 Valuations.
This opens a window that shows only differences in Quantity or Value for an item per location.
FrontLine 6.5.058- April 8, 2016

You can now change order identifiers on an order after it is closed. The user must have full Read, Add, Modify, Delete permits for the Order Identifier Document security context under Customer Orders to do this.

The Bank Deposit drop-down listings in the customer order window now show the current value of the batch. The status bar in Customer Orders displays the Batch Name for Bank Deposits when you hover over the Bank Deposit ID.
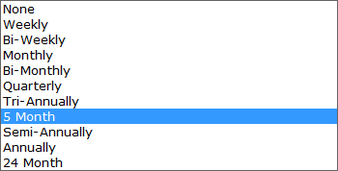
There is a new 5 Month option for Bill Frequency.
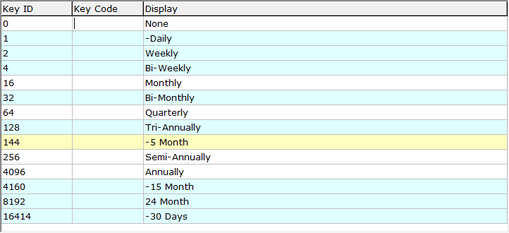
If you do not want to see this option, you can remove it in Setup/Lists by putting a hyphen in front of the Display text.

The non-text options in Transaction Inquiry are now sticky per user.

You now see a note icon on Equipment Set member lines with notes.
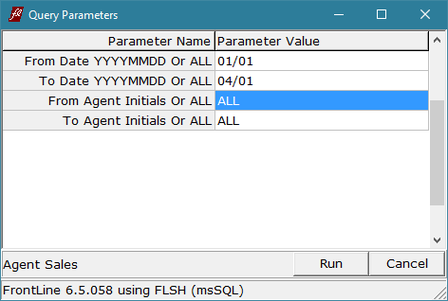
Dates on reports that export to Excel can now be entered in FrontLine’s date format. Custom report parameters with a date now recognize dates entered in FrontLine's date format.
In User Options, when the User Agent priority on new orders is OFF:
If you change a customer order's ship-to address, or assign a new customer, the agent indicated by the new ship-to address (or new customer) is assigned to the order even if the order already has an agent assigned.
The situations below remain as before:
If you change a customer order's ship-to address, or assign a new customer, the agent indicated by the new ship-to address (or new customer) is assigned to the order even if the order already has an agent assigned.
The situations below remain as before:
- If the order already has line items, the agent assigned to the line items is not automatically changed.
- If the new customer and ship-to address have no designated agent then the agent already assigned to the order is left unchanged.
- If User Agent priority on new orders is turned ON, then changing the order customer or ship-to does not change the order agent.
March 2016
FrontLine 6.5.057- March 11, 2016

You can now sort your recurring billing by Group. In Recurring Billing Output, select Group from the sort by selection. These selections are sticky.

A Bill of Materials (BOM) can now be automatically grouped together in Equipment Sets. If set eligible, all lines from a bill of materials will join the ESet under the same group.
February 2016
FrontLine 6.5.056- February 25, 2016
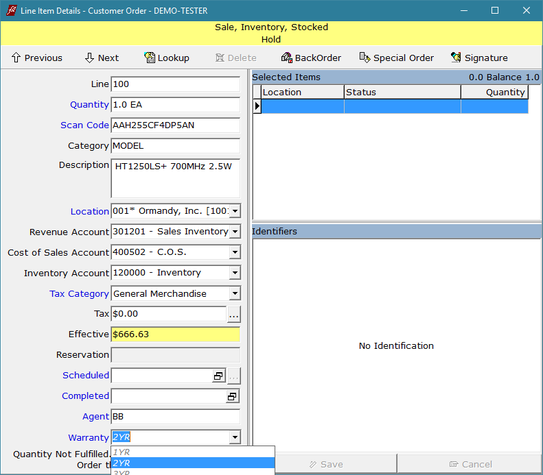
You can now assign a Custom Unit Warranty at the time of sale. This is to keep track of extended warranties. In the Line Item Details for the unit, select the duration of the full warranty period. For example, if the customer purchases a 3 year warranty, select 3 year from the Warranty drop-down selector to indicate the length of the warranty coverage. The warranty dates are assigned at the time of invoicing.
This override warranty is applied to all units committed to the line at time of check-out, instead of the standard warranty indicated for the model, unless they have a custom unit warranty, which takes highest precedence.
This override warranty is applied to all units committed to the line at time of check-out, instead of the standard warranty indicated for the model, unless they have a custom unit warranty, which takes highest precedence.

There is a new item status flag that can be used to only apply depot repair if a unit is under warranty. Select the flag Depot During Warranty to apply the depot repair start and end dates only when a unit is still covered by warranty.
There is now security for Warranty Vendor in the Unit Warranty group in Setup/Security/Access. You must have security for this context to be able to change the unit warranty on a line item.
FrontLine 6.5.055- February 12, 2016
When creating a Purchase Order manually, adding an item to a blank PO now opens the scan match window to show you the different vendors and their last cost so you can select the vendor to purchase from.
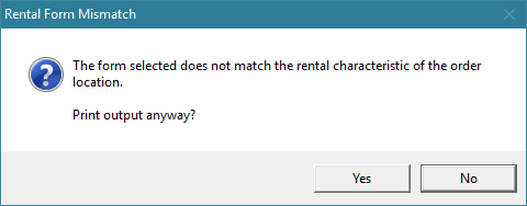
FrontLine forms will now prompt you to pick the rental forms rather than regular sales forms when you print a rental order. This feature is for companies that use different forms for rentals. When printing a form at a rental location, FrontLine will check that the word rent is included in the file name of the form. If there is not a match to the word rent on the form selected, FrontLine will warn you with a Rental Form Mismatch prompt.
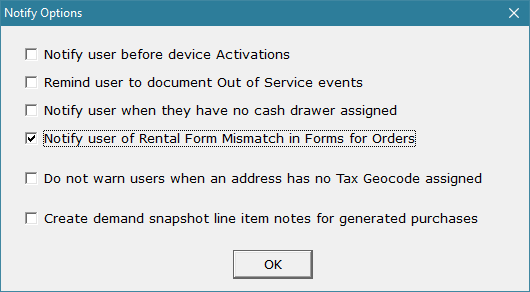
If your company uses separate rental forms, you can turn on the Rental Form Mismatch prompt in the company setting Notify Options. Select the checkbox for Notify user of Rental Form Mismatch in Forms for Orders.
FrontLine 6.5.054- February 8, 2016
Transaction ID reference for Credit Card Refunds has been improved to reduce refund rejections by the payment gateway.
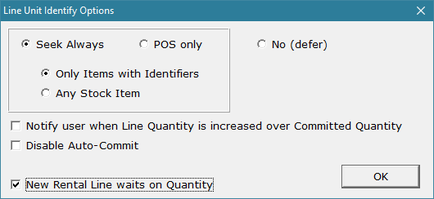
You can now have the cursor on rental items automatically go to quantity rather than price. In the Company Settings, open Line Unit Identify Options and select New Rental Line waits on Quantity.
There is now an optional Periods value on line items to indicate how many rental periods to charge the given price. Quantity, Periods, and Unit Price are multiplied to calculate the Total. The Periods column only appears on customer orders when the order location is a rental location, and it can be printed on forms.
Customer PO numbers have been expanded from 20 to 32 characters.
January 2016
FrontLine 6.5.053- January 22, 2016
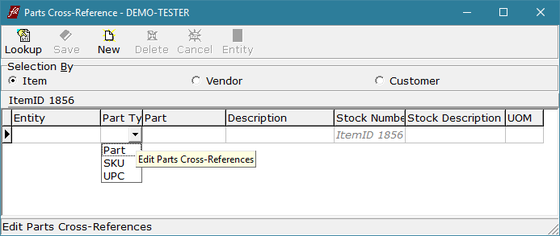
You can now use Parts Cross Reference to enter SKUs and UPCs as well as Parts. This provides you will three reference numbers, so a vendor or customer can have a different Part number, SKU, and UPC for the same stock item.
All SKU and UPC numbers entered in parts cross reference are identified from the ScanCode field. Simply scan the SKU or UPC, and select the correct item from scan match results.
All SKU and UPC numbers entered in parts cross reference are identified from the ScanCode field. Simply scan the SKU or UPC, and select the correct item from scan match results.
A Package type item can now include the same item in different Groups.
FrontLine 6.5.052- January 18, 2016
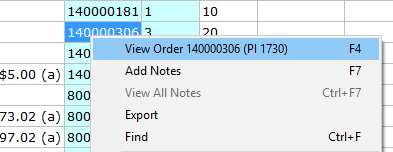
The periodic invoice number for individual invoices now appears in AR. Right-click on the invoice line in the AR grid, and the periodic invoice number appears in the View Order entry. It is displayed as (PI ####).
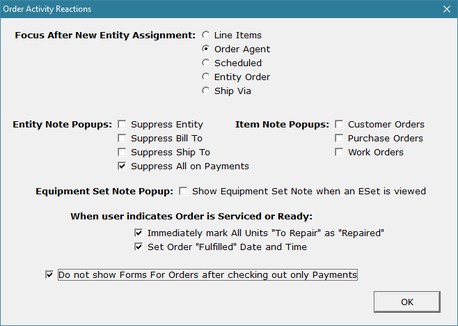
You can now skip printing forms after taking a payment. This is a company setting.
- Point to Setup and click Company & Stations
- In Company Settings, choose Order Activity Reactions and click the ellipses in the value field to open the Order Activity Reactions window.
- Select Do not show Forms For Orders after checking out only Payments. This will skip the step to print forms after making a payment order. You can still print forms by reopening the order.

There is now a Bank Deposit feature to provide you with deposit batches.
1. Click the drop-down arrow next to the POS button in the top toolbar. Select New Deposit Batch to begin a new batch. Select Close Deposit Batch to select a batch to close. Select an existing deposit batch to add to the existing batch. (users can add to batches other users have created with Modify permits.
1. Click the drop-down arrow next to the POS button in the top toolbar. Select New Deposit Batch to begin a new batch. Select Close Deposit Batch to select a batch to close. Select an existing deposit batch to add to the existing batch. (users can add to batches other users have created with Modify permits.

2. If you begin a new batch, you are given an opportunity to close all your own open batches, if any, and you can enter some identifying text.

3. You are prompted to select a customer, and then the Receivables window opens. If you had already entered a customer on the order, type “payment” in the Scancode field to open receivables.
4. Once you complete the payment, you remain in the batch as seen in the green status bar in the window header. An order that is part of a bank deposit batch displays a light green bar near the top of the window indicating the Bank Deposit ID, when it was created, and by whom. To leave the batch without closing it, close the Customer Order window.
4. Once you complete the payment, you remain in the batch as seen in the green status bar in the window header. An order that is part of a bank deposit batch displays a light green bar near the top of the window indicating the Bank Deposit ID, when it was created, and by whom. To leave the batch without closing it, close the Customer Order window.
5. You can also close deposit batches by selecting them from the Close Deposit Batch list. At this time you can revise the identifying text with confirmation information provided by the bank.
6. Although an order that is part of a bank deposit batch opens Receivables expecting to take payments as line items, you can still cancel and enter a regular line item if you choose. Regular non-payment orders will be removed from the batch after invoicing.
7. There is a new Bank Deposits security context in the Customer Orders group under Setup/Security/Access.
- Add permit allows you to create and handle your own batches.
- Modify permit allows you to add to other user's batches.
- Delete permit allows you to close other user's batches.


