Updates 6/13 - 12/14
December 2014
FrontLine 6.5.007- December 19, 2014
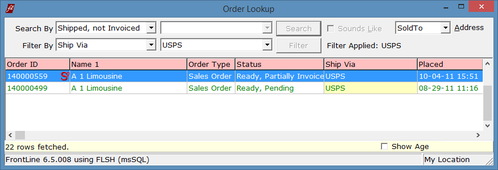
Customer Order Lookup and Purchase Order Lookup now include a filter for Ship Via. There is also a column in the lookup grid that displays Ship Via information.
FrontLine 6.5.006- December 17, 2014
St. Maarten has been added to the Countries list using code SX.
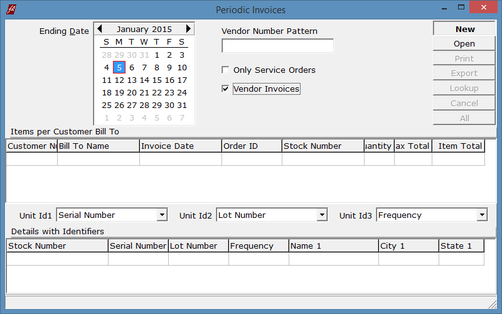
Periodic Invoicing now has a Vendor Invoices option. Select this option to collect vendor warranty invoices.
FrontLine 6.5.004- December 12, 2014
Recurring Billing and Late Fee Billing now use customer currencies when you have selected to use the multiple currencies option.
Receivables now display and handle multi-currency input. FrontLine does not yet handle the closure of receivables paid off after exchange rates change.
Receivables now display and handle multi-currency input. FrontLine does not yet handle the closure of receivables paid off after exchange rates change.
FrontLine 6.5.003- December 8, 2014

There is a new Item Status flag in the item file. This flag, Simple PO Cost, should be selected if you would like FrontLine to look at the location last cost or standard cost when creating a purchase order. Selecting this flag allows you to control costs on purchase orders by updating the item file cost manually or through catalog update. If not selected, FrontLine looks for the vendor-specific last cost when creating purchase orders.
FrontLine 6.5.002- December 3, 2014
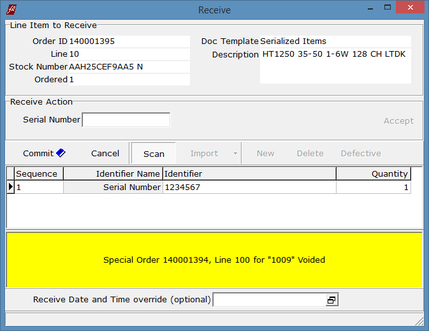
When you receive inventory for a customer’s special ordered item, if the customer order line item has been voided, the receive window will show you the order line is voided and the unit will be added to inventory. The Voided status is indicated with a bright yellow highlight.
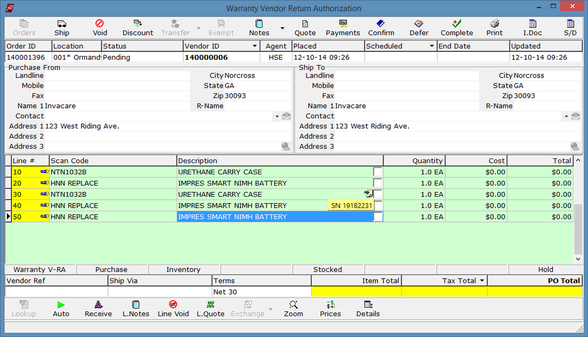
The Warranty Vendor Return Authorizations generator now generates POs for returned parts. Also, line notes added to the lines on the customer order are copied from the customer order to the Warranty V-RA.
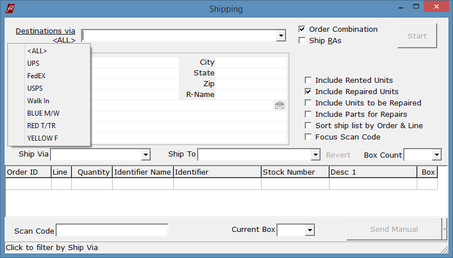
The Destinations label in Shipping is now enhanced to provide a Ship Via filter. Click on the Destination label to the left of the selection field to choose from the drop-down list of ship vias. This filters the destinations offered by the shipping method you select.
November 2014
FrontLine 6.5.001- November 26, 2014
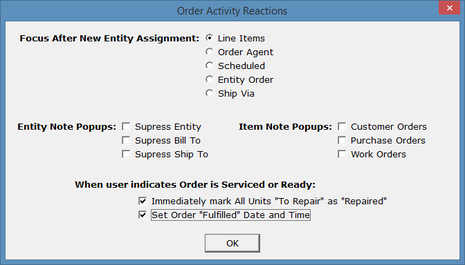
There are two new Company Settings. Point to Setup and choose Company & Stations. In the Company Settings section select the Value column next to Order Activity Reactions. There are two new options for when a user marks an order as Serviced or Ready.
- Immediately mark All Units "To Repair" as "Repaired" – This selection marks all repair units as “Repaired” when the Serviced button is clicked. This selection works with shipping when selecting “Include Repaired Units” to ship completed repairs.
- Set Order "Fulfilled" Date and Time – This selection automatically enters the date in the End Date or Fulfilled Date on the order when the Service or Complete button is clicked.
The Company Setting for MOL Vendor can now select either an individual vendor or a Vendor Category. If you have more than one Motorola vendor, create a vendor category for the Motorola vendors and assign this vendor category to each of them.
- In Setup/Lists, select the list for the vendor category. Create a vendor category for Motorola Vendors.
- In the vendor file under Maintenance/Vendors, assign this vendor category to the Motorola vendors.
- In Setup/Company & Stations/Company Settings, enter the Motorola Vendor Category in the MOL Vendor field.
- If a vendor category is chosen, then the Third Party Export MOL feature provides a drop-down list of the vendors in this category to start a new export batch.
Multiple currencies are now posted to AR during invoicing if you are using the multi-currency feature:
Receivables and payments from the order are posted in the order currency and rate.
Payment returns are posted in the currency and rate of the original payment.
Warranty invoices are posted in the vendor's default currency and rate at time of invoicing.
Note that multiple currencies are not yet handled in AR.
FrontLine 6.5.000- November 21, 2014
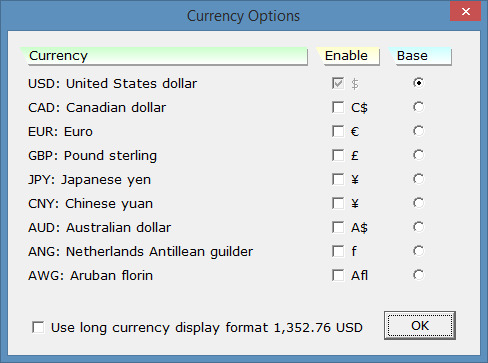
FrontLine now includes multi-currency for customers and customer orders.
To turn on multi-currency, there is a new Company Setting. Point to Setup and select Company & Stations. In Company Settings, there is a new company setting called Currencies. Click the ellipses in the Value column to open the Currency Options window. Select the Enable flag to enable supported currencies, click to select a Base currency, and choose between short symbol display format like $1,234.56 and long ISO display format like 1,234.56 USD.
The Base Currency is the currency in which all transactions are recorded. If a company's base currency is USD and they do not handle multiple currencies, then their Currency Options do not need to be set. But if their base currency is not USD, then their Currency Options should be set correctly before proceeding to use FrontLine 6.5
Changing the base currency does not revalue existing transactions, so if multiple currencies will be used then base currency should be set before adding transactions in FrontLine 6.5, or these transactions will need to be revalued manually in the database.

Once you have enabled multiple currencies, you can assign these different currencies as the default currency for customers and vendors. In the Customer file and Vendor file found under Maintenance, enter the default currency if it differs from the base currency.
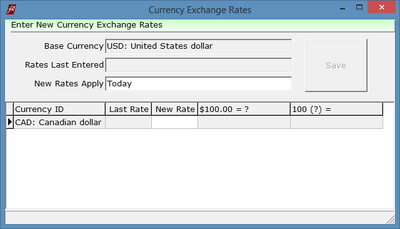
Once you have enabled multiple currencies, you must maintain your exchange rates. Point to Maintenance and click Currency Exchange to open the Currency Exchange Rates window and enter exchange rates. This selection does not appear unless currencies are set up in Company Settings. Also, you must have security to enter new rates- in Setup/Security/Access, the new Currency Exchange context must be assigned the Add permit.
When currencies are set up, FrontLine assigns the default currency and the latest exchange rate to an order when the order customer or vendor is selected. Orders are recorded in company base currency with a known exchange rate to the default currency. From the customer or vendor's perspective, the order is in their currency and is paid in their currency. If the exchange rate changes, any exchange rate adjustments must be written off.
The currency of an order cannot be changed once the order has been invoiced. All invoices from the order use the order currency and exchange rate.
You can toggle the currency display on an order by keying Ctrl-F11.
The currency of an order cannot be changed once the order has been invoiced. All invoices from the order use the order currency and exchange rate.
You can toggle the currency display on an order by keying Ctrl-F11.
FrontLine 6.4.114- November 5, 2014
FrontLine now encrypts connections to email servers using only TLS, older (SSL) encryption protocols are no longer supported.
October 2014
FrontLine 6.4.113- October 31, 2014
Date Range in the Tax Report log is now recorded in a standardized yyyy.mm.dd format regardless of the company date format.
FrontLine 6.4.111- October 24, 2014
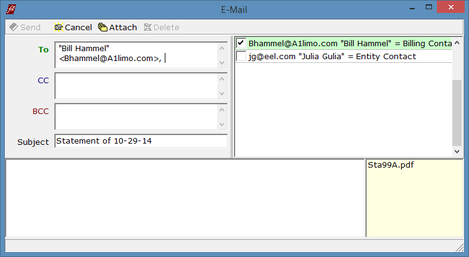
The email address helper is now available when printing individual receivable statements. The contact with the Invoicing flag selected is suggested by default.
FrontLine 6.4.110- October 24, 2014
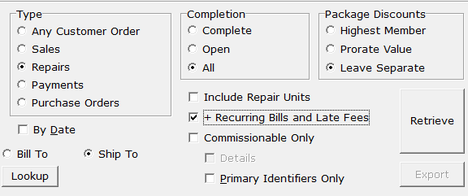
Transaction Inquiry now has a checkbox selection for Recurring Bills and Late Fees. Un-check the box to remove these transactions so they do not clutter the view of other transactions.
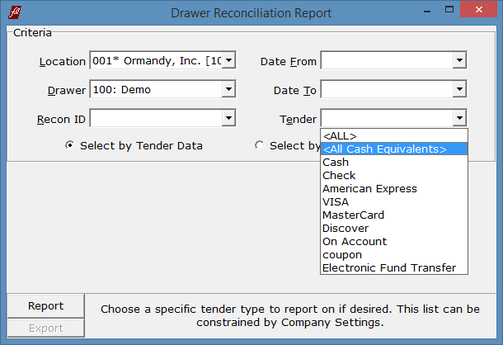
There is now an All Cash Equivalents option for Tender choices in the Drawer Reconciliation Report. Point to Inquiry and click Cash Drawers to open the Drawer Reconciliation Report window. Select All Cash Equivalents to select all but On Account tenders.
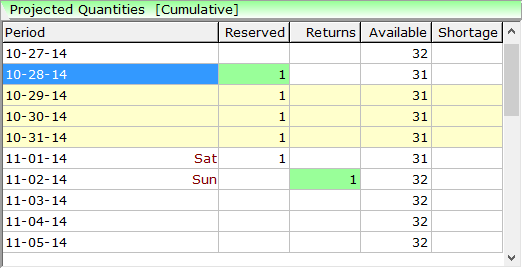
Rental Reservations now provides you with cumulative reserved quantities in the projected quantities list. Click the colored tile above the Projected Quantities to turn on this option. Relevant information is highlighted in the grid when selected.
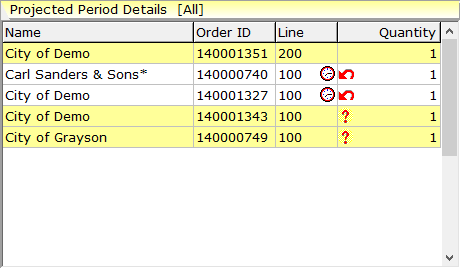
There is now an All toggle for the Projected Period Details in Rental Reservations. Click the colored tile above the Projected Period Details to view all details. Relevant information is highlighted below when selected.
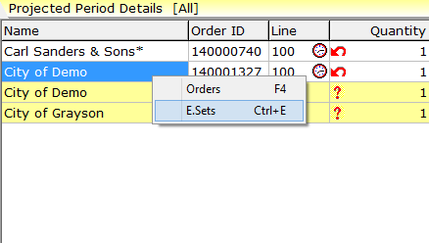
In Rental Reservations, late pick-ups that are past the end of their reservation are now excluded altogether. Within their reservation period, late pick-ups are included and shown in Projected Period Details with a clock icon. Late returns still rented out past their scheduled return date are also indicated with a clock icon. To view the relevant equipment set, right-click and select E.Sets.
FrontLine 6.4.109- October 17, 2014
The Location filter in Identify Unit is now sticky past log off per user.
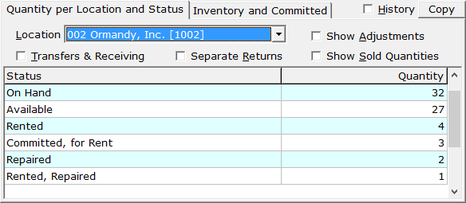
Rented units now appear as inventory in the Item Quantities window.
There are new separate security contexts for Miscellaneous Purchases and Warranty Vendor Return Authorizations in the Purchase Orders section of Access Profiles. An Add permit is required to autogen these types of transactions.
Warranty Vendor Return Authorization has been added to the autogen menu in purchasing. This selection is used to generate a Vendor RA for parts used in repairs of warranty covered items. These parts must be flagged in the item file with the item status flag Warranty V-RA to be included in autogen. This feature is available for users who invoice vendors for parts and service on warranty covered repairs.

To Autogen a Warranty Vendor RA:
1. Click Auto in the bottom toolbar of the Purchase Order window, and select Warranty Vendor Return Authorization.
1. Click Auto in the bottom toolbar of the Purchase Order window, and select Warranty Vendor Return Authorization.
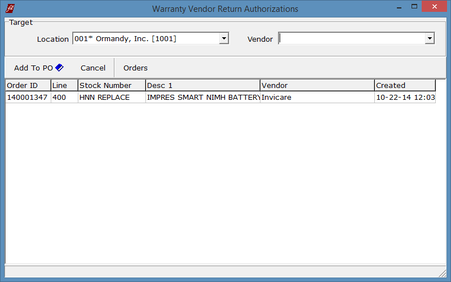
2. The Warranty Vendor Return Authorization window opens.

3. Select the Vendor. Parts awaiting V-RA appear in the grid to suggest vendors for selection. The parts suggested come from vendor warranty invoices generated from warranty repairs for customers. Once the vendor is selected, parts for that vendor are highlighted in yellow.
4. Click Add to PO to create a Warranty Vendor RA for the parts displayed.
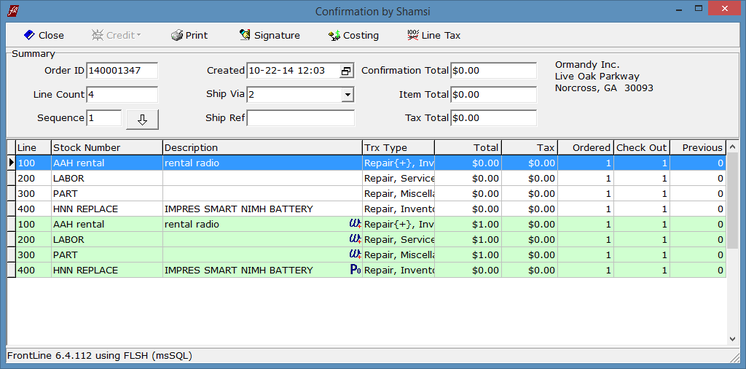
5. Once the Warranty Vendor RA is created, the parts on the V-RA are tagged as ordered. Open the customer invoice for the warranty repair, and key Alt+F8. The Invoice or Confirmation window opens, and parts ordered on a Warranty V-RA show a PO symbol. In the picture below, the first 4 white line items are the lines charged at zero price on the customer invoice. The last 4 green lines are the labor charged to the vendor and parts charged to the vendor at cost. The line marked with a PO symbol is not charged to the vendor, but instead sent by Warranty V-RA to the vendor for replacement.
5. Once the Warranty Vendor RA is created, the parts on the V-RA are tagged as ordered. Open the customer invoice for the warranty repair, and key Alt+F8. The Invoice or Confirmation window opens, and parts ordered on a Warranty V-RA show a PO symbol. In the picture below, the first 4 white line items are the lines charged at zero price on the customer invoice. The last 4 green lines are the labor charged to the vendor and parts charged to the vendor at cost. The line marked with a PO symbol is not charged to the vendor, but instead sent by Warranty V-RA to the vendor for replacement.
6. While in the Warranty Vendor RA, click Ship in the top toolbar to ship the old parts to the vendor. After they are shipped they are no longer considered in inventory quantities.
7. Replacement units from the vendor are received on the V-RA just like depot repairs on customer orders. If you are receiving a unit that is serialized, you can begin the receiving by entering the original serial number, and following the receiving process.
7. Replacement units from the vendor are received on the V-RA just like depot repairs on customer orders. If you are receiving a unit that is serialized, you can begin the receiving by entering the original serial number, and following the receiving process.
If receiving a non-serialized unit, simply add a new line item to the V-RA and select the checkbox to receive it.
8. Click Confirm to check-in the units received and complete the order.
9. Incoming units are linked to the history of the inventory unit they replaced, as seen in Unit Tracking.
10. There is a new Purchase Order Lookup selection to assist with these transactions: Open Warranty V-RAs
9. Incoming units are linked to the history of the inventory unit they replaced, as seen in Unit Tracking.
10. There is a new Purchase Order Lookup selection to assist with these transactions: Open Warranty V-RAs
FrontLine 6.4.108- October 7, 2014
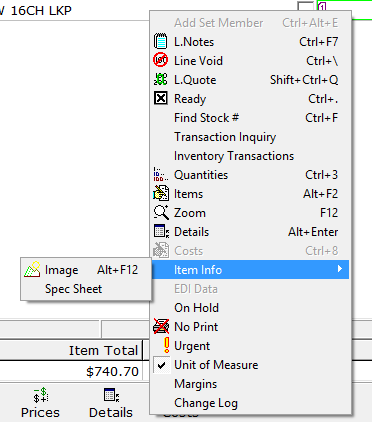
There is a new Item Info option in the line item context menu that replaces the Item Image selection. Right-click on a line item in an order, and point to Item Info. If there are images or specs linked to the item, they appear in a sub-menu for selection. The Item Image and Item Specifications entries provide links to file or web pages that can be opened.
FrontLine 6.4.107- October 6, 2014
For addresses in countries outside the USA and Canada, FrontLine will no longer prefix the current location's 3-digit area code to phone number entries when only 7 digits are typed in.
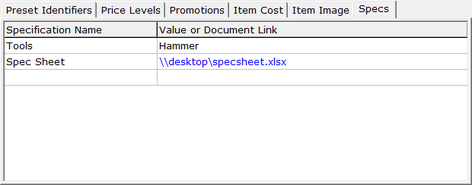
Items maintenance now has a Specs tab where multiple specifications can be listed for an item. Each entry can be one of:
- A simple text, such as
Tools Required Hammer, Drill, Wrench. - A local file reference, such as
Schematics F:\Schematics\ModelABC.pdf
Programming \\MyServer\Programming\ModelABC.xlsx - A web page reference, such as
Radio Web Image http://www.motorolasolutions.com/web/Business/SL7550ProdPhotos.jpg
Product Web Page http://www.kenwoodusa.com/Communications/Land_Mobile_Radio/Business_-_Industrial/Portable_Radios/TK-480-48
FrontLine opens file and page references when you click on the link:
- Leading X:\ or \\aaa\... indicate a local file associated with a local program by file name extension.
- Leading http:// or https:// indicate a web page to open in the default browser.
September 2014
FrontLine 6.4.106- September 24, 2014
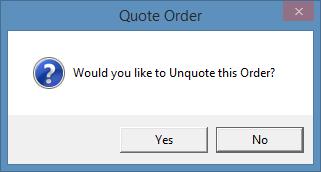
When an order is unquoted, there is now a confirmation. Also, all of its lines are also unquoted, even if they were originally created using the line quote.

When a customer order is not flagged as a quote, but all the line items are quoted using the line quote, the order itself is now flagged as a quote after check-out.
When in the Identifier Document History window, you can now put back an identifier that has been deleted from the current document. Right-click and choose Restore to put back the deleted identifier. This feature is available when the user is allowed to edit the identifier document but is not in edit mode.
You can now automatically generate a vendor invoice for warranty repairs. All parts, services, and charges assigned to equipment that is in for a warranty covered repair appear on the vendor invoice. Services and charges on the invoice are charged with the prices that appear on the customer order, unless the vendor has a specific flat price level assigned. Parts with the new Warranty V-RA flag are charged $0 on the vendor invoice. For other parts used, the warranty vendor is invoiced at a price selected in this preferential order:
- Last positive non-zero purchase cost from this vendor
- Location Last Cost
- Location Standard Cost
- Item Standard Cost
- Line item price on the customer order
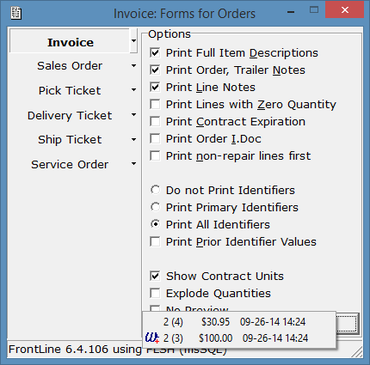
When using the warranty vendor invoicing feature, printing an Invoice during check-out of a customer order provides you with an option to print either the customer or vendor invoice. This also occurs when re-printing an invoice.
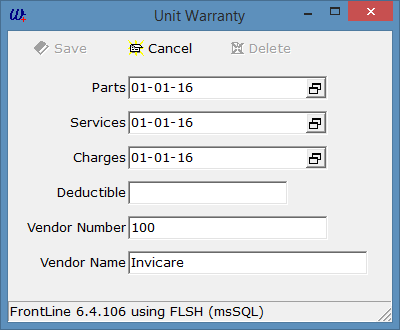
In order for the warranty vendor invoicing feature to work, warranty dates for the equipment being repaired must be assigned in the warranty window, and the warranty vendor must be specified.
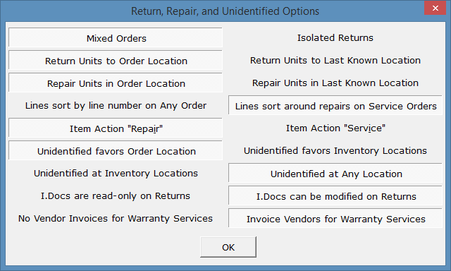
To turn on the warranty vendor invoicing feature, point to Setup and choose Company & Stations. In Company Settings, click the ellipses in the value column for the Returns, Repairs, Unidentified selection. In this window, select Invoice Vendors for Warranty Services in the last line.

There is a new feature to flag parts that must be returned to the vendor when removed from a piece of equipment. These parts should be flagged with this new Item Status flag Warranty V-RA. Selecting this flag marks this part for return to vendor when used in exchange on a warranty repair. If you use the vendor invoicing feature, this item will appear on the vendor invoice at $0, because it is returned to the vendor instead of reimbursed.
FrontLine 6.4.105- September 15, 2014
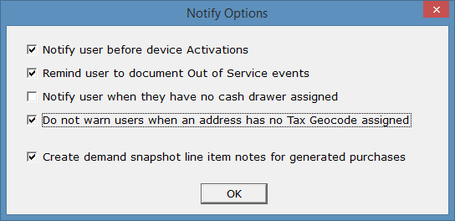
There is a new Company Setting under Notify Options- Do not warn users when an address has no Tax Geocode assigned. This option stops FrontLine from prompting users to enter Geocodes on addresses. This should only be selected when all locations where customer transactions take place have the Tax On Location GeoCode flag selected.

Third party rentals is now available for subrentals from a vendor to fulfill customer rental needs.
Any items that you will be subrenting from a vendor must be flagged with the new Item Status flag Allow Third Party.
Any items that you will be subrenting from a vendor must be flagged with the new Item Status flag Allow Third Party.

To Create a Third Party Rental:
1. A customer order line item in a rental location that is special ordered is a third party subrental. The whole quantity on the line item must be special ordered. If you would like to fulfill part of the quantity from rental inventory, create a separate line item for the third party subrental.
2. Because a customer rental line item marked for Special Order is a third party subrental, turning on or off special order on a rental line item requires any committed inventory to be deleted.
3. In the Purchase Order window, use the Auto Generate Purchases feature to search for third party rental demands. Select the rental location and the flag for Third Party Rentals. FrontLine will generate a list of third party rental demands. (To create a regular PO to purchase rental inventory, select the Rental Inventory flag instead of Third Party Rentals.)
4. When third party rental units are received from a vendor they are flagged as Third Party equipment, and are committed to the customer order.
5. Third Party equipment committed to a customer order must be manually added to the equipment set. Right-click on the third party rental line and choose Add Set Member to add all the rental units on that line to the Equipment Set.
6. Complete the rental transaction as you would a regular rental transaction.
7. Return the Third Party rental equipment as you would regular rental equipment.
8. When a customer returns Third Party rental equipment, this equipment is then available to return to the vendor or commit to another customer order.
9. Third party inventory that is on hand can be committed to another customer order. To commit third party rental equipment to another order, the rental line must be selected for special order.
10. The Scan Match window will only allow you to select third party inventory for rentals that are marked for Special Order. It also only allows the selection of rental inventory for rental lines that are not Special Ordered.
11. When looking at rental reservations, you can include third party units in the quantities listed by selecting the Include Third Party Units flag in the Reservation window.
12. Neither purchasing and receiving nor customer transactions cost Third party subrental units and line items.
13. For rental locations, Inventory Valuation now has an option to include, exclude, or only show Third Party units.
14. When you create a return of a Third Party Rental PO, the Returns window indicates which units have been returned from the customer so you can select them to return to the vendor. A Third Party Rental PO can be partially returned multiple times until all units that were received from the vendor are sent back.
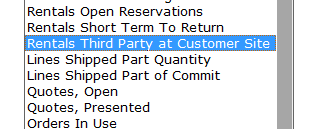
There is a new Customer Order lookup selection for finding rental equipment. The Rentals Third Party at Customer Site order lookup selection retrieves all third party rental orders that are not yet returned from the customer.

There is a new Purchase Order lookup selection to find open purchase orders for third party rental equipment. The Open Third Party Rental Orders selection retrieves all open POs for third party rentals.
August 2014
FrontLine 6.4.103- August 20, 2014
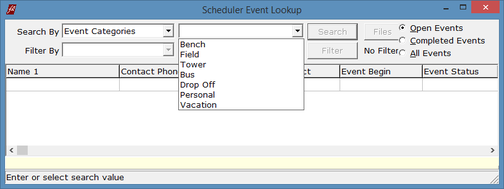
You can now search for scheduler events by Event Category. There is a column to display the event category in the lookup results, and you can select Event Category in the Search By and Filter By fields.
FrontLine 6.4.102- August 19, 2014
There is now a toggle to sort line items on service orders. Click the drop down in the line number column header to Sort Service Orders by Repair Equipment. Lines can only be inserted when they are not sorted. Toggle off the sort feature to insert line items. When the sort feature is on, charges not linked to a repair equipment line are now listed last.
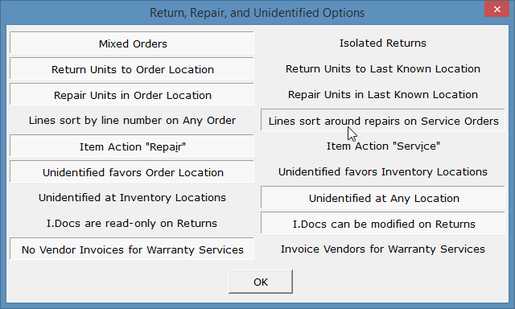
This feature is set to default to your selection in Company Settings.
- Point to Setup and click Company & Stations.
- In the Company Settings, select the Return, Repair, Unidentified value and click the ellipses to open the Return, Repair, Unidentified Options dialog box.
- Select Lines sort around repairs on Service Orders to turn on the sort feature as default.
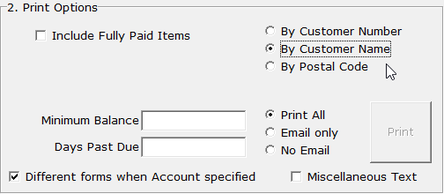
You can now sort the receivable statement before printing. The Print Summary output in Receivable Statements now follows the sort order chosen for the statements in the upper right of the Print Options section.
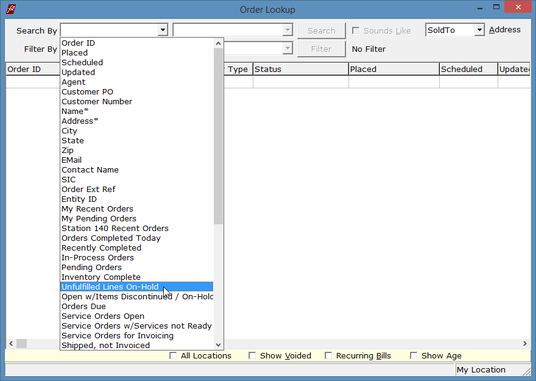
There is a new Customer and Purchase Order Lookup Called Unfulfilled Lines On-Hold. Select this to find orders with open tangible lines that are on hold and not completely fulfilled.
FrontLine 6.4.100- August 7, 2014

You can now place a line item on hold so that it will not create demands for purchasing. Right-click on a line item, and click On Hold in the context menu to put a line item on hold. The hold is indicated on the line by a green Zzz icon. The hold does not prevent you from fulfilling and checking out the line.
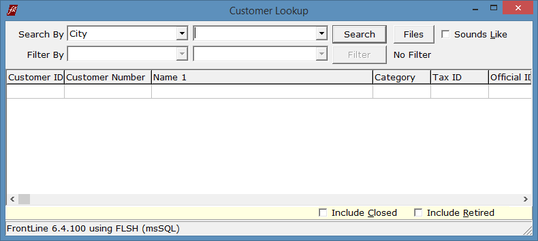
When a customer has more than 40 addresses and a user chooses to lookup an alternate address using a right-click, the lookup window opens to help find the address. The Search By field defaults to City, but if you change this, your selection defaults until logout.
FrontLine 6.4.099- August 6, 2014
Now you can view customer order numbers for special ordered items when auto-generating a Purchase Order. The Special Order column in the Generate Purchase Order window shows the order number of special orders on the purchase suggestion list.
Line items on a service order are now sorted when the order is re-opened. Line items unrelated to the repairs are first, then come the repair units, each followed by the lines attached to it. This sorting occurs when the order is deferred and opened again.
FrontLine 6.4.098- August 5, 2014
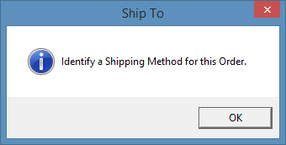
FrontLine no longer requires a Ship Via in the customer file. Instead, it is required on Customer Orders with a Ship-To address. If there is a blank ship via on the customer order, the system will prompt you to select a ship via.
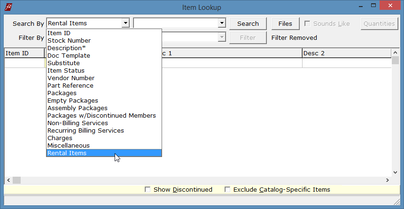
You can now search for Rental Items in Item Lookup. In the Search By field, select Rental Items. All items that have ever been in a rental location will appear in this lookup.
When you complete shipping, FrontLine now offers to print Packing Slips. This will require a packing slip form. Contact [email protected] if you would like a packing slip form.
FrontLine 6.4.097- August 3, 2014
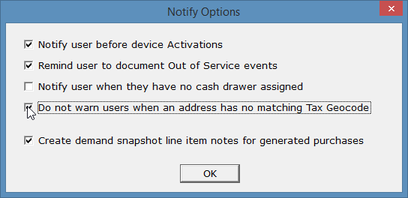
There is a new Company Setting in Notify Options for use by companies who use origin state taxes. This setting can be selected not to warn the user if an address has no matching Tax Geocode. This setting should only be applied when origin state taxes apply to all locations. This option does not apply to addresses on company locations, and all company locations should have the Tax on Location GeoCode flag selected.
July 2014
FrontLine 6.4.096- July 30, 2014
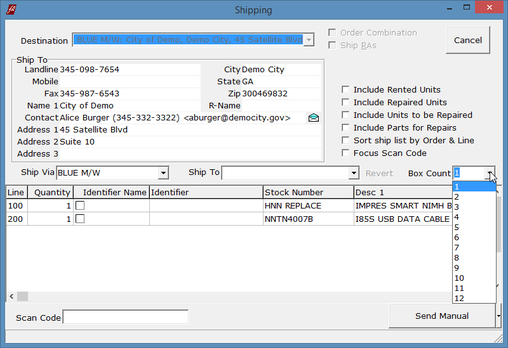
There is a new feature in Shipping for shipping multiple boxes with one tracking number. In the shipping window, you can indicate the number of boxes, allocate line items to boxes, and ship multiple boxes under one tracking number. The line details then display which box carried that item. For example, “Box 2 of 3”.
- While in an order, click Ship in the top toolbar to open the Shipping window.
- Items from the order that are allocated from inventory are available for shipping in this window. Items from other orders for the same ship-to address will also appear here for shipping.
- In the Box Count field, select the number of boxes you will need.
- Select the line items that are in the first box.
- In the Current Box field, select the next box. Then select the line items that are shipped in the second box.
- Continue selecting a box and then choosing the items in that box until all items are boxed.
- You can manually change box selections for line items in the Box column on the line item.
- Once all boxes are filled, continue shipping as usual.
FrontLine 6.4.094- July 18, 2014
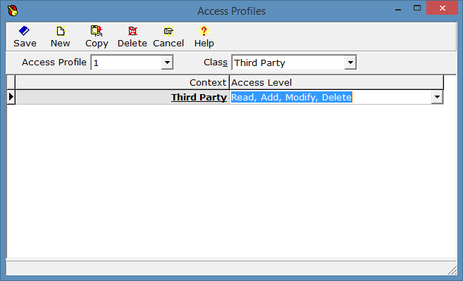
Third Party now has its own security context.
- Log in as system administrator
- Point to Setup and click Securtiy
- Click Access in the top toolbar to open the Access Profiles window.
- Select the access profile that you would like to assign permissions to in the Access Profile field.
- Select Third Party in the Class field.
- Give Read, Add, Modify, Delete permits to give full access to Third Party functions.
When using purchasing autogen, FrontLine now removes package line suggestions when the package is a special order that has no members that need ordering.
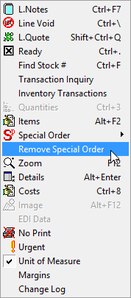
There is now a Remove Special Order option in the line item context menu for package lines on customer orders. Right-click and select Remove Special Order to take all package members off special order.
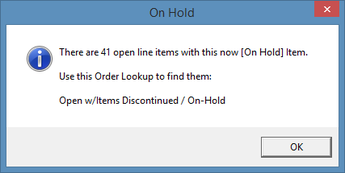
FrontLine now warns a user if an item is Discontinued or placed On-Hold while it is on open line items.
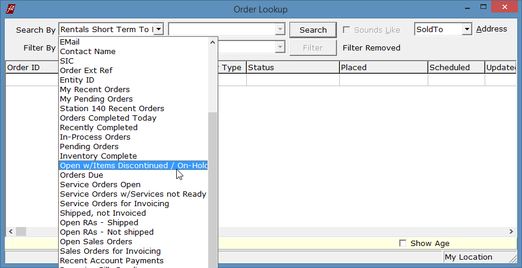
There is a new lookup for both customer orders and purchase orders called Open w/Items Discontinued /On-Hold. This lookup selection will retrieve orders with open lines whose items are discontinued or on hold in Items maintenance.
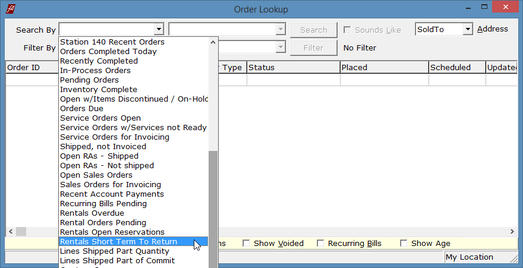
There is a new order lookup selection to assist in returning short term rental items. In the Order Lookup Search By field, select Rentals Short Term To Return to find short term rental orders that are completely fulfilled and checked out but still open to accept returns.

There is now a Receive Payment function in the bottom toolbar for taking payment on account. Click the drop-down arrow next to the Exchange button in the bottom toolbar, and select Receive Payment. This will allow you to receive a payment without typing “Payment” into the line item Scan Code field.
Note: This feature requires that the Company Setting for Returns, Repairs, Unidentified be changed to Mixed Orders. This setting should only be selected for users with AR in FrontLine.
Note: This feature requires that the Company Setting for Returns, Repairs, Unidentified be changed to Mixed Orders. This setting should only be selected for users with AR in FrontLine.

Searching for an OrderID in the Receivables window by using the Find function now searches for fully applied credits if there is no match in the receivable list.
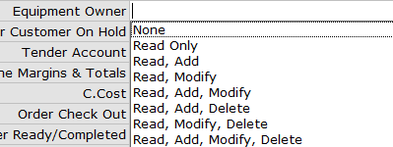
There is a new security context to prevent users from changing ownership of equipment. Under security for Customer Orders, the Equipment Owner security context must be set to Modify to allow change of equipment owner. Users without Modify security selection will not be able to change ownership of equipment. This is needed because repairing equipment sold to one customer in another customer's service order changes the equipment owner. Before, FrontLine simply asked for confirmation.
- Log in as system administrator
- Point to Setup and click Securtiy
- Click Access in the top toolbar to open the Access Profiles window.
- Select the access profile that you would like to assign permissions to in the Access Profile field.
- Select Customer Orders in the Class field.
- Scroll down in the grid below to to find the Equipment Owner context.
- In the Access Level column, select Read Only to restrict the user from changing ownership of equipment. Users with any access levels that include Modify will be able to change ownership of equipment.
FrontLine 6.4.093- July 3, 2014
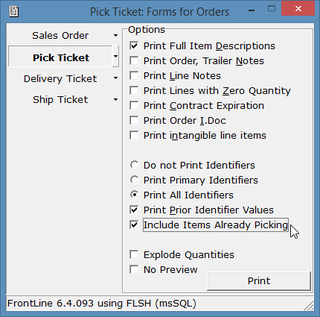
There is a new option in the Forms for Orders window for use when printing pick tickets. Select Include Items Already Picking to print a pick ticket that includes items that have already been printed on a previous picking ticket for that order. If not selected, only items added since the previous picking will be included on the picking ticket.
Reports can now include the parameters specified when running the report.
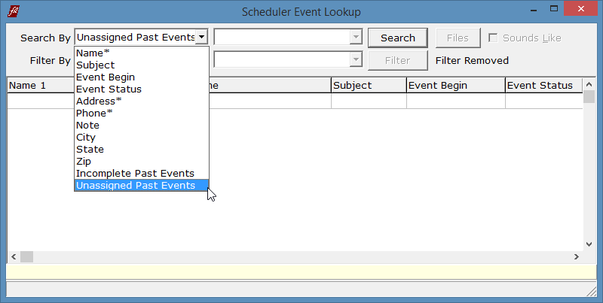
Two special searches have been added to Scheduler Event Lookup: Incomplete Past Events and Unassigned Past Events. Both of these lookup selections ignore background events.
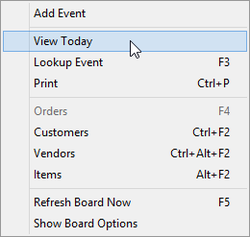
There is now a View Today option in the scheduler board context menu to make it easier to return to a view of today’s date. Right-click and choose View Today to move to a view of today's scheduler board.
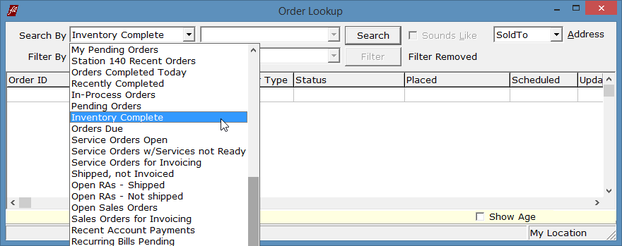
There is a new special lookup for both customer order lookup and purchase order lookup: Inventory Complete. This selection lists orders with open tangible line items in which all the ordered quantity is committed from inventory.
June 2014
FrontLine 6.4.092- June 27, 2014
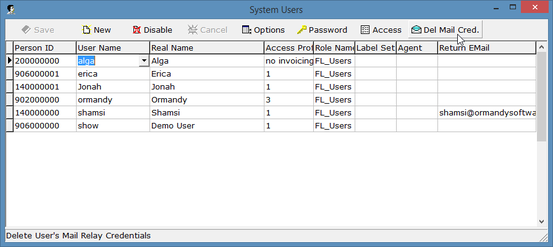
There is a new button in security setup that will delete a user’s mail relay credentials. This function should be used if your mail relay is not allowing you to send email out of FrontLine. This might occur if your mail relay or password has changed. Once your credentials are deleted, FrontLine will prompt you to enter your new credentials the next time you attempt to send an email out of FrontLine.
- Login as System Administrator
- Point to Setup and click Security. The System Users window opens.
- Select the user whose credentials you would like to delete, and click Del Mail Cred in the top toolbar.

There is now an option to create a return of a line item in the bottom toolbar of customer orders. Click the drop down arrow next to the Exchange button in the bottom toolbar, and select Return Next Scan. When you select this option before scanning for a new line item, a return is assumed instead of a sale or rental. This facilitates refunds of intangibles (services and charges) and returns of unidentified rental units.
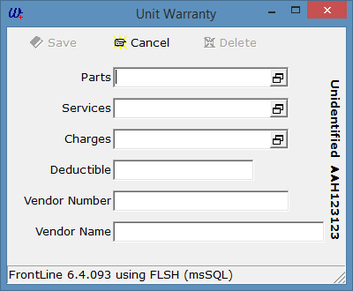
When bringing in items for repair, units that are brought in as unidentified prompt for adding warranty information after you add serial number and other identifiers. This occurs for unidentified units only if they usually carry a warranty when sold new.
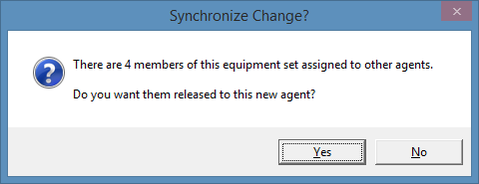
When the agent on an Equipment Set is changed, there is now a Synchronize Change feature that will reassign the new agent to every contract on that Equipment Set. The default option overrides the agents assigned on the order that created the equipment set, and replaces it with the agent indicated on the Equipment Set tab. If you click NO, the agent assigned on the original orders will remain.
There is now a 30 Day option for Bill Frequency.
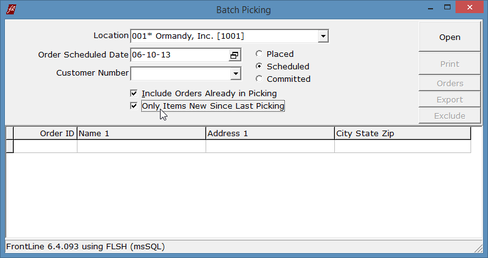
There is a new option when printing batch picking tickets. Select Only Items New Since Last Picking to only print items added to orders or received since the last time the order was picked.
FrontLine 6.4.091- June 24, 2014
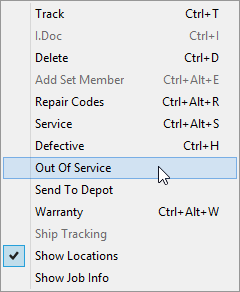
Units received back from the depot can now be marked as Out of Service or Defective. Select the receiving line for the unit, and click Details in the bottom toolbar. Right-click in the Selected Items box to choose Out of Service or Defective.
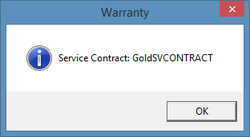
To view service contract coverage of a repair line, click the umbrella symbol. The stock number of the service contract appears in the pop-up warranty window.
The Item Description has been added to the Equipment Search.
Line items on recurring bill credits are now completely read-only.
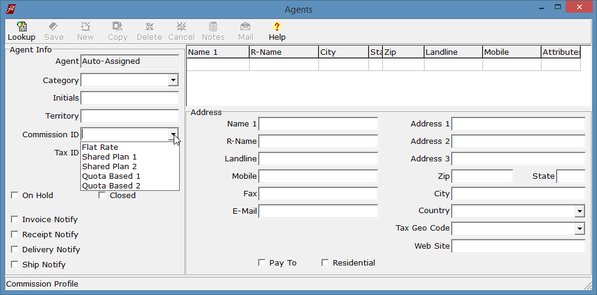
The CommissionID field in the Agents window can now be selected from a list. This Commission Profile list is set up in Setup/Lists.
FrontLine 6.4.090- June 13, 2014
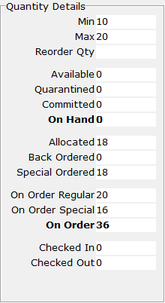
When generating purchase orders using Autogen, The On Order quantity is now also broken down into On Order Regular- for regular purchases on an open PO, and On Order Special, for Special Order purchases on an open PO.
You can now have your company name print at the top of reports. The Company Name that appears in the Company Settings is used for this function.
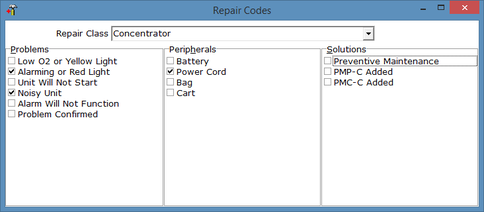
You can now set up 15 equipment Repair Code Classes with separate Problem Codes, Solution Codes, and Peripherals. When these are set up, filter your repair codes by selecting a Repair Class at the top of the Repair Codes window.
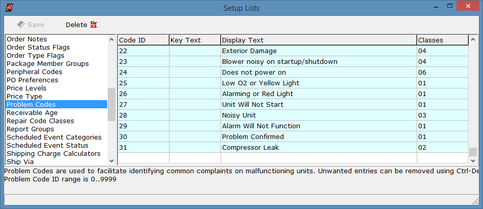
To set up repair code classes:
1. Point to Setup and click Lists. Select the Repair Code Classes list. You may enter up to 15 repair classes.
2. Once these are set up, assign repair classes to each of the repair codes lists- Problem Codes, Solution Codes, and Peripherals. The repair class is assigned in the new Classes column of these lists using binary code. For assistance with setting up repair code classes, contact [email protected].
Sending an email from the Scheduler Event window by clicking the envelope icon now includes iCalendar (.ICS) data with the email.
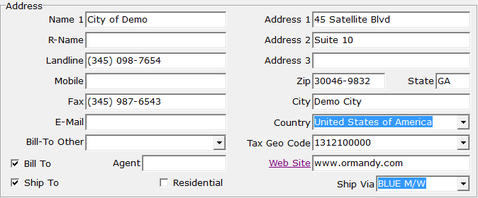
Customer, Vendor, and Location addresses can now be assigned their own Ship Via. This selection will override the main Ship Via when this address is selected for an order's ship-to.
FrontLine 6.4.089- June 4, 2014
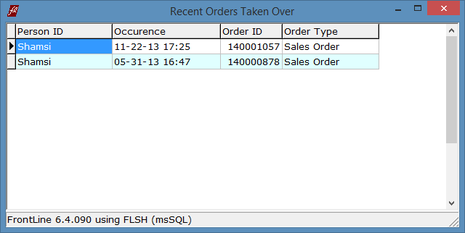
You can now view orders that were taken over by another user. Log in as the system administrator, and right-click on the yellow System Administrator bar at the bottom of the Welcome to FrontLine window. Choose Recent Orders Taken Over to view a list.

You can now flag any service or charge item with the new Item Type selection Service Order. Using this item flag will cause any order containing the service or charge to be considered a service order. This is useful when beginning service tickets without known equipment for repair such as service calls and field service orders.
The Shipping Charge Calculator can now be qualified for Sales vs Service orders.
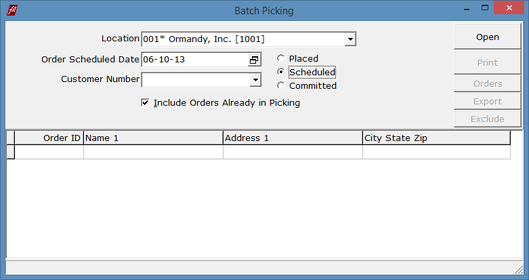
Batch Picking now has an Inventory Committed date option in addition to Order Placed, Order Scheduled, and an Export function. To select the date to use, select Placed, Scheduled, or Committed during batch picking.
May 2014
FrontLine 6.4.088- May 30, 2014
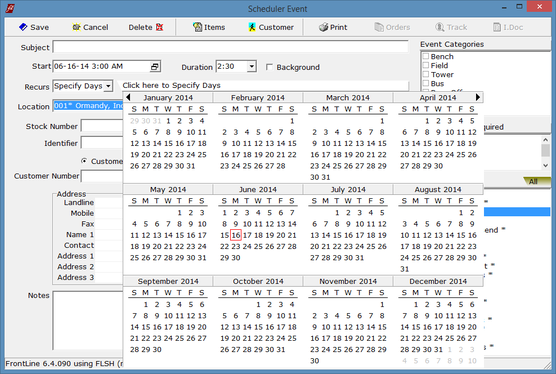
Scheduler Events can now recur on a random selection of days.
- When creating a scheduler event, in the Recurs field, select Specify Days.
- This provides a year calendar for selection of recurring days. Click days while holding down the CTRL key to select multiple days.
FrontLine 6.4.087- May 21, 2014
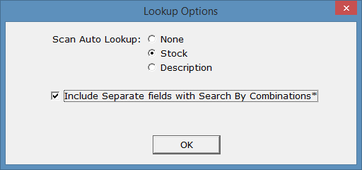
You now have the option to expand lookup options so combined fields such as Name* are separated into the fields that were merged, Name and Name 2.
- Log in as system administrator.
- Point to Setup and click Company & Stations.
- In the Company Settings, select the Lookup Options value and click the ellipses to open the Lookup Options dialog box. Select Include Separate fields with Search By Combinations to enable search by individual fields instead of merged fields. This selection will expand the Name*, Address*, Phone*, and Description* lookup selections.
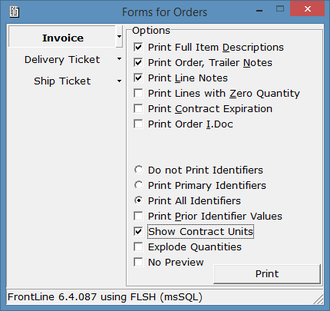
You can now print units covered by contracts on contract line items. When printing the invoice, select Show Contract Units to print a list of units covered by the service contract line item.
FrontLine 6.4.086- May 15, 2014

Statement forms now include the description “Finance Charge” if the receivable comment text is blank and the document type is a finance charge.
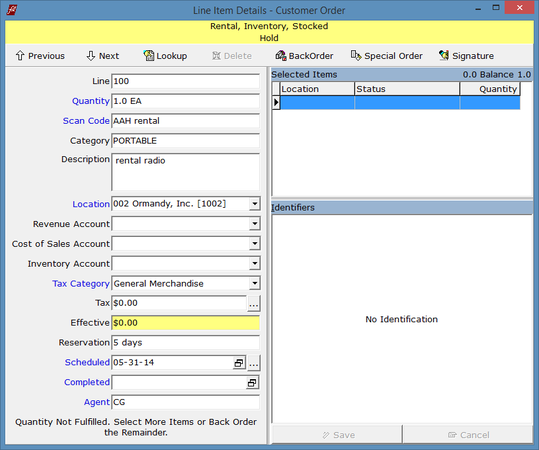
There is now a Reservation feature for rentals.
To set up a rental reservation:
1. Enter a unit for rental, and click Details to reserve equipment.
2. Rental line items are reserved starting at the date in the Scheduled field in line item details, and for a time span indicated by the number of days entered in the Reservation field. Both can be edited in the Line Item Details window.
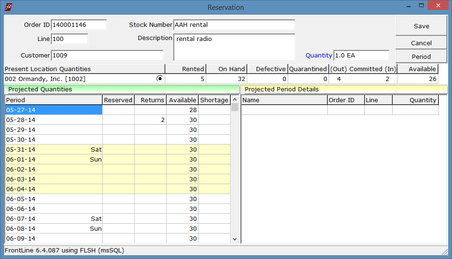
3. You can also create a reservation using the Reservation window. Right-click on a rental line item, or the keystroke shortcut CTRL+’ to open the Reservation window. The Reservation window can also be opened from the Line Item Details window- click the ellipses next to the Scheduled field, and click Reservation.
In the Reservation window, information about the rental inventory selected appears at the top of the window. Information about projected quantities appears in the grid below.
In the Reservation window, information about the rental inventory selected appears at the top of the window. Information about projected quantities appears in the grid below.
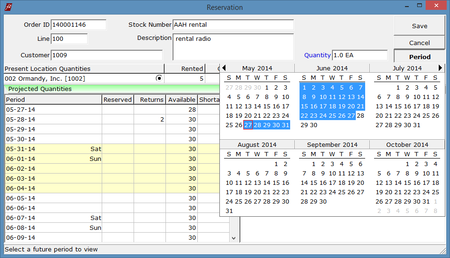
4. To select a period of days to view, click the Period button on the right, highlight a quantity of days from the Period calendar, and press ENTER. The days you selected appear in the projected quantities grid below.
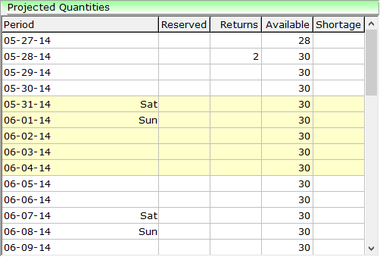
5. Select a rental location if needed. The location of the rental order is the default location.
6. The Projected Quantities list shows reserved quantities, expected returns based on reservation time spans, and shortages to fulfill the desired quantity entered in the Quantity field.
6. The Projected Quantities list shows reserved quantities, expected returns based on reservation time spans, and shortages to fulfill the desired quantity entered in the Quantity field.
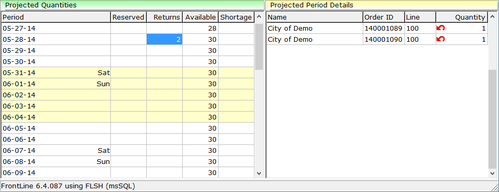
7. Select the range of days in the Projected Quantities list by using a right-click to mark the begin and end days. The selected date range will already be highlighted if they have already been selected in the Line Item Details window’s Scheduled and Reservation fields.
8. The Projected Period Details grid on the right shows projected outgoing and incoming rental order line items for the day selected in Projected Quantities to the left.
9. Once your selection is complete, click Save.
8. The Projected Period Details grid on the right shows projected outgoing and incoming rental order line items for the day selected in Projected Quantities to the left.
9. Once your selection is complete, click Save.
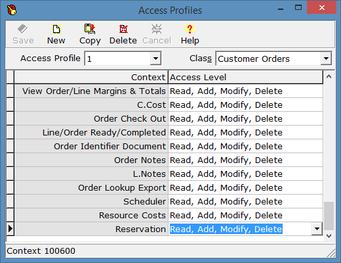
To activate reservations:
There is a new permit context for Reservation under Customer Orders.
There is a new permit context for Reservation under Customer Orders.
- Login as System Administrator, point to Setup and click Security.
- Click Access to modify user access permits.
- Select Customer Orders in the Class field, and assign security for Reservation.
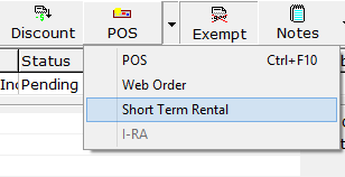
You can now create Short Term rentals. By default, an order creates long term rentals. To make a short term rental, select the drop-down arrow next to the POS button in the top toolbar, and click Short Term Rental before renting units. A short tern rental is different from a long term rental in a few ways:
- Orders flagged for short term rentals will place rental equipment in a non-billing equipment set rather than in a billing equipment set. This means short term rentals will not be billed in recurring billing.
- Short term rentals do not close when they are invoiced. These orders can be re-opened so that equipment can be returned and additional charges be transacted on the original order. All rental items must be returned, and the order must be invoiced a second time to close the transaction. You can manually close a rental order without returning equipment by opening an invoiced short term rental order and invoicing again without adding any equipment return lines. If you choose to close orders this way, rental equipment can be returned on a separate order.
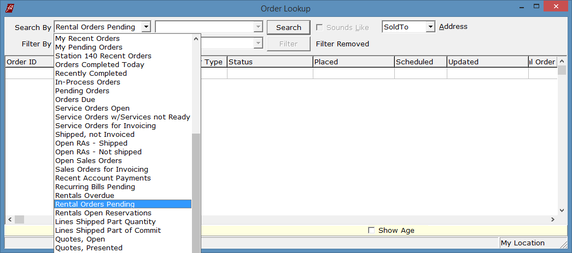
There are three new customer order lookups: "Rentals Overdue", "Rental Orders Pending" and "Rentals Open Reservations". Rentals Overdue will find orders with rentals that are past due to be returned according to their reservation. Rental Orders Pending will find rental orders that are open. Rental Open Reservations will find open rental orders that have reservations.
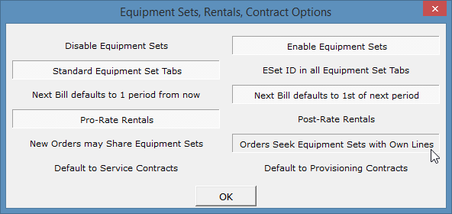
FrontLine will now automatically create new billing equipment sets for new contracts entered. This option is located in the Company Setting Equipment Sets, Rentals, Contract Options. Select Orders Seek Equipment Sets with Own Lines to activate this feature. Selecting this option makes FrontLine find an Equipment Set with existing members from the same order, or automatically create a new equipment set. If you do not move members manually, this option creates a new ESet for every order. It could also create more than one ESet for one order, for example if the order adds both billing and non-billing members.
April 2014
FrontLine 6.4.085- April 15, 2014
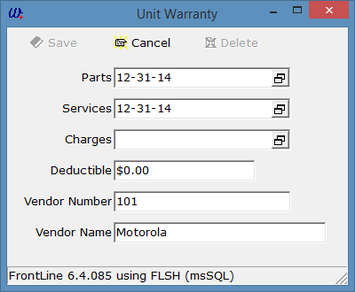
Clicking the umbrella icon on a line item now offers to show the unit warranty record. If you click YES, the warranty window opens to display detailed warranty information including the warranty vendor, if assigned.
Service quotes are now available for serialized units. This feature requires two new Company Settings described below.
To quote a repair:
To quote a repair:
- Enter units in for service in an order.
- Click Quote in the top toolbar to change the order into a quote. The line items will retain the unit serial number and other identifiers.
- Parts and services can be entered on the service quote and assigned to a quoted repair unit line.
- When you unquote an open quote or create a new order from a presented quote, FrontLine will recommit repair units that were assigned to a repair unit line item.
- You can also begin a repair quote by entering repair units directly on a quote using an identifier such as a serial number. These units will retain their serial number identification as well.
- For service quotes, or orders that contain quoted repair service line items, there is a new Service Quote available for printing in Forms for Orders.
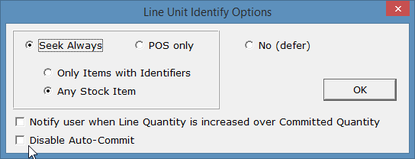
For the Service Quote feature to work, the following Company Settings must be applied:
1. The company setting Disable Auto-Commit in Line Unit Identify Options must be turned off.
1. The company setting Disable Auto-Commit in Line Unit Identify Options must be turned off.
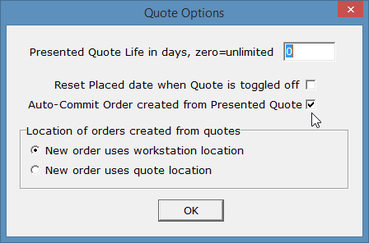
2. The company setting Auto-Commit Order created from Presented Quote in Quote Options must be turned on.
March 2014
FrontLine 6.4.084- March 31, 2014
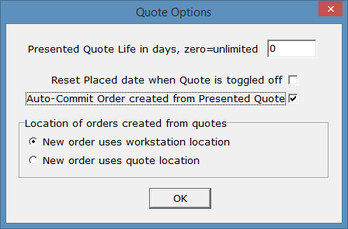
There is now an option to automatically commit inventory when changing a presented quote into an order.
Note: This setting does not override the global option to Disable Auto-Commit in the Line Unit Identify Options company setting.
- Log in as System Administrator. Point to Settings and click Company & Stations.
- Select the company setting Quote Options. Click the ellipses in the value field to open the Quote Options dialog box.
- Select Auto-Commit Order created from Presented Quote to turn on this feature.
Note: This setting does not override the global option to Disable Auto-Commit in the Line Unit Identify Options company setting.
FrontLine 6.4.083- March 28, 2014
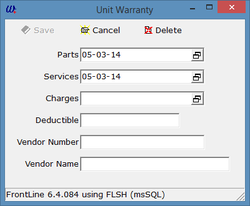
The Unit Warranty window now displays and accepts input for both Vendor Number and Vendor Name. This feature is used for invoicing vendors for warranty service.
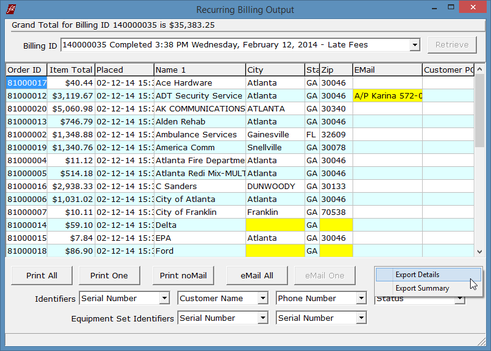
There are now two exports from Recurring Billing Output:
Export Details exports the customer number, line count, price min, price max, price total, order ID, and terms. This is the same export found on previous versions of FrontLine.
Export Summary exports the information shown in the window grid.
Export Details exports the customer number, line count, price min, price max, price total, order ID, and terms. This is the same export found on previous versions of FrontLine.
Export Summary exports the information shown in the window grid.
FrontLine 6.4.082- March 26, 2014
There is now a shipping charge calculator for automatic assignment of freight charges on orders and quotes based on order totals and vendor item totals. More specifics on this feature are coming soon. For more information contact [email protected].
FrontLine 6.4.081- March 5, 2014
There is now a Days Overdue column in the Receivables window.
When a unit that was sold in a package is returned by entering the scan code, FrontLine brings in the entire package for return. Now package members can be voided individually on these returns.
The size of the Mail Relay field in Locations has increased from 40 to 80 characters.
When a unit that was sold in a package is returned by entering the scan code, FrontLine brings in the entire package for return. Now package members can be voided individually on these returns.
The size of the Mail Relay field in Locations has increased from 40 to 80 characters.
February 2014
FrontLine 6.4.079- February 24, 2014
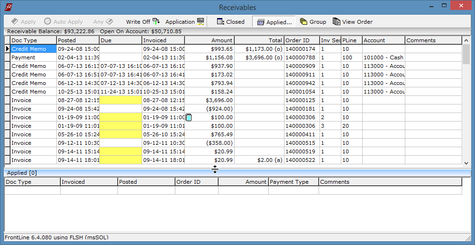
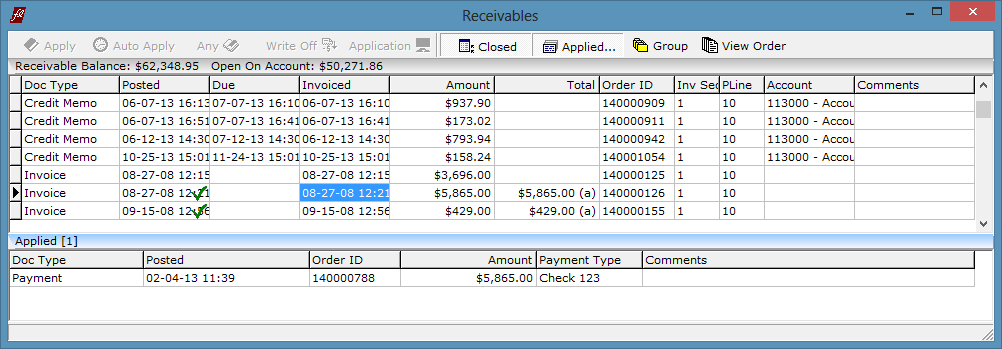
There is now an Invoiced column in the Applied list in the Receivables window that displays the date of invoicing. Also, there is now a sizer to increase vertical space for the Applied section. Point to the dividing line between the Receivables and the Applied sections to access the double-sided arrow. Click and drag to resize the Applied section.
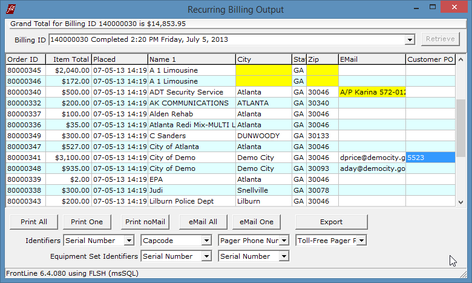
A user who has Modify access to Recurring Billing can now change the values in the Customer PO column in Recurring Billing Output.
- Login as Administrator, point to Setup, and click Security.
- Click Access in the top toolbar, and select the access profile to modify.
- Select Recurring Billing in the Class field to assign security.
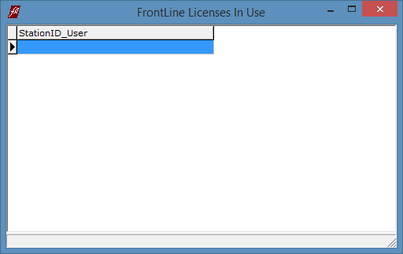
You can now view a list of FrontLine licenses in use. Log in as system administrator and click on the System Administrator link in the Welcome to FrontLine window to show a list of FrontLine licenses in use.
FrontLine 6.4.076- February 14, 2014
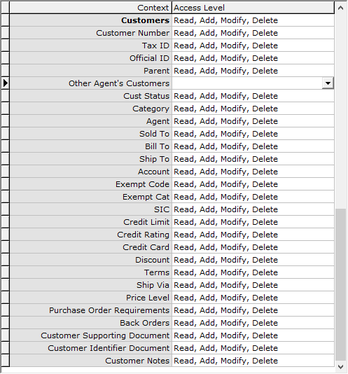
There is now an Other Agent’s Customers security context in the Customers class in security.
For the Other Agent’s Customers context, a value of None or NULL will:
- Login as administrator, point to Setup, and click Security.
- Click Access in the top toolbar, and select the access profile to modify.
- Select Customers in the Class field.
For the Other Agent’s Customers context, a value of None or NULL will:
- Cause warnings if the user does not have an Agent associated with their login.
- Show only the Agent's customers in Customer Lookup and Order Lookup.
- Only allow the Agent to open their customers in maintenance.
- Only allow the Agent to assign their customers to a customer order.
- Only allow the Agent to view customer orders assigned to the Agent in Customer Orders and Transaction Inquiry.
FrontLine 6.4.075- February 12, 2014
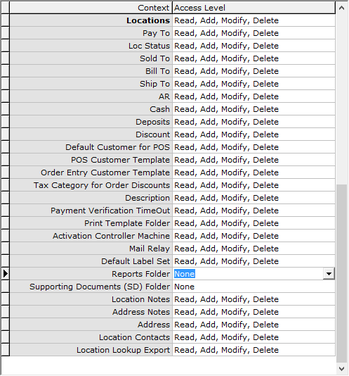
There are now separate security contexts for the two folder fields that were introduced in 6.4.070. These folders are for Reports and Supporting Documents.
- Login as Administrator, point to Setup, and click Security.
- Click Access in the top toolbar, and select the access profile to modify.
- Select Locations in the Class field.
- The new security fields are Reports Folder and Supporting Documents Folder.
FrontLine 6.4.073- February 6, 2014
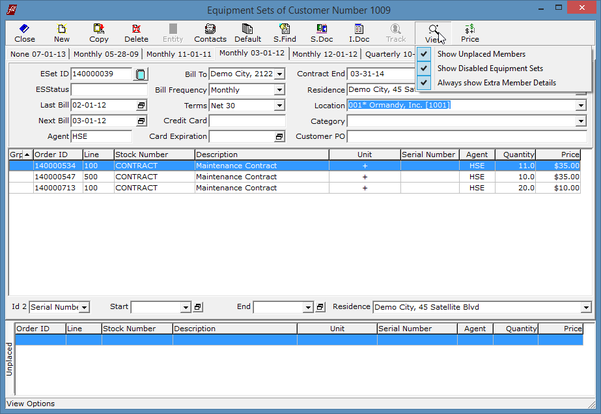
You can now filter your view of Equipment Sets. When in the customer order window, enter a customer on the order and click E.Sets in the top toolbar to open the Equipment Sets window.
Click View in the top toolbar to access the following view options. These options are sticky, so once they are selected, they remain selected after logoff.
Click View in the top toolbar to access the following view options. These options are sticky, so once they are selected, they remain selected after logoff.
- Show Unplaced Members: Select to show the Unplaced members section at the bottom of the window. This replaces the Zoom function.
- Show Disabled Equipment Sets: Select to show disabled equipment sets. If not selected, equipment sets that have been disabled or deleted are hidden.
- Always show Extra Member Details: Select to show the details section at the bottom of the contracts grid. This feature replaces the Hide* checkbox beside the Id 2 selector.
FrontLine 6.4.072- February 4, 2014
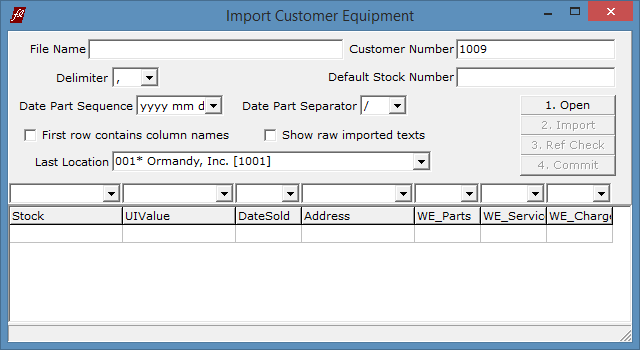
You can now import a file of customer equipment with a Stock column to indicate equipment with different stock numbers. A default stock number must still be selected before the import as a default item because the stock column is optional. The selected stock number also indicates the identifier documents to import for other stock numbers in the import file.
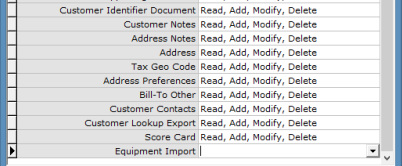
There is a new security setup for the equipment import function:
- Login as system administrator, point to Setup and click Security. Click Access in the top toolbar.
- Select the access profile to give permissions for equipment import. In the Class field, select Customers.
- Assign access levels to the Equipment Import context.
To Import Equipment:
- Point to Maintenance and click Customers. The Customer window opens. Click Lookup to select a customer.
- Click the drop down arrow next to the Parts button in the top toolbar, and select Equipment Import.
- Notice the first column is labeled Stock. This allows the selection of a stock number column from the import file. For full instructions on importing customer equipment, see
- Note: In order to import, the file you are importing must be delimited. For example, if you are importing from an Excel spreadsheet, open the file in Excel, and save it as a text (.txt) file. This file type is delimited with a tab.
- In the Import Customer Equipment window, enter the Default Stock Number of the equipment you are importing, select a delimiter (for the text file, the delimiter is a tab), select the format for dates in the file you are importing including the sequence and separator. Select the checkbox for First row contains column names and Show raw import texts if desired.
- Click 1. Open to select the file to import. Browse to choose the file from your computer.
- Use the drop down selections in the headers of the grid to select the columns you would like to import. Notice the first column is the Stock column.
- Click 2. Import to import data from the file.
- In the Address column, you have the option to select the customer address where each piece of equipment resides. These come into FrontLine if they appear in the imported file.
- In the other columns you may add or change warranty information, review imported data, and make any necessary changes before finalizing.
- Click 3. Ref Check to check for duplicate serial numbers, incorrect addresses, or other conflicting data.
- Click 4. Commit to finalize the import.
January 2014
FrontLine 6.4.070- January 29, 2014
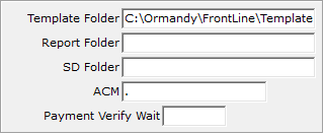
There are now two new folder setups available in the Location file. These folders, the Report folder and the SD folder, are optional. If you choose to add these folders, the Report folder will hold reports and the SD folder will hold all the supporting documents. This will leave the templates folder to hold the core function forms. If these settings are left blank, FrontLine will continue to use the Template folder as before, as a place for all forms, reports and SD files to reside together.
To add these folders, point to Maintenance and click Locations. Look up a location, and enter the pathway for the location of the folder in the Report Folder and SD Folder fields.
To add these folders, point to Maintenance and click Locations. Look up a location, and enter the pathway for the location of the folder in the Report Folder and SD Folder fields.
FrontLine 6.4.068- January 22, 2013
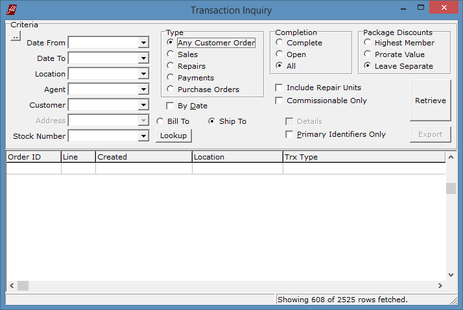
You can now search for payment transactions in Transaction Inquiry. Select Payment in the Type box to search for payments for a customer.
The Order Totals window now summarizes in rows and by basic Item Type (Inventory, Service, Charge) and overall totals. Quote totals are viewed below order totals. In the Customer Order window, click the total in the bottom right to open the Order Totals window.
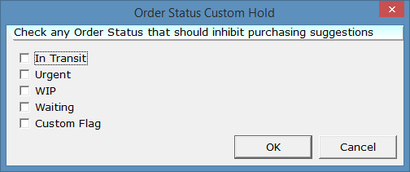
There is now a Company Setting Order Status Hold Purchasing to indicate that one of the Custom Order Status flags on a customer order excludes that order from purchasing.
- Point to Setup and click Company & Stations, and the FrontLine Setup window opens.
- In the company setting filter at the bottom of the window, type “Order Status” to filter the company settings.
- Select the setting Order Status Hold Purchasing, and click the ellipses in the value column. The Order Status Custom Hold dialog box opens.
- Select all custom order statuses that you would like to inhibit purchasing. Orders assigned to a selected status would no longer create demands in purchasing. You may create a custom status flag specifically for this purpose under Setup/Lists. (Select the list called “Order Status Flags” to add a new flag. The new flag you create will then appear in the Order Status Custom Hold dialog box.)
FrontLine 6.4.067- January 15, 2014
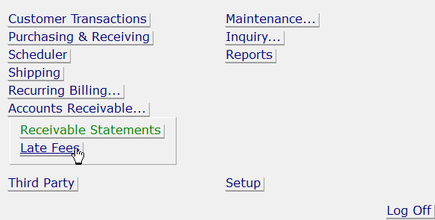
Receivable Statements has been moved from Inquiry to a new Accounts Receivable selection in the Welcome to FrontLine window.

There is now an option to choose the font size 14 in the Current Station setup. This font size is useful for small high resolution screens 1,920 pixel wide such as the Surface or a 20 inch or greater desktop screen.
- Point to Setup and click Company & Stations.
- At the top of the window in the Current Station section, click the drop down arrow next to the Font Size field and select 14. Changes will take effect after you log out.
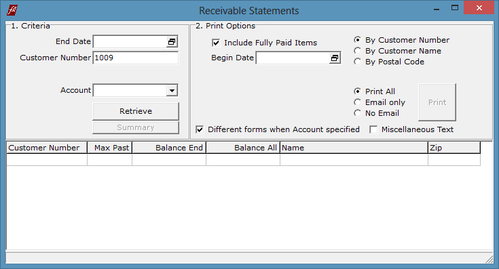
Now you can select a specific receivables account when producing a receivable statement for a single customer. This lets you use an account-specific form, and will output only the customer's receivables marked for that account. Request account-specific forms from [email protected].
- In the Welcome to FrontLine window, point to Accounts Receivable and click Receivable Statements.
- Enter a Customer Number in the Criteria fields.
- Select the receivables account from the Account drop down selection.
- In Print Options, select the Different forms when Account specified checkbox.
- Click Print.
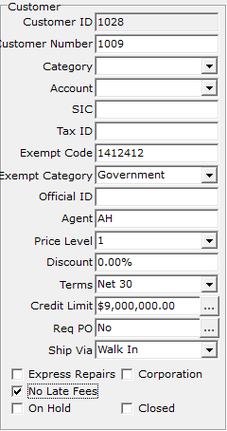
There is now an option for customers to be exempt from late fees billing. In the Welcome to FrontLine window, point to Maintenance and click Customers. Lookup a customer, and indicate that this customer will not pay late fees by selecting the No Late Fees checkbox at the bottom of the Customer fields on the left.
The Late Fees Billing feature is found under the new Accounts Receivable heading. Late fee bills are created in a similar sequence of steps to recurring bills. The late fee bills created are similar to recurring bills, except that they have only late fee line items. The following is a description of late fee billing:
- Every line item on the late fee billing is the Late Fee Item indicated in Company Settings.
- The quantity on line items is the effective percentage applied to the overdue receivable balance. For example, if the late fee rate is 24% and the receivable is two months overdue, the quantity is 4% recorded as 0.04 in the record.
- The price on the line item is the value of the overdue receivable.
- The total [Effective] on the line item is the late fee charged. The line total is calculated before rounding the applied percentage, so recalculating the Quantity x Price shown may yield a less precise value.
- The line item's Revenue account is the Late Fee Item Category Account for Income.
- The line item's Scheduled date is the due date of the receivable or the posted date of the credit that was used for interest calculation. If the receivable has previously billed late fees, then instead this is the date of the last fee billed on the receivable.
- If Late Fees are configured with a minimum charge, the minimum charge appears as line 32000 and has a quantity of 1 with a price (and total) equal to the minumum charge minus the sum of itemized late fees.
- Receivables that are part of a late fee billing process have an AR.BillingID assigned to them. This BillingID is cleared after the late fee billing is completed or cancelled.
- After a late fee billing is completed, the receivable's AR.LastFee value is updated to indicate that late fees have been charged up to that date past the due date.
- Open credits are assessed negative late fees as they reduce the net balance overdue.
- Subsequent changes to the overdue receivable will not change late fees already assessed.
- Late Fee OrderIDs always begin with 81, followed by 6 other digits. For example, 81000016.
To Set Up Late Fee Billing:
- Create a late fee item. This item is a charge, so the charge flag should be selected. In the price field of the item, enter the annual percent rate for late fees. For example, if the late fee is 24% per year, the price of the item is 24.
- Set up late fees in Company Settings.
- Point to Setup and click Company & Stations.
- In the Company Settings at the bottom of the window, find Late Fees in the Name column by typing Late Fees in the Company Setting Filter at the bottom of the window.
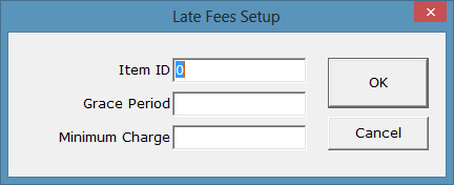
- Click in the Value column, and click the ellipses to open the Late Fees Setup dialog box.
- In the ItemID field, indicate the item that is your late fee. This item should be set up as a charge with the annual percent rate as the price. Entering a partial stock number will open item lookup to assist in selecting the item.
- You also have the option to set up a grace period and minimum charge. In the Grace Period field, indicate the number of days before late fees will be charged. In the Minimum Charge field, indicate the minimum amount late fees must reach before they will be charged.
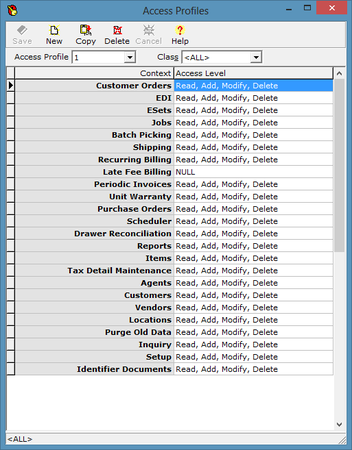
- Set up the new security context to control access to Late Fee Billing.
- Sign in a System Administrator, point to Setup, and click Security.
- Click Access in the top toolbar, and select the class to modify.
- There is a new security context called Late Fee Billing. Assign an access level to allow use of this feature.
To Run Late Fee Billing:
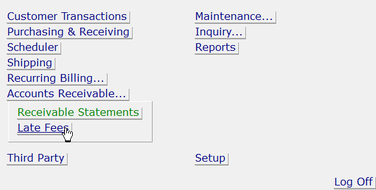
1. Point to the new Accounts Receivable heading in the Welcome to FrontLine window and click Late Fees. The Late Fee Billing window opens.
1. Point to the new Accounts Receivable heading in the Welcome to FrontLine window and click Late Fees. The Late Fee Billing window opens.

2. Step 1: Late Fee Assessment Date
Enter the Assessment Date. This is the date through which late fees will be assessed. At this time, you may also select an Issued Date if you would like the date of issue to be other than today. Click Begin.
Enter the Assessment Date. This is the date through which late fees will be assessed. At this time, you may also select an Issued Date if you would like the date of issue to be other than today. Click Begin.

3. Step 2: Batch Review
Review the late fees that will be applied and click Next when done. If you make changes to the receivables click Cancel to return to Step 1, then click Begin in Step 1 to recalculate late fees.
Right-click to access these context menu options:
Review the late fees that will be applied and click Next when done. If you make changes to the receivables click Cancel to return to Step 1, then click Begin in Step 1 to recalculate late fees.
Right-click to access these context menu options:
- Exclude- Select to exclude a late fee bill from the batch.
- Receivables- Select to view and change the receivables for this customer.
- Customers- Select to open the customer file.
- Find- Select to search within the selected column.

4. Step 3: New Receivables Assessed for Late Fee Completion
Review the new late fee billing that has been generated. Click Preview Bills to view a preview of the selected bill. Click Finish to print late fee bills. Click Export to export the late fee data. Click Cancel to cancel all the late fee bills created in the batch and return to step 2.
Right-click to access these context menu options:
- Orders- Select to view the late fee bill that has been generated.
- Exclude- Select to exclude a late fee bill from the batch.
- Receivables- Select to open the receivables for this customer.
- Customers- Select to open the customer file.
- Show Names- Select to change display to show customer names.
- Find- Select to search within the selected column.
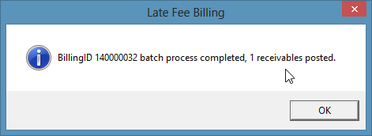
5. When you click Finish, the receivables are posted for the late fee batch.
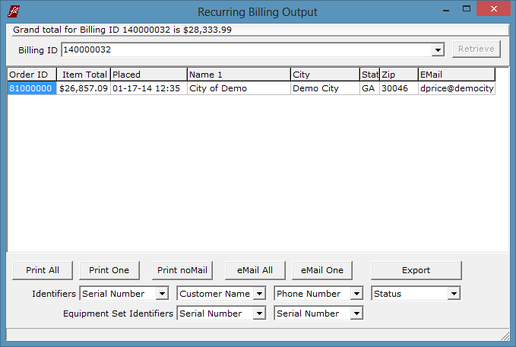
6. Click Print to print late fee bills. The Recurring Billing Output window opens.
7. Select from the following print options:
Right-click to access the following context menu options:
8. To reprint late fee bills, point to Recurring Billing and click Output Bills. In the Billing ID field, select the late fee batch to reprint, and click Retrieve to open the late fee batch for reprinting.
7. Select from the following print options:
- Print All to print all the bills
- Print One to print the selected bill
- Print noMail to print bills with no email address on file
- eMail All to email all bills that do have an email address
- eMail One to email the selected bill
- Export to export bill data
Right-click to access the following context menu options:
- Print- Select to print the bill
- Orders- Select to view the order
- E.Sets- Select to view the customer’s equipment sets. This is used for recurring billing.
- Customers-Select to view the customer file
- Find-Select to search within the selected column
8. To reprint late fee bills, point to Recurring Billing and click Output Bills. In the Billing ID field, select the late fee batch to reprint, and click Retrieve to open the late fee batch for reprinting.
December 2013
FrontLine 6.4.066- December 31, 2013
You can now assign a Parent to customers. Customers under a parent are considered members of the parent group for payment purposes, and can have their receivables paid for by the parent. There is a new security context to control access to the customer Parent field.
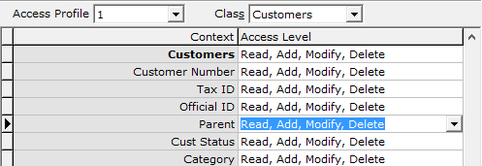
To Assign Access to the Parent field:
- Log in an administrator to access security settings. Point to Setup and click Security.
- Click Access and select a profile to modify for Parent field access.
- From the Class drop down, select Customers. Assign access for the Parent context.
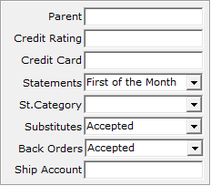
To Assign a Parent to a Customer:
- Point to Maintenance and click Customers.
- Lookup the customer.
- Click the ellipses next to the credit limit to access the Parent field.
- Enter the customer number of the parent in the Parent field, or key in the name and press ENTER to open the customer lookup and select the parent.
To Apply Payments from Parents to the Customers in their Group:
- Point to Maintenance and click Customers.
- Lookup the Parent customer.
- Click AR in the top toolbar and click Receivables.
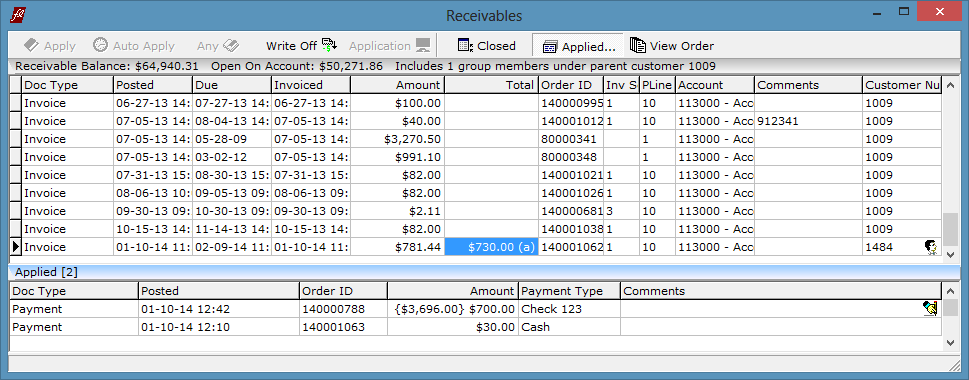
- Click Group in the top toolbar to show receivables of all members of the group, and apply parent payments to members. A pop-up box indicates the number of customers assigned to this parent.
- A head symbol appears in the Customer Number column on receivables lines belonging to customers assigned to this parent.
- When applying a payment with all members of the group displayed, a payment from the parent customer or non-payment credits from a group member can be applied to any invoice. However, a payment from one group member can only be applied to receivables of that group member.
- After a parent payment is applied to a group member’s receivable, the applied list shows the parent payment with a writing hand symbol.
FrontLine 6.4.065- December 19, 2013
In Receivables, you can now view payments applied to receivables.
- In the Customer Maintenance file, click AR in the top toolbar and click Receivables. The Receivables window opens.
- Click Applied in the top toolbar to display Applied fields at the bottom of the window. These fields list payments applied to the selected receivable.
- Right-click on the applied payment line to view the payment order.
FrontLine 6.4.064- December 12, 2013
You can now sort recurring bills when printing. In Recurring Billing Output, click a column header to sort the list. Bills will print in the sorted order. Default sorting is restored whenever a batch is retrieved.
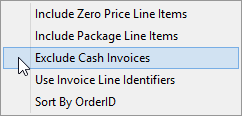
There is now an option to exclude cash invoices in periodic invoices. In Periodic Invoicing, right-click on the button bar on the right, and click Exclude Cash Invoices. This is a sticky option that affects the Periodic Invoices output. It can be toggled on and off on an existing batch.
November 2013
FrontLine 6.4.063- November 29, 2013
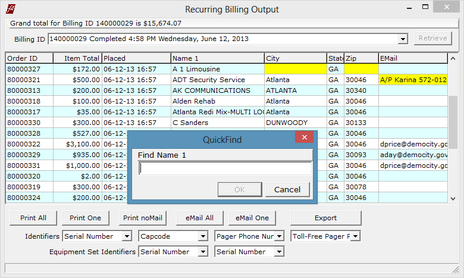
Recurring Billing Output has three new features.
- A column for City has been added.
- Now you can right-click and choose QuickFind to search for a value in the selected column.
- A yellow highlight appears if there is a missing physical address and no email address, or if the email address is invalid.
FrontLine 6.4.062- November 27, 2013
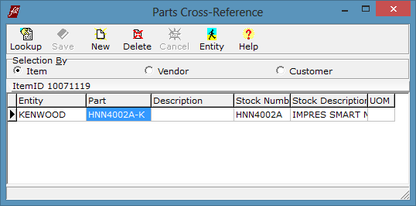
The Parts Cross Reference in the Items Maintenance file now displays the name of the customer or vendor rather than the Entity ID. An Entity ID can still be entered in this name field.
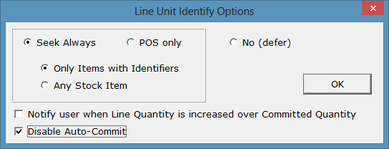
You can now completely disable the auto-commit feature. This feature commits inventory when it is placed in an order. To disable this feature:
- Point to Setup and click Company and Stations.
- In Company Settings, select the value for Line Unit Identify.
- Click the ellipses to open the Line Unit Identify Options dialog box, and choose Disable Auto-Commit.
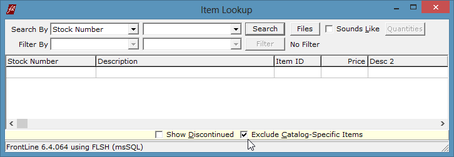
When looking up items, there is now an option to exclude catalog-specific items.
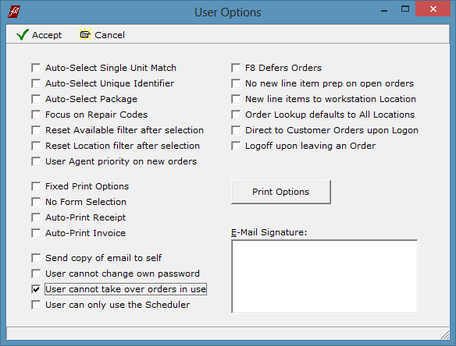
In User Options, there is a feature to stop users from taking over an order that is in use.
- Log in as the system administrator.
- Point to Setup and click Security.
- Select a user, and click Options to open User Options.
- Select User cannot take over orders in use.
FrontLine 6.4.061- November 21, 2013
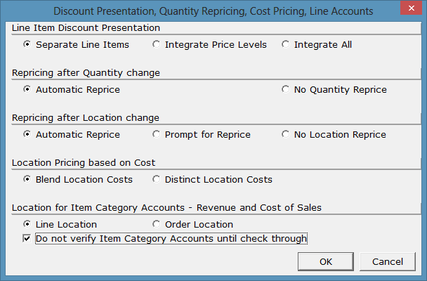
There is now an option in company settings to specify when Item Category Accounts will be verified.
- Point to Setup and click Company & Stations.
- In the company setting Discount Presentation, Repricing, Cost, LA, click the ellipses in the value column to open the dialog box.
- Select Do not verify Item Category Accounts until check through to defer verification of line item accounts.
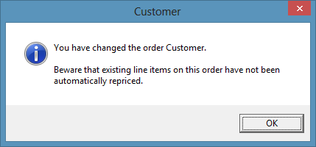
There is now a pop-up notice that reminds you if there is no automatic repricing when the customer is changed on an order.
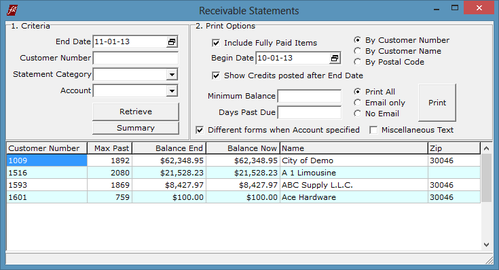
There is now a summary button in Receivable Statements. This summary can be printed or exported for internal use. There is a report needed to use this feature, and if you select Different forms when Account Specified, and select a customer, the customer account information appears on the form. The form also shows credits after the end date if the Show Credits posted after End Date option is selected.
FrontLine 6.4.060- November 7, 2013
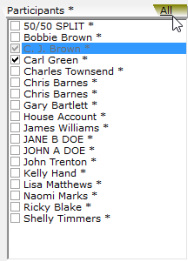
When creating an event in the Scheduler, after selecting the primary participant for an event, you can now use the All selection to assign the event to all agents.
FrontLine 6.4.059- November 5, 2013
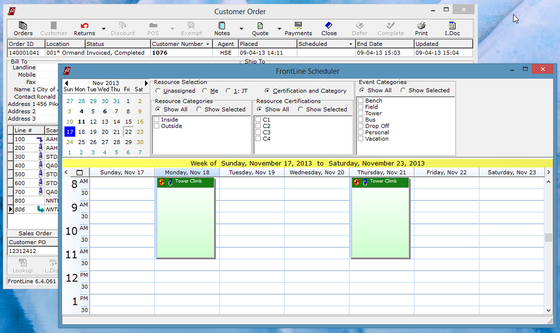
If there is a floating Scheduler window open at the same time as the Customer Orders window is open, it disappears when you click Print in the top toolbar. The Forms For Orders window appears for printing, and when it is closed after printing, the Scheduler window appears again.
October 2013
FrontLine 6.4.057- October 30, 2013
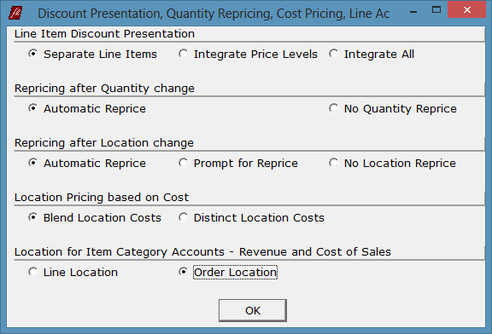
There is now a Company Setting that allows you to select if revenue and cost of sales are taken from the order location or the line item location. This allows you to sell out of other locations without transferring inventory.
- Point to Setup and click Company & Stations. The FrontLine Setup window opens.
- In the Company Settings filter at the bottom of the window, type Discounts.
- Click the ellipses in the value column of the company setting called Discounts, Repricing, Costs, LA (Line Accounts). The Discount Presentation, Quantity Repricing, Cost Pricing, Line Ac dialog box opens.
- The last option in this dialog box is Location for Item Category Accounts - Revenue and Cost of Sales. Select Line Location (default) or Order Location.
- When Order Location is selected, and the order location on an order differs from the location of a line item, the revenue (income) and cost of sales accounts are taken from the order location.
FrontLine 6.4.056- October 25, 2013
In Recurring Billing, all critical exceptions must be fixed or excluded during the Exceptions and Batch Review process before FrontLine will create bills.

When a customer returns a non-rental item, you can now change the cost of the unit by entering a cost in the C.Cost column. This will affect Layers and Location Average Cost. This allows a return unit to be devalued for inventory based on wear.
To change costs on a returned item:
To change costs on a returned item:
- Enter the item in the Scan Code field, and select Return in the Item Action window.
- Click Costs in the bottom toolbar and select Cost Column to display the C.Cost column in the item grid.
- Change the returned item’s cost in the C.Cost column.
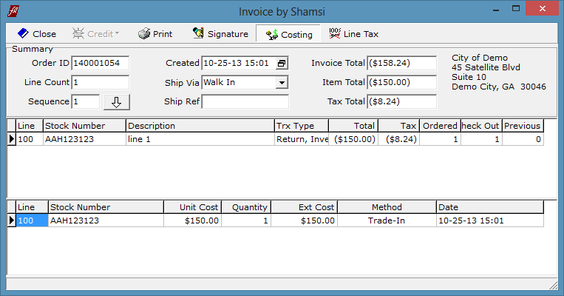
To look at cost details:
- Reopen the return order after invoicing, and key Alt+F8.
- The Invoice by window opens. Click Costing in the top toolbar to view the costing details at the bottom of the window.
- The return invoice cost method indicates Trade-In.
FrontLine 6.4.055- October 23, 2013
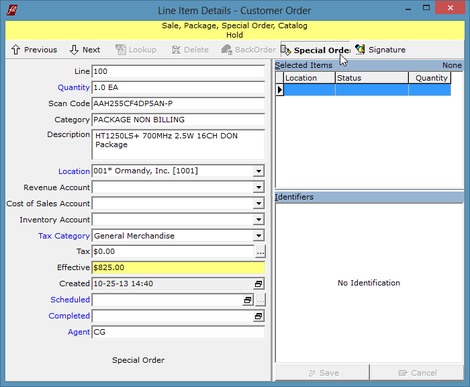
The Special Order status can now be toggled on Package line items. If a package item is entered on an order, a package line item displays when company settings for Package Sale Method are set to Package First mode.
To toggle off special order status:
To toggle off special order status:
- Select the package line and click Details in the bottom toolbar to open the Line Item Details window.
- In the Line Item Details window, click Special Order in the toolbar to remove the special order status of the package line.
FrontLine 6.4.054- October 18, 2013
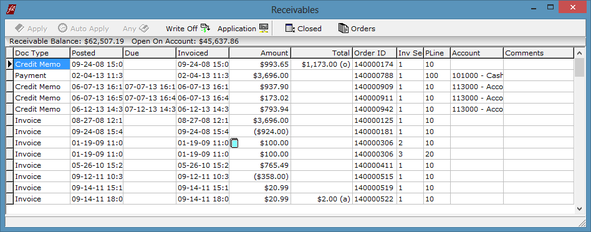
The Receivables window now has columns to display Due and Invoiced dates. The Posted date and Invoiced date for recurring bills displays the Issued date from step one of recurring billing. This date defaults to the date the recurring billing batch was run.
If using Unearned Revenue for some recurring bills, Recurring Billing now checks to ensure all line items on the same bill have the Unearned Revenue Account defined for their Item Category. If some contracts are not defined for unearned revenue, and others on the same bill are, in the Exceptions and Batch Review step of recurring billing, the exception states “Unearned Revenue disparity on Item Category Accounts”. To fix this exception, all contracts on the same equipment set must be assigned to the unearned revenue account under Item Category Accounts. Bills not assigned to this account should be billed separately.
FrontLine now accepts a digitizer pen signature on a Tablet PC such as a Microsoft Surface Pro.
FrontLine now accepts a digitizer pen signature on a Tablet PC such as a Microsoft Surface Pro.
FrontLine 6.4.053- October 3, 2013
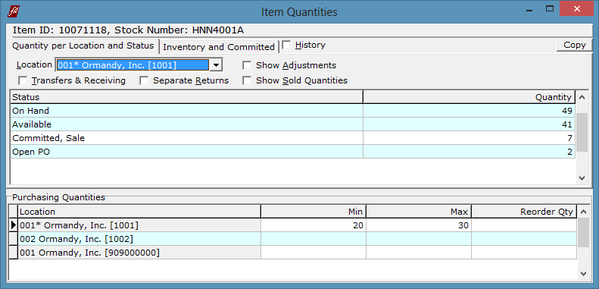
The Item Quantities window now shows quantity on hand and on open POs. Select a location from the drop-down selection to see this breakdown of quantities.
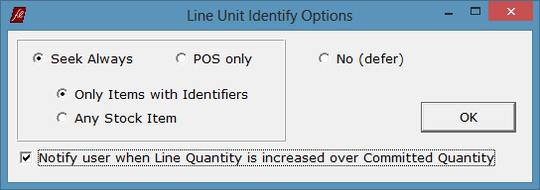
There is now an option in company settings to notify users when the quantity of a line item is increased over the quantity that is committed from inventory for that line item. This is important for items that cannot be auto-committed, such as serialized items.
- Point to Setup and click Company and Stations.
- In the Company Setting Filter at the bottom of the window, type Line Unit Identify.
- Select the Line Unit Identify company setting, and click the ellipses in the Value column to open the Line Unit Identify Options dialog box.
- Select the checkbox for Notify user when line quantity is increased over Committed Quantity.
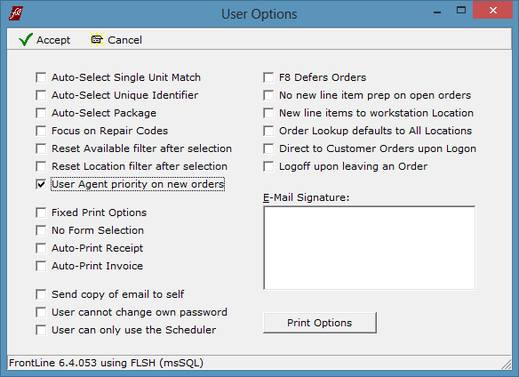
There is now a user option that assigns the user’s agent to orders instead of the customer’s agent assigned in the customer file.
- Log in as system administrator.
- Point to Setup and click Security.
- Select a user, and click Options in the top toolbar.
- In the User Options dialog box, select the checkbox for User Agent Priority on new orders.
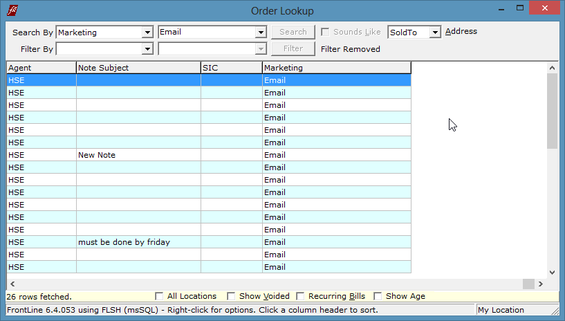
When looking up customer orders and purchase orders using an order identifier, the Order Lookup and PO Lookup now display the identifier matched. This replaces the Order Ext Ref column that appears when non-identifier searches are performed. For example, if you have an order identifier used to record marketing method, when you search a specific marketing method, you see a column that displays that identifier.
September 2013
FrontLine 6.4.051- September 23, 2013

The Scan Code field on open orders now shows both the identifier (such as the serial number) and the stock number if the line is started by entering the identifier. The format of the display is Identifier » Stock. Units entered by selecting the stock number show only the stock number.

The Price button appears in the top toolbar of Equipment Sets. Click Price to change the recurring price of the selected contract.

For custom tender types, an account number of any format can now be input in the Account Number field on the payments screen. The numbers are not obscured like card numbers.
August 2013
FrontLine 6.4.050- August 28, 2013
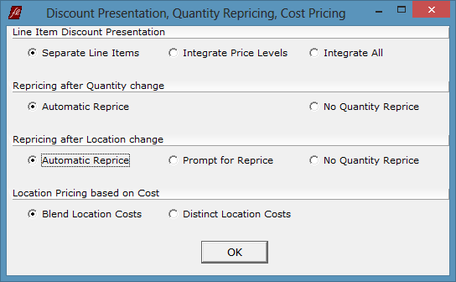
There is now a setting to disable repricing a line item after changing the line location. Point to Setups and click Company & Stations. In the Company Setting filter found at the bottom of the window, type Discount to filter your company setting selections. Find Discounts, Repricing, Cost Loc, and click the ellipses in the value column to make your selections for Repricing after Location change.
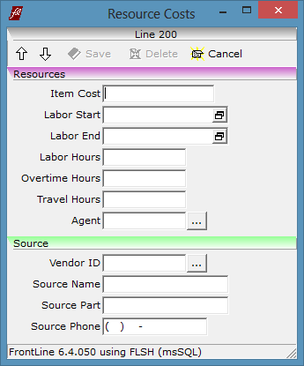
The Resource Costs window has been redesigned to include next and prior buttons to scroll through line items on the order without having to close and reopen. To access Resource Costs, click Costs in the bottom toolbar, and select Resource Costs. Source information now appears below resources information.
FrontLine 6.4.049- August 8, 2013
When you type into a Bill To field on an order to lookup a customer, the lookup now only lists addresses that are marked as Bill To addresses.
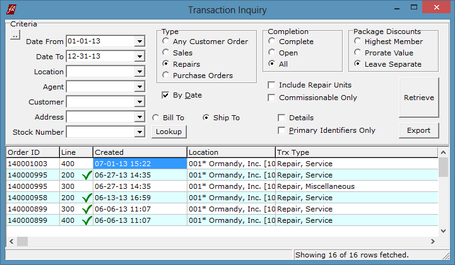
When searching for transactions in Transaction Inquiry, if the By Date checkbox is selected, the results are sorted in order of the most recent orders first.
FrontLine 6.4.048- August 6, 2013
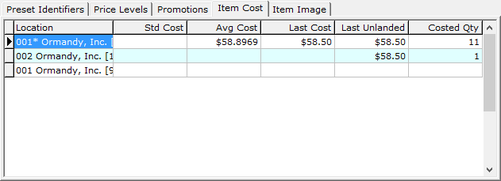
There is now an Item Cost preview tab in the Items file. Point to Maintenance and click Items to open the Items window. In the bottom right of the Items window, select the Item Cost tab to view item costs. Item Costs can also be
viewed by clicking the ellipses next to the Cost field.
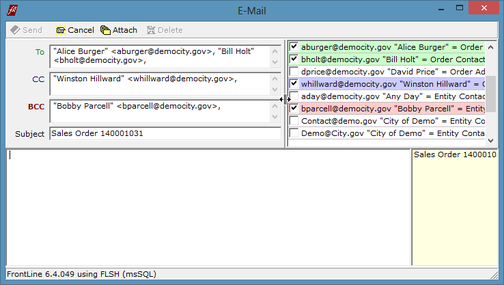
There is now an email assistant in the E-Mail window. Currently it is limited to email sent from printed orders. When in an email, a list of all email addresses related to the customer appears to the right of the email address fields. Hover on the separating line, and click on the double arrow to resize the email address fields. The contacts for the order appear first and are preselected.
To add contacts to an email:
To add contacts to an email:
- Select the To, CC, or BCC field.
- Select the checkbox of the email address to add from the list at the right. Addresses are color-coded when selected. The To field selections appear in green, the CC field in blue, and the BCC field in red. Unchecking an address removes it from wherever it appears in the recipient fields.
- You can also add addresses by typing into the To, CC, or BCC fields. FrontLine seeks a match from the list of email addresses, and highlights matches in yellow. Press enter to select the highlighted email address.
- If no email addresses are found for the customer, the blank list is hidden.
July 2013
FrontLine 6.4.047- July 30, 2013
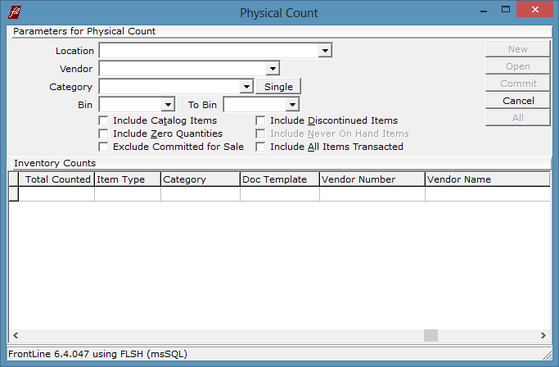
There is an option to Include Discontinued Items in the Physical Count. Selecting this checkbox will include items that have been discontinued in your physical count.
There is now a Tenders field available in Receivables Statements forms. This field lists the payment tenders on the payment order where a payment was received. This field only appears on forms. To request this field appear on your receivables statements, contact [email protected].
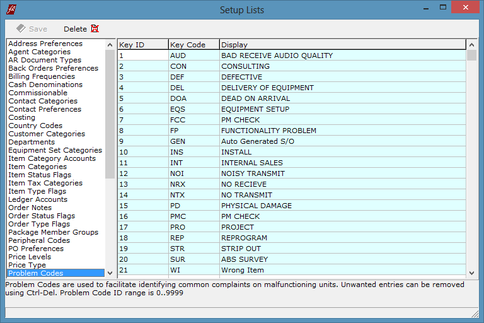
There is now a Delete button under Setup/Lists. This button is only enabled when applicable.
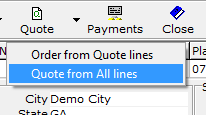
When the Quote function is used on a closed order that contains both quote and non-quote line items, FrontLine now displays a selector for Order from Quote lines vs Quote from All lines.
- Select Order from Quote lines to create an order from the quoted line item.
- Select Quote from All lines to create a new quote from all the line items.
FrontLine 6.4.046- July 17, 2013
The last custom order note now displays as a follow-up note, like receivable notes. It logs additional notes with time and date stamp to track each addition. This note is not available for printing on forms. This follow-up note follows all presented quotes, and also copies to the order, when created.
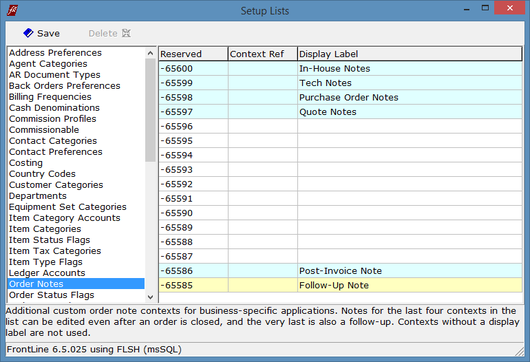
To Set Up a Follow-up Note:
- Point to Setup and click Lists.
- Select the Order Note list on the right.
- In the last note context, name your follow-up note.
- Click Save.
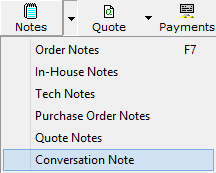
To Use a Follow-up Note:
- When in a quote or order, use the drop down arrow next to the Note icon in the top toolbar, and select the follow-up note.
- Each time you open this note, you are given a blank window to enter a new note entry.
- To view all entries, press CTRL on your keyboard when you click on the follow-up note, and the log of entries opens.
FrontLine 6.4.044- July 15, 2013
Now there is a Collected function that allows you to process a cash, check, or card tender before invoicing. When in a customer order, click Payments in the top toolbar. After entering a payment tender line, right-click to access the context menu. Click Collected to process the payment.
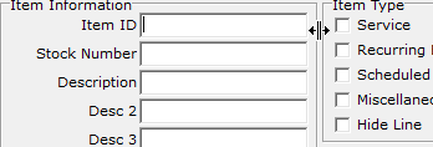
You can now change the width of the Item Information section of the Items window. In the Items window, point to the divider between the right and left sections, and click on the double-sided arrow and drag to widen or narrow the Item Information section. The result is sticky per user.
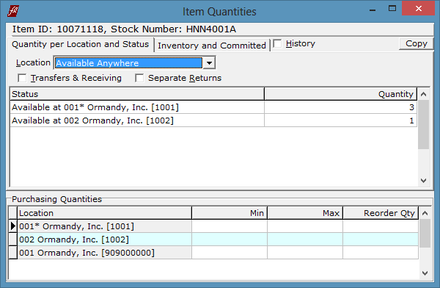
The Item Quantities window in Items Maintenance now remains open until closed. If Items Maintenance is closed and reopened, the Item Quantities window opens as soon as an item record is selected.
There is now a Separate Returns option in Item Quantities. With this option off, return quantities are merged into available. Previously, returns were always separate.
Checkbox options in Item Quantities are now sticky per user, except the History checkbox. Checkbox selections will stay selected after logoff.
FrontLine 6.4.042- July 2, 2013

There is now an item-specific Last Lead value (in days) in the Vendor Performance floating window in the Generate Purchase Order window. Last Lead is the number of days between the PO placed date and the item received date. It is evaluated here when the PO line item is checked in and final cost is recorded.
Returning an item that has been repaired since the sale by entering the Scan Code or selecting it from Customer Equipment now returns the equipment for zero dollars. Override the return price to provide a refund.
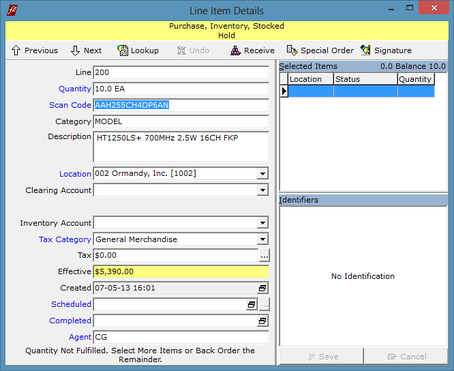
You can now commit inventory on Transfer Orders by scanning in units in the Scan Code field in Line Item Details.
- In a Transfer order, enter an item to transfer.
- Change the quantity in the Quantity column.
- Click Details in the bottom toolbar to open the Line Item Details dialog box.
- In the Scan Code field, scan or key the identifier for the unit to transfer. This allows you to scan in multiple units for transfer on one line item.
Recurring Billing Output now sorts output of multiple bills by Bill-To name first, then the first Equipment Set Identifier (if selected), then OrderID.
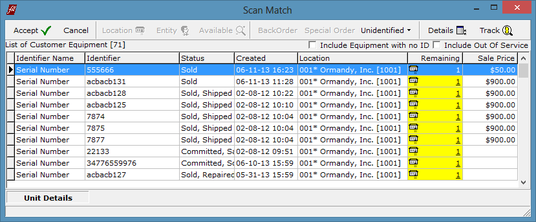
When viewing Customer Equipment, there are now two options to "Include Equipment with no ID" and "Include Out Of Service". This allows you to filter out irrelevant equipment.
- In the Customer Order window, enter a customer.
- In the Customer Number field, use the drop down arrow to select Customer Equipment.
- The Scan Match window opens, listing customer equipment.
- Select the checkboxes above the equipment grid to include equipment with no unique identifier or equipment marked out of service.
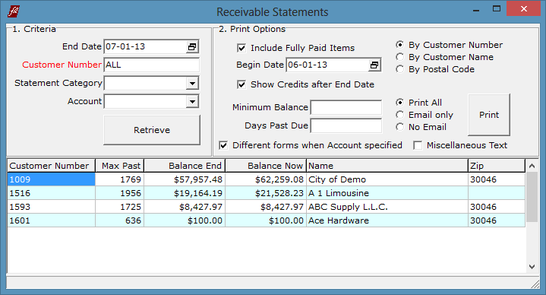
Receivable Statements output with an End Date selected now have an option to Show Credits after End Date. This option is “sticky” for the user, so it remains selected until the selection is removed.
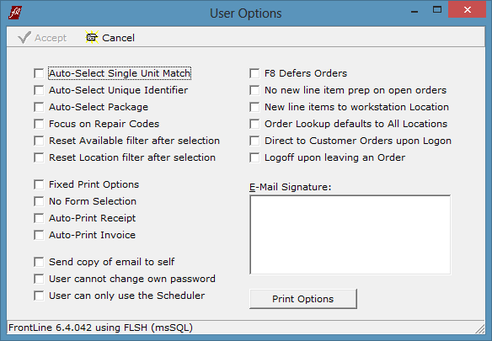
You can now set up your user E-Mail Signature in User Options.
- Log in to FrontLine as the system administrator.
- Point to Setup and click Security.
- In the System Users window, select the user to set up, and click Options in the toolbar.
- In the E-Mail Signature field, enter the email signature for the user.
June 2013
FrontLine 6.4.041- June 18, 2013
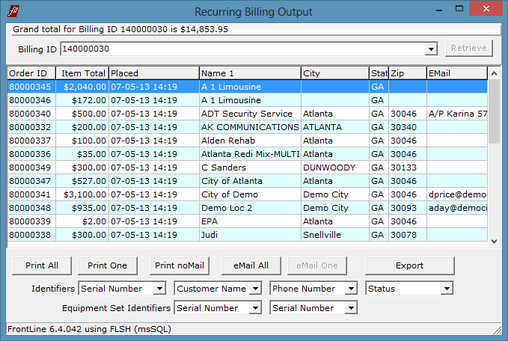
Two Equipment Set Identifiers can now be output to forms from Recurring Billing Output. Select the Equipment Set Identifiers in the two fields at the bottom of the Recurring Billing Output window.

FrontLine now uses an order's Customer PO number as the default text in the Comments column in the Receivables window.
FrontLine 6.4.040- June 13, 2013
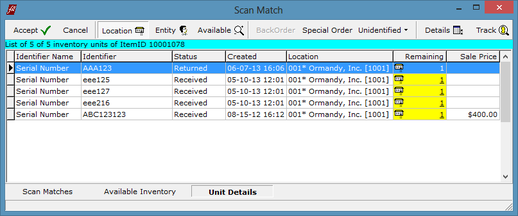
When the Company Setting for Line Unit Identify is set to Seek ID, only items with identifiers prompt users to identify units from inventory.
- Point to Setup and click Company & Stations.
- In the Company Settings Filter field at the bottom of the window, type “Line unit”.
- For the company setting Line Unit Identify, click in the Value column and use the drop down to select Seek ID.
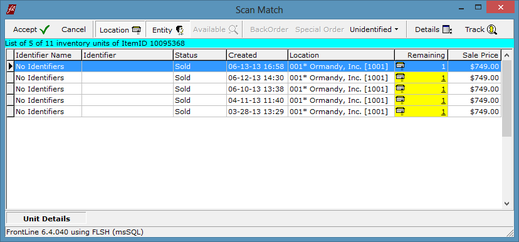
When a unit is brought in for repair, the Scan Match window shows unit details of the item that were previously sold to the customer. The "Scan Matches" and "Available Inventory" tabs are not shown.
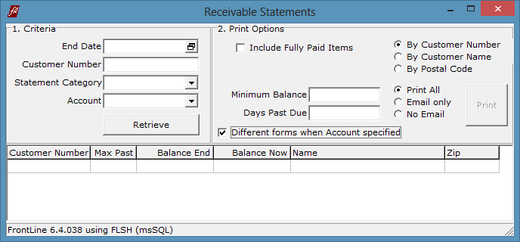
There is now a Miscellaneous Text feature in Receivable Statements. Click the Miscellaneous Text checkbox to display a type-in box for miscellaneous text that can appear on statements. Although the option is sticky, the miscellaneous text entered is not saved.
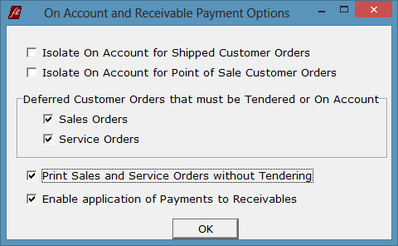
There is now an option to print sales and service orders without taking payment. When this option is not selected and a customer has no credit, an explanation now appears before printing.
- Point to Setup and click Company & Stations.
- In the Company Settings Filter field at the bottom of the window, type “On Account”.
- For the company setting On Account Tenders & AR, click in the Value column and click the ellipses to open the On Account and Receivable Payment Options window.
- Select the checkbox for Print Sales and Service Orders without Tendering to allow printing forms without recording payment.
FrontLine 6.4.038- June 7, 2013
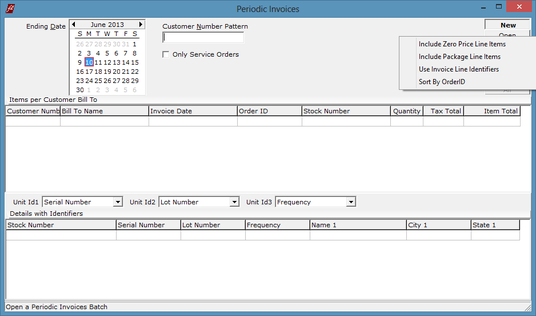
Three new context men options have been added to Periodic Invoices. Point to Recurring Billing and click Periodic Invoices. Before or after generating a batch, right-click on the open button to access these context menu options:
When selected, these options are sticky, so they remain selected by user for following periodic invoicing batches.
- Use Invoice Line Identifiers- This option prevents FrontLine from linking otherwise unrelated services on an order to the first preceding set eligible line item on the same order.
- Include Package Line Items- This option includes package line items on orders. If not selected, these are excluded.
- Sort By Order ID- This option sorts the results by order ID.
When selected, these options are sticky, so they remain selected by user for following periodic invoicing batches.
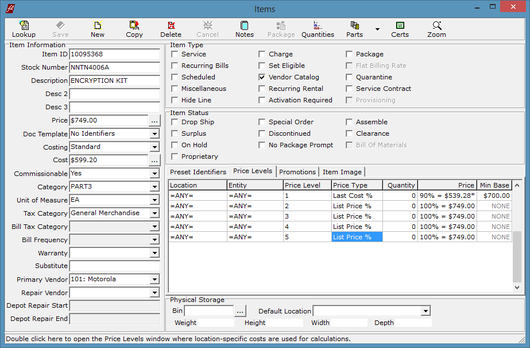
Cost based calculations now display in Price Levels.
- Cost based price level calculations shown in the Price Levels tab in the bottom right of the Items window use the base standard cost seen in the Cost field in the Items window. Prices calculated using the base standard cost (not location-specific) are indicated by a trailing asterisk.
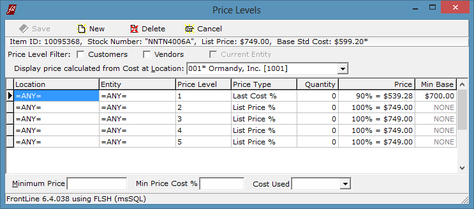
- Cost based calculations shown in the Price Levels window are location-specific. In the Item window, click the ellipses next to the Price field to open the Price Levels dialog box. Select a location from the Display price calculated from Cost at Location drop-down selection. Cost based prices in this window reflect costs at the location chosen.
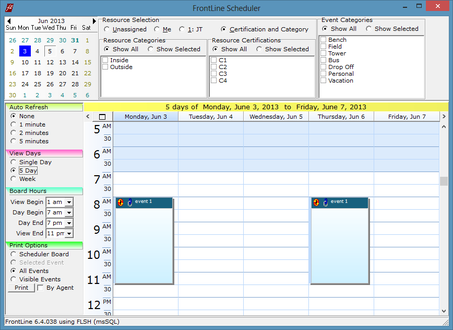
You can now get a limited (new program) user license for the exclusive use of the scheduler. This user can access the scheduler board, manipulate scheduler events, and view orders related to events. This user does not consume a FrontLine user license upon log in, and is taken to the scheduler board directly. Contact us for details and pricing. ([email protected])
FrontLine 6.4.037- June 4, 2013
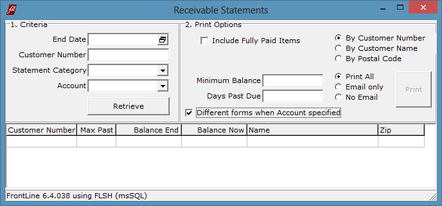
In Receivable Statements you now have a sticky checkbox selection to use Different forms when Account specified. Point to Inquiry and click Receivables. If the Different forms when Account specified checkbox is selected, different forms can be printed depending on the Statement Category and Account selected in the Criteria section. Please contact [email protected] if you would like different statement forms set up.


