October 2012 Updates
FrontLine 6.3.030 - October 18, 2012
You can now print signatures collected on line items and during invoicing. These signatures are displayed on screen and are printed on invoices and receipts. Line signatures may be printed on order forms as well. Form changes are required for printing signatures. Signatures are not sent to PDF file output. For information on using signature capturing devices and creating forms adjustments, contact Ormandy support at [email protected].
FrontLine 6.3.029 - October 12, 2012
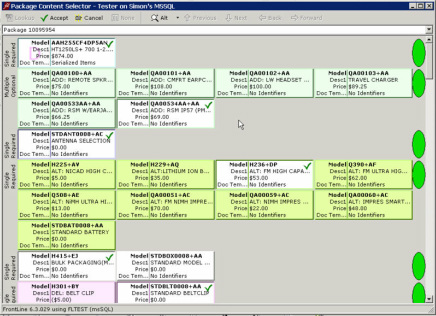
There is now a green checkmark in the upper right corner of selected options in the package model option selector.

The Item Types Miscellaneous and Charge can now be selected together in the Items maintenance file. Line items with both Miscellaneous and Charge item types receive the default price specified in the item file.
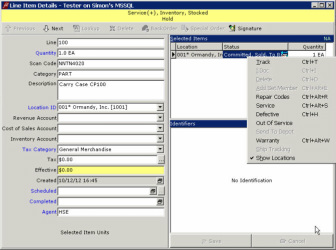
Items must have at least one identifier in their document template to be sent to depot. Otherwise, FrontLine now:
- disables the Send To Depot function in Line Item Details dialog box
- greys out the Depot Repair Start/End fields in the Items maintenance file
- excludes such items from the All To Depot drop down selection next to the Serviced icon in the top toolbar on orders
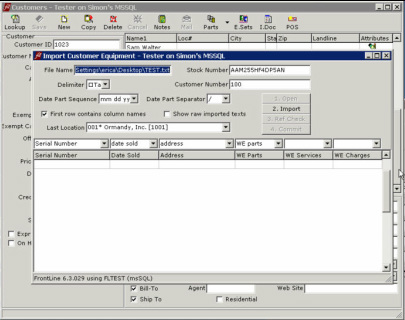
Now you can import customer equipment. This feature imports data from a delimited file, performs checks and validation, and allows you to review and correct the data before importing. Warranties can be provided in the import file, calculated from the imported sale date, or entered manually during review. Imported equipment appears like previously unknown equipment that came for repair, except that the unit event has an additional C.Equipment flag.
Note: In order to import, the file you are importing must be delimited. For example, if you are importing from an Excel spreadsheet, open the file in Excel, and save it as a text (.txt) file. This file type is delimited with a tab.
To Import Customer Equipment:
Note: In order to import, the file you are importing must be delimited. For example, if you are importing from an Excel spreadsheet, open the file in Excel, and save it as a text (.txt) file. This file type is delimited with a tab.
To Import Customer Equipment:
- Point to Maintenance and click Customers.
- In the Customers window, click Lookup to find the customer who owns the equipment.
- Click the drop down arrow next to Parts in the top toolbar, and select Equipment Import.
- The Import Customer Equipment dialog box opens.
- In the Import Customer Equipment window, enter the Stock Number of the equipment you are importing, select a delimiter (for the text file, the delimiter is a tab), select the format for dates in the file you are importing including the sequence and separator. Select the checkbox for First row contains column names and Show raw import texts if desired.
- Click 1. Open to select the file to import. Browse to choose the file from your computer.
- Use the drop down selections in the headers of the grid to select the columns you would like import.
- Click 2. Import to import data from the file.
- In the Address column, you have the option to select the customer address where each piece of equipment resides. These come in with the data if they appear in the imported file.
- In the other columns you may add or change warranty information, review imported data, and make any necessary changes before finalizing.
- Click 3. Ref Check to check for duplicate serial numbers, incorrect addresses, or other conflicting data.
- Click 4. Commit to finalize the import.
FrontLine 6.3.027 - October 2, 2012
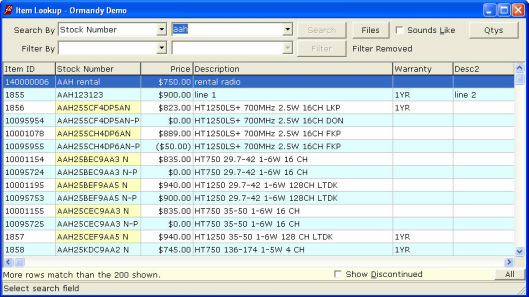
You now have a Warranty column available in the Item Lookup. This lets you look up stock items and view the warranty that appears in the item file as a column in the item lookup grid.
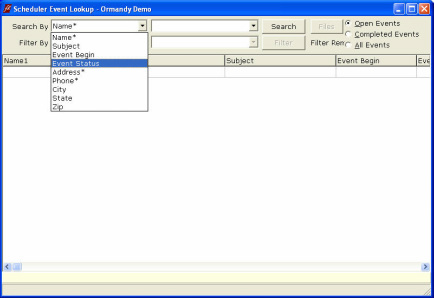
Now the Search By list in Scheduler Event Lookup has the option to search by Event Status. In the FrontLine Scheduler, right-click and choose Lookup Event. Event Status is available in the Search By drop down list.
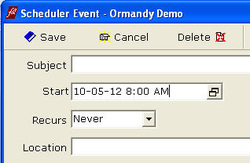
When in the Scheduler Event window, now you can click the calendar icon to select a date from a month calendar. Also, time of the event displays with the date in the Start field of the Scheduler Event window.
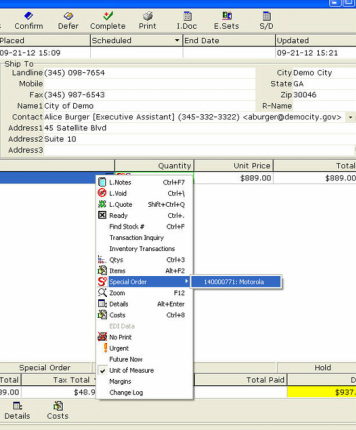
When a customer order is opened for read-only viewing from a purchase order, or vice versa, the read-only order window now floats beside the open order window so both can be seen and used on the screen.
- Open a Customer Order or Purchase Order that has special orders. Right click on the special order line and choose Special Order. If there is a linked purchase order or customer order, the number of the linked order appears here.
- Click on the linked order to open it in read only mode.
- Now the customer order and purchase order can be seen together.
